
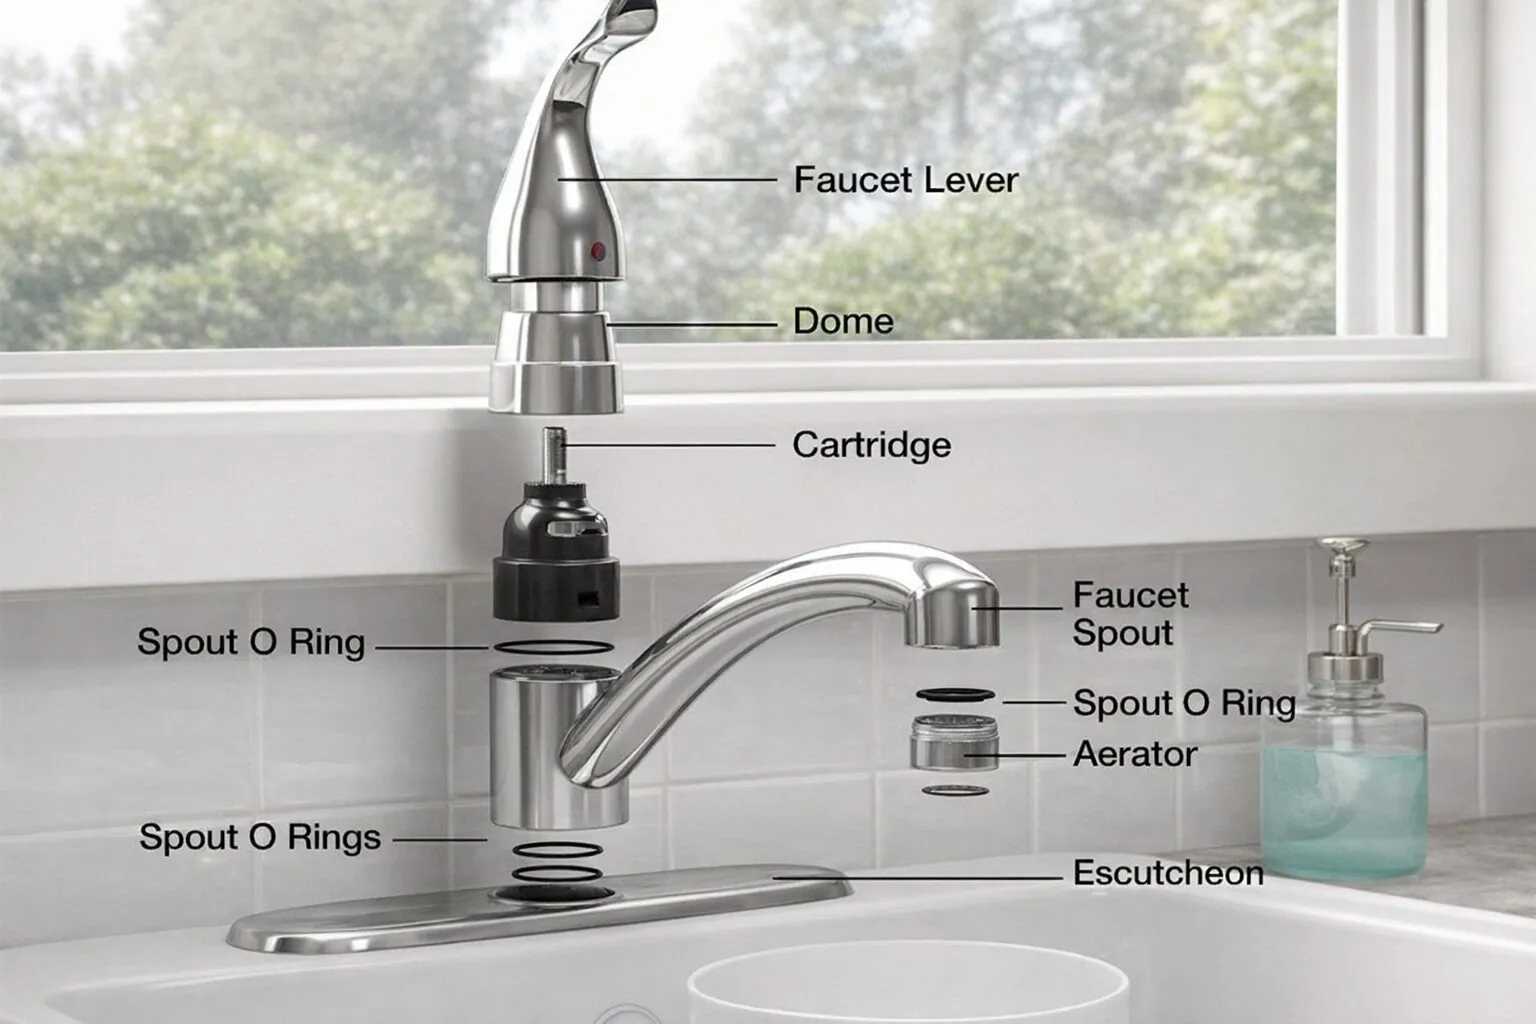
If you’re dealing with a dripping faucet or a weak stream of water, you’re likely trying to decide between a faucet cartridge vs faucet aerator repair. These two components serve entirely different functions within your plumbing system, yet both are common culprits for simple household water issues. A faucet cartridge is the internal mechanism that controls the flow and temperature of water, while the aerator is the small mesh screen located at the very tip of the spout. Understanding the distinction between these parts is vital for diagnosing whether you have a mechanical failure or a simple debris blockage. Replacing a faulty aerator costs between $3.00 and $12.00, while a replacement cartridge typically ranges from $15.00 to $65.00 depending on the complexity of the faucet model.
Key Takeaways
- Check the aerator first if water flow is uneven or sputtering, as it’s the easiest part to clean or replace.
- If the handle feels loose, sticks, or the faucet drips from the spout even when off, the cartridge is likely the issue.
- Always shut off the water supply valves under the sink before attempting any disassembly of the faucet.
- Take the old part to a hardware store; matching the exact size and brand is necessary for a proper seal.
- Use a crescent wrench with a soft cloth to protect the finish of your faucet hardware during removal.
What Does an Aerator Do?
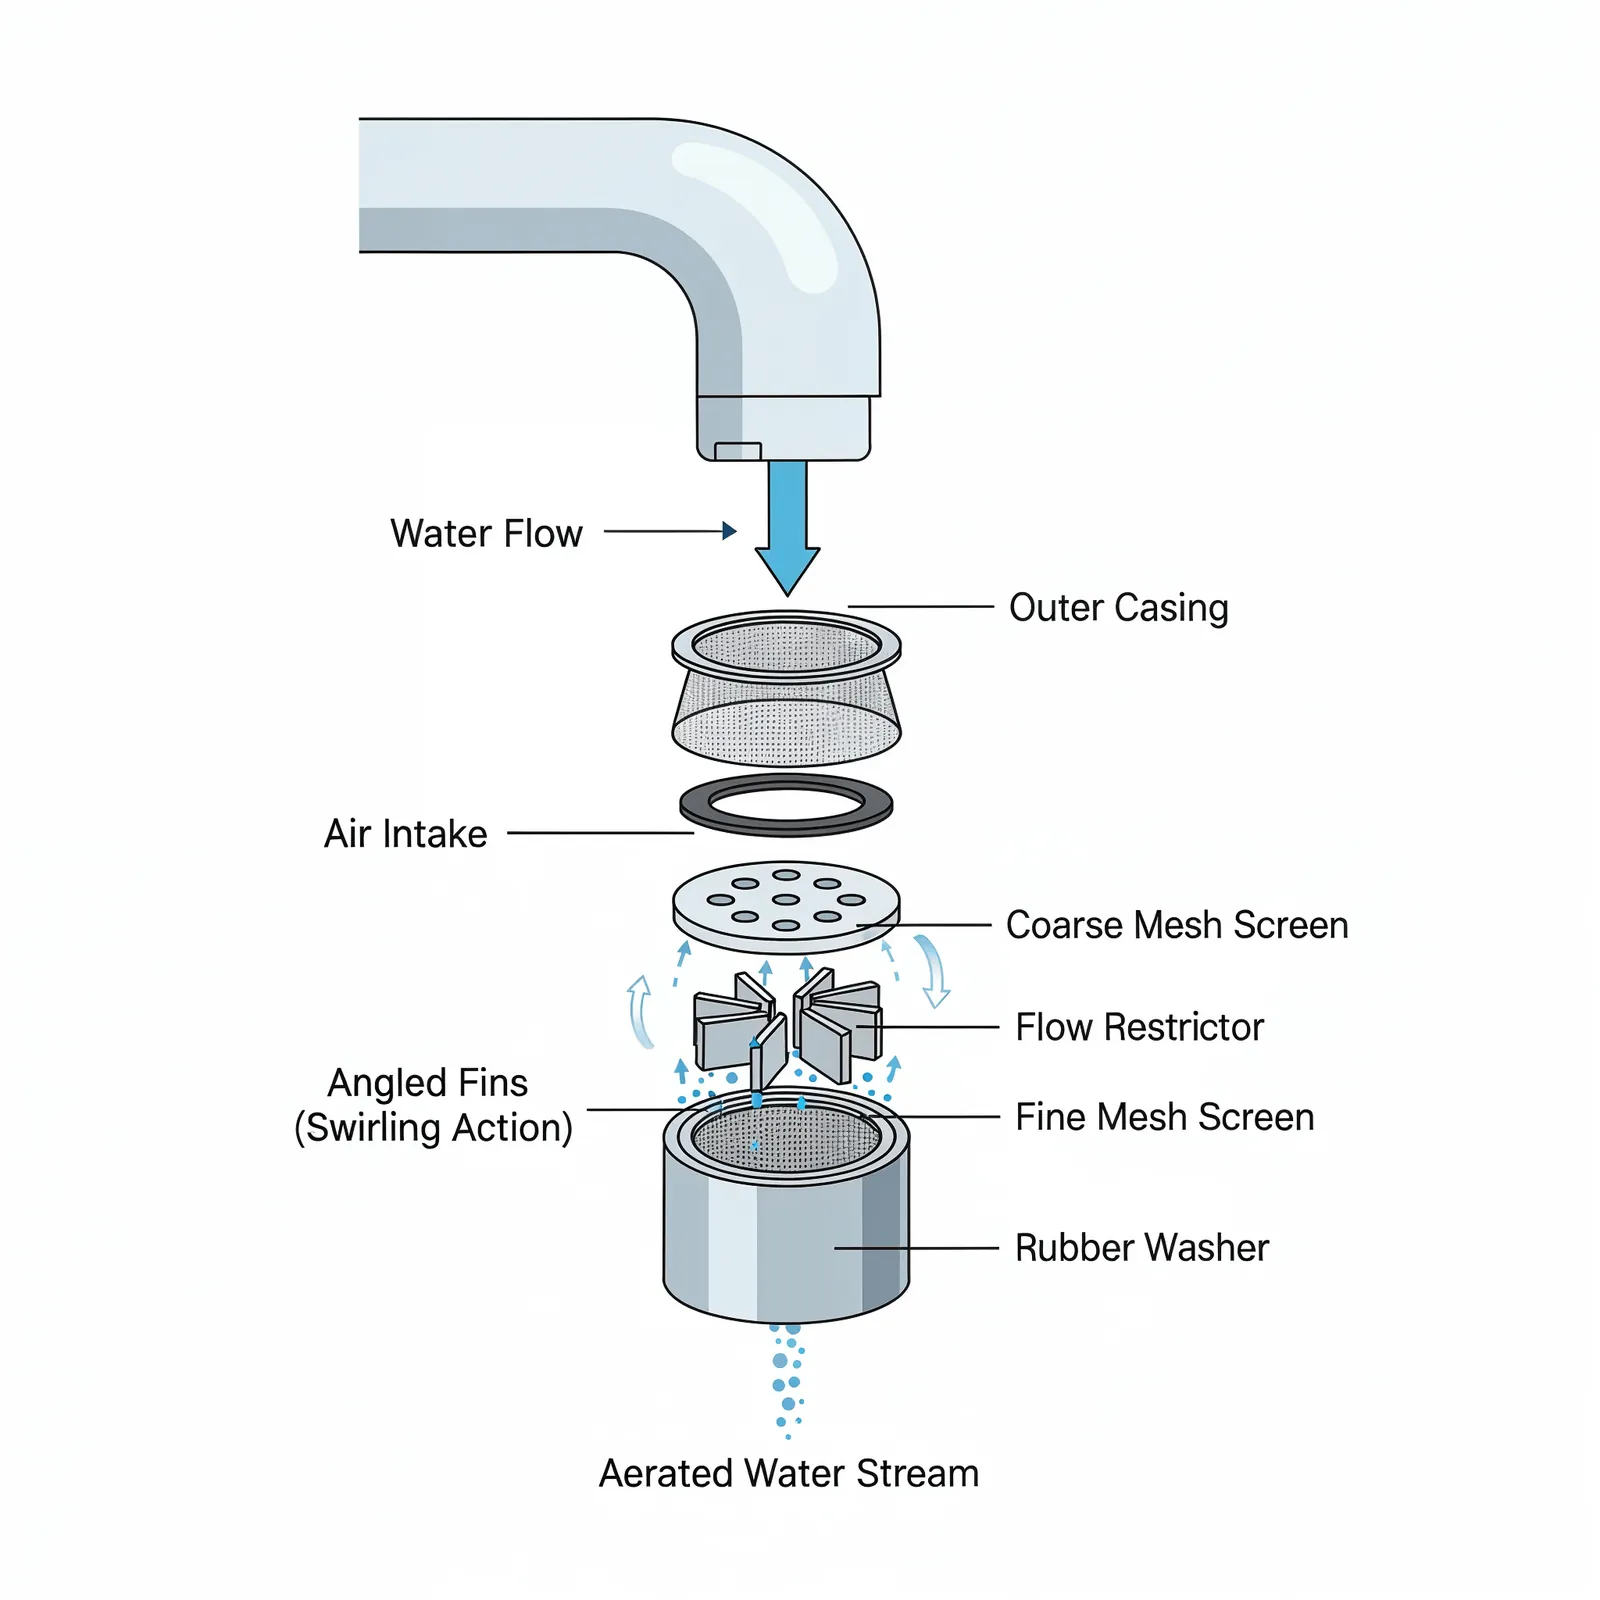
The aerator is the small, cylindrical component screwed into the end of your faucet spout. Its primary purpose is to introduce air into the water stream, which creates a steady, splash-free flow while reducing water consumption. By mixing air with water, the device maintains the sensation of high pressure while actually using less volume. When the mesh screens inside the aerator become clogged with mineral deposits or sediment, the water flow may spray erratically or lose its pressure entirely.
Signs of a Bad Aerator
- Uneven spray patterns coming from the spout.
- A significant decrease in water pressure at the faucet but not elsewhere in the house.
- Visible debris or white calcium buildup on the screen face.
- Water sputtering or “coughing” when the handle is turned on.
Function of a Faucet Cartridge
Unlike the aerator, which is external, the cartridge acts as the “heart” of your faucet. It’s a sealed plastic or metal unit that sits inside the faucet body. When you turn the handle, the cartridge moves to open or close the ports that allow hot and cold water to enter the spout.
Because these parts contain rubber O-rings and internal seals that rotate or slide every time you use the sink, they eventually wear out. A leaking cartridge is the most common cause of a steady drip from the spout, regardless of how tightly you close the handle.
Identifying Cartridge Failure
- Dripping from the spout even when the handle is firmly closed.
- Difficulty turning the handle, which feels stiff or gritty.
- Water leaking from the base of the handle itself.
- Inability to regulate the temperature properly (e.g., the water stays lukewarm).
Comparison of Repair Tasks
| Feature | Faucet Aerator | Faucet Cartridge |
|---|---|---|
| Location | Tip of the spout | Inside the faucet body |
| Primary Tool | Pliers or hand pressure | Hex key and wrench |
| Typical Cost | $3.00 – $12.00 | $15.00 – $65.00 |
| Difficulty | Very Easy | Moderate |
| Frequency | Clean every 6 months | Replace every 5–10 years |
How to Clean an Aerator
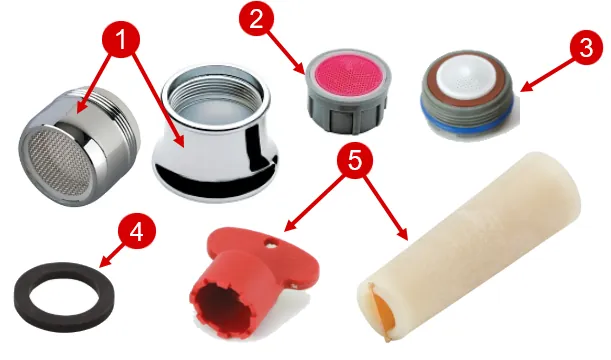
Cleaning an aerator is a standard maintenance task that can restore full water pressure without the need for expensive tools. First, unscrew the aerator housing from the end of the spout. If it’s stuck, use a pair of pliers, but wrap a thick towel around the metal to prevent scratching the finish.
Once removed, disassemble the internal components—usually a mesh screen, a rubber washer, and a plastic housing. Soak these parts in white vinegar for about an hour to dissolve mineral deposits. Scrub them gently with an old toothbrush, rinse with water, and reassemble.
Replacing a Faucet Cartridge
Replacing a cartridge is a more involved process. You must first remove the decorative handle cap and unscrew the handle itself using a hex key or screwdriver. Once the handle is off, you’ll likely see a retaining nut or a clip holding the cartridge in place. Remove this carefully.
Use a pair of needle-nose pliers or a dedicated cartridge puller to extract the old unit. It’s essential to bring the old cartridge to the store to match the specific model, as even slight variations in length or diameter will cause leaks. According to the United States Environmental Protection Agency, fixing common household leaks can save homeowners significant money on utility bills by preventing the waste of thousands of gallons of water annually.
Recommended Tools for Success
To perform these repairs, you should keep a basic set of plumbing tools in your home. Having the right equipment ensures you don’t damage the delicate finish of your plumbing fixtures.
- Adjustable crescent wrench for removing retaining nuts.
- Hex key set (Allen wrench) for removing faucet handles.
- Needle-nose pliers for pulling out cartridges.
- Soft cloth or rag to protect finishes from metal tools.
- Plumber’s grease (silicone-based) to lubricate new O-rings.
Troubleshooting Common Issues
If you have replaced the aerator and the water pressure remains low, the issue might be deeper in the system. Check the shut-off valves under the sink to ensure they’re fully open.
If the faucet still drips after a new cartridge is installed, check the “seat” inside the faucet body. If the seat is pitted or corroded, the new cartridge won’t create a watertight seal, and the dripping will persist. In such cases, you may need to replace the entire faucet unit.
Selecting Replacement Parts
When you head to a supply store, you’ll encounter various brands and proprietary designs. Major manufacturers like Moen, Delta, and Kohler use specific cartridges that aren’t interchangeable. Never attempt to force a part into place. If the cartridge doesn’t slide in smoothly, you likely have the wrong part. Always verify the model number of your faucet, which is often printed on a small tag under the sink or on the installation manual that came with the unit.
Maintaining Your Plumbing Fixtures
Routine maintenance prevents the need for major repairs. Once or twice a year, unscrew your aerators and rinse them to prevent sediment buildup. If you live in an area with “hard water,” which contains high levels of calcium and magnesium, consider installing a whole-home water softener to extend the lifespan of your cartridges and other plumbing components. Keeping the faucet exterior clean and free of soap scum also prevents debris from migrating into the internal seals of the handle mechanism.
Related guides
- Foosball Table Replacement Parts Rods: How to Fix Them in 2026
- Foosball Table Replacement Parts Grip Wraps Fix in 2026
Frequently Asked Questions
Can I fix a leak without replacing the cartridge?
Sometimes, a leak is caused by worn-out O-rings on the outside of the cartridge rather than the internal mechanism itself. You can try replacing just the rubber O-rings if you can find the exact size match. However, because cartridges are precision-engineered plastic units, the internal seals are often fused or non-serviceable, meaning a full cartridge replacement is usually the most reliable long-term solution.
Why is my new cartridge still leaking?
If a new cartridge leaks, the most common cause is debris in the faucet body. Even a tiny grain of sand can prevent the new seal from sitting flush against the valve seat. Remove the cartridge again, flush the faucet body with water to clear any sediment, and ensure the seat is perfectly clean before reinstalling the cartridge. Also, ensure the retaining nut is tightened firmly but not overtightened.
How do I know which cartridge I need?
The most accurate method is to remove the existing cartridge and take it to the store. Hardware stores often have “cartridge identification” charts or displays that allow you to compare your old part against new ones. If you have the original installation manual or the faucet model number, searching the manufacturer’s website is the best way to identify the exact replacement part number for your specific fixture.
Is it better to replace the whole faucet?
If the faucet is very old, corroded, or the finish is peeling, replacing the entire unit is often more cost-effective than buying a replacement cartridge. High-quality cartridges can be expensive, and if the internal valve seat is damaged beyond repair, a new cartridge won’t fix the leak. If the faucet is less than ten years old, a simple cartridge swap is usually the best approach.
Can I use a generic cartridge?
It’s generally discouraged to use generic or “universal” cartridges unless they’re specifically certified to be compatible with your faucet brand. Most major faucet manufacturers use proprietary designs with unique measurements for the stem length and the mounting notches. Using a generic part that’s even a fraction of a millimeter off can lead to leaks, handle misalignment, or damage to the faucet body itself.
Conclusion
Taking the time to diagnose your faucet issue correctly will save you hours of frustration and prevent unnecessary damage to your fixtures. If you’re confident in your ability to handle basic tools, start by checking the aerator for debris and then inspect the cartridge for signs of wear. If you remain unsure, don’t hesitate to contact a licensed professional to avoid causing a larger leak.