
Is your shower valve too far out from the wall? This small problem can cause big headaches.
Water might splash everywhere, or your shower door won’t close right. It can even make fixing leaks harder. But don’t worry—you’re not stuck with this issue. You’ll discover simple solutions to get your shower valve back where it belongs. Keep reading, and you’ll learn how to make your shower work perfectly again without stress or costly mistakes.
Causes Of Shower Valve Misalignment
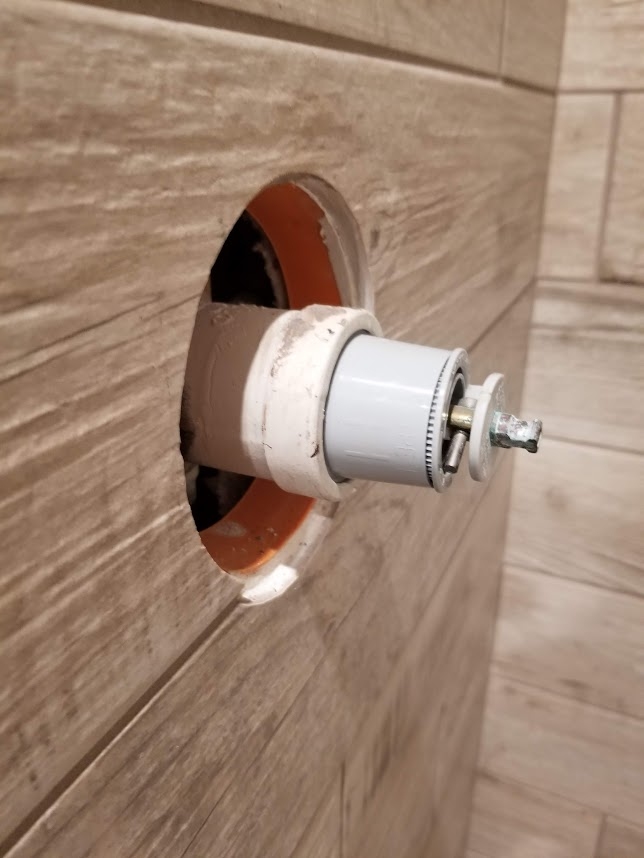
Shower valve misalignment happens when the valve is set too far out from the wall surface. This issue causes leaks, poor water control, and an unattractive shower finish. Understanding the causes helps prevent these problems and ensures a neat installation.
Installation Errors
Incorrect valve placement during installation is a main cause. Installers may misjudge the depth needed for the valve body. This mistake pushes the valve too far out or too deep inside the wall. Inaccurate measurements or rushing the job often lead to errors. Proper planning and checking can avoid this problem.
Wall Thickness Variations
Wall thickness changes affect valve positioning. Different wall materials or added tiles can change the surface depth. If installers do not adjust for these changes, the valve sticks out. Old walls with uneven surfaces may also cause misalignment. Measuring wall thickness carefully is essential before fitting the valve.
Valve Replacement Issues
Replacing an old valve with a new one can cause misalignment. New valves may have different sizes or designs. Installing a new valve without adjusting the wall or trim can leave it too far out. Removing trim or adjusting the wall may be necessary for a proper fit. Careful comparison before replacement helps prevent this issue.

Credit: diy.stackexchange.com
Tools And Materials Needed
Fixing a shower valve that sits too far out requires the right tools and materials. These items make the job easier and safer. Preparing ahead can save time and avoid frustration.
Basic Plumbing Tools
You need a few key tools for this repair. A pipe wrench helps loosen or tighten pipes. Adjustable wrenches fit different sizes of nuts and bolts. A screwdriver is essential for removing the valve handle. A plumber’s tape seals pipe threads to prevent leaks. A measuring tape ensures precise adjustments. A utility knife can trim caulk or old sealant.
Replacement Parts
Replacement parts depend on the valve type. Common parts include a new valve cartridge or stem. A new shower valve trim kit may be necessary. Sometimes, you need new washers or O-rings. Make sure parts match your shower model. Using the right parts avoids future leaks or damage.
Safety Gear
Safety is crucial during plumbing work. Wear gloves to protect your hands from sharp edges. Safety glasses shield your eyes from debris. Use a mask if working with old pipes or dust. Have a towel or bucket handy to catch water spills. Proper safety gear keeps you safe and comfortable.
Assessing The Shower Valve Position
Assessing the shower valve position is essential to fix the problem of a valve placed too far out. Proper positioning ensures the valve works well and looks neat. It also prevents water leaks and damage to the wall. Start by checking how far the valve sticks out from the wall surface. Then, measure the wall depth to see if it matches the valve’s placement. Finally, understand the type of installation used to know the right adjustment needed.
Measuring Valve Protrusion
Use a ruler or tape measure to check how far the valve extends from the wall. Measure from the finished wall surface to the valve face. The valve should not stick out more than a few millimeters. A valve too far out can cause leaks or damage the shower trim. Record the exact measurement for reference during repair.
Checking Wall Depth
Know the wall thickness where the valve sits. This includes tile, drywall, or any other covering. Measure from the finished wall surface to the plumbing pipe behind it. A shallow wall may cause the valve to stick out. Compare this depth with the valve’s protrusion to find mismatches. This helps decide if the valve or wall needs adjustment.
Identifying Installation Type
Shower valves can be installed in different ways. Some are mounted directly on the plumbing pipe, others on a mounting bracket. Check if the valve is a rough-in or a trim valve. Knowing this helps understand why the valve is too far out. It also guides the next steps to fix the issue correctly.
Simple Fixes For Minor Valve Protrusion
Minor valve protrusion from your shower wall can cause leaks and poor water control. Fixing this problem does not always need a full remodel. Simple solutions can bring the valve back to the right position quickly. These fixes help keep your shower neat and functional.
Using Extension Kits
Extension kits add length to your shower valve stem. This adjustment brings the valve closer to the wall surface. Kits usually include an extension piece and new screws. Installing one is quick and does not need special tools. Extension kits work well for valves just a bit too far out.
Adjusting Trim Plates
Trim plates cover the valve and add a clean finish. Some plates fit over valves that stick out slightly. Changing to a thicker trim plate hides the extra gap. It also stops water from leaking behind the wall. This fix improves both look and function without much effort.
Adding Wall Thickness
Adding material around the valve can bring it flush with the wall. Use thin plywood or drywall cut to size. Secure the material around the valve box carefully. This creates a thicker wall section for the valve to sit against. It is a simple way to fix deeper valve problems.
Advanced Solutions For Significant Misalignment
Shower valve misalignment can cause frustration and water leakage. When the valve is too far out, simple fixes might not work. Advanced solutions help correct major misalignment issues. These approaches ensure your shower functions properly and looks neat.
Repositioning The Valve
Repositioning the valve involves moving it closer to the wall surface. This process needs careful planning and skill. The plumber must open the wall and detach the valve. Then, they adjust the valve’s position to fit properly. This solution restores the valve’s correct placement. It also prevents leaks and improves water flow.
Replacing The Valve Assembly
Replacing the valve assembly works well if the current valve is old or damaged. The plumber removes the entire valve setup. A new valve is installed in the right spot. This method guarantees better performance and longer life. It also fixes alignment problems that cause poor shower function.
Modifying Wall Structure
Modifying the wall structure helps create space for the valve. The plumber may cut or rebuild part of the wall. This allows the valve to fit flush with the surface. Wall adjustments can be minor or extensive, depending on the issue. It ensures the valve sits correctly, improving both function and look.
Preventing Future Valve Issues
Preventing future issues with your shower valve helps save time and money. Proper care and smart choices keep your shower working well. Avoiding common mistakes stops problems before they start. Follow these simple tips to protect your valve and enjoy a smooth shower experience.
Proper Installation Techniques
Install the valve at the right depth behind the wall. Use a level to keep it straight. Secure the valve tightly to avoid movement. Check the manufacturer’s instructions for exact measurements. Test water flow and temperature before closing the wall. Accurate installation prevents leaks and valve damage.
Choosing The Right Valve
Select a valve that fits your shower system and water pressure. Match the valve size to your pipes for best results. Pick a valve made of durable materials like brass. Choose valves with good reviews for reliability. Investing in quality valves reduces future repairs.
Regular Maintenance Tips
Clean the valve and surrounding area regularly to avoid buildup. Check for leaks or loose parts every few months. Replace worn washers or seals quickly to stop drips. Run water through the valve to clear debris. Regular care extends valve life and improves shower comfort.
When To Call A Professional Plumber
Knowing when to call a professional plumber can save time and avoid damage. A shower valve too far out might seem like a small problem. It can hide bigger issues that need expert care. Understanding the right moments to get help is important for safety and cost.
Signs Of Complex Problems
Look for leaks behind the wall or water stains. Low water pressure or inconsistent temperature can signal serious trouble. If the valve feels loose or does not turn smoothly, it may need expert adjustment. Strange noises when using the shower can also show hidden problems.
Safety Concerns
Water leaks can cause mold and damage to your home. Incorrect valve placement can lead to scalding or sudden temperature changes. A professional plumber ensures the valve meets safety codes. They use proper tools to avoid injury or further damage. Safety should always come first with plumbing fixes.
Cost Considerations
Attempting repairs without skills can increase repair costs later. A professional can fix the issue quickly and correctly the first time. They can prevent expensive damage to walls and pipes. Hiring a plumber helps avoid costly mistakes and ensures long-lasting results.
Credit: diy.stackexchange.com

Credit: www.youtube.com
Frequently Asked Questions
Why Is My Shower Valve Too Far Out From The Wall?
A shower valve too far out means it sticks out more than usual. This often happens due to incorrect installation or wall thickness issues.
How Can I Fix A Shower Valve That Is Too Far Out?
You can fix it by adjusting the valve depth or adding a thicker trim plate. Sometimes, replacing the valve with a better fit is necessary.
What Problems Does A Shower Valve Too Far Out Cause?
It can cause water leaks, difficulty attaching the trim, and an uneven shower look. It may also allow water to splash outside the shower area.
Can I Adjust The Shower Valve Myself?
Yes, basic adjustments like moving the valve or adding spacers can be DIY tasks. Complex fixes might require a plumber to avoid damage.
Why Is The Shower Valve Not Flush With The Tile Surface?
This happens when the valve is installed too close to the wall studs or behind thick tile layers. Proper measurements during installation prevent this issue.
Does A Shower Valve Too Far Out Affect Water Temperature Control?
It can make handling temperature harder if the valve handle doesn’t fit well. Proper valve positioning ensures smooth control and better safety.
What Tools Do I Need To Fix A Shower Valve That Sticks Out?
Common tools include a screwdriver, adjustable wrench, and valve depth adjustment spacers. Sometimes, tile cutters or wall anchors may be required.
Conclusion
A shower valve set too far out can cause leaks and discomfort. Fixing it early saves time and money. Small adjustments make the shower work properly again. Proper valve placement improves water flow and safety. Don’t ignore this issue if you want a better shower experience.
Simple steps can help avoid bigger problems later. Keep an eye on your shower valve’s position. A well-placed valve keeps your bathroom running smoothly.