
If you rely on your pool’s Hayward flow switch, you know how important it is to keep it working perfectly. But how do you know if your flow switch is actually doing its job?
Testing it might seem tricky, but it’s easier than you think. You’ll learn simple, step-by-step ways to test your Hayward flow switch so you can catch problems early and keep your pool running smoothly. Keep reading, and you’ll be able to protect your pool system and save yourself time and money.
Credit: www.inyopools.com
Hayward Flow Switch Basics
The Hayward flow switch is a key part of many pool systems. It helps keep the water moving safely and correctly. Knowing its basics is important before testing it. Understanding how it works and the common models helps you handle it better.
Purpose And Function
The flow switch detects water flow inside the pool system. It tells the pump to turn on or off based on water movement. This protects the pool heater and other equipment. Without it, the system might overheat or get damaged. The switch ensures water flows before allowing the heater to run.
It acts like a safety guard. It stops the heater if water flow is too low or stops completely. This prevents damage and keeps the pool safe to use. The flow switch is simple but very important.
Common Models
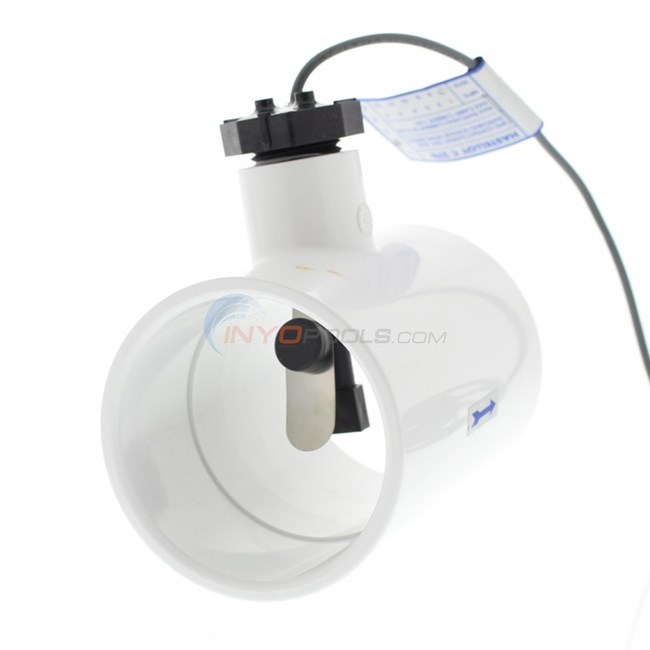
Hayward offers several flow switch models. Each fits different pool systems and pipe sizes. Popular models include the SPX0260X, SPX0260Z, and SPX0260W. These switches vary in design but serve the same basic function. They fit easily into Hayward pumps and heaters.
Choosing the right model depends on your pool’s setup. Most switches work with standard Hayward equipment. Knowing your model helps when testing or replacing the flow switch. It ensures you find the correct part for your system.

Credit: www.youtube.com
Tools Needed For Testing
Testing a Hayward flow switch requires specific tools for accurate results. Having the right equipment ensures safety and efficiency during the process. Prepare all tools before starting the test to avoid delays.
Essential Equipment
A multimeter is the main tool for testing electrical continuity in the flow switch. A screwdriver helps remove the switch cover and access wiring. A wrench or pliers may be needed to disconnect the switch from the system. You might also need a flashlight to see clearly inside tight spaces. Keep a small container to hold screws and small parts safely.
Safety Gear
Wear insulated gloves to protect against electric shocks. Safety glasses shield your eyes from debris and splashes. Use closed-toe shoes to protect your feet from accidental drops. Avoid loose clothing that could get caught in equipment. Always turn off power before starting any testing work.
Preparing For The Test
Preparing for the test is an important step before checking your Hayward flow switch. It helps keep you safe and makes the process easier. Take your time to follow these preparation steps carefully. They set the stage for a smooth and accurate test.
Shutting Off Power
Start by turning off the power to your pool pump. This stops electricity from running through the system. It protects you from electric shocks. Locate the circuit breaker or switch that controls your pool equipment. Flip it to the off position. Confirm the power is off by trying to turn on the pump. It should not run.
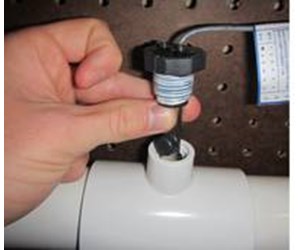
Locating The Flow Switch
Next, find the flow switch on your pool system. It is usually near the pump or filter. Look for a small device attached to the piping. It may have wires connected to it. Check your pool manual if you cannot find it. Knowing its exact location makes testing easier and faster.
Inspecting For Damage
Before testing, carefully examine the flow switch. Look for cracks, rust, or loose parts. Check the wiring for cuts or wear. Damage can affect the switch’s performance. If you see problems, fix them first or replace the switch. A healthy flow switch gives the best test results.
Credit: www.inyopools.com
Step-by-step Testing Process
Testing a Hayward flow switch is important to keep your pool system running smoothly. This step-by-step process helps you check if the flow switch is working correctly. Follow each step carefully to find any issues.
Testing Continuity With A Multimeter
Start by turning off the power to the pool system. Set your multimeter to the continuity setting. Remove the flow switch from the system. Place the multimeter probes on the switch terminals. A beep or low resistance shows the switch is continuous. No beep means the switch may be broken.
Checking Flow Activation
Reconnect the flow switch to the plumbing. Turn the pool pump on to create water flow. Listen for a clicking sound from the switch. The click means the switch activates with water flow. No sound could indicate a stuck or faulty switch.
Verifying Electrical Connections
Inspect all wires connected to the flow switch. Look for loose or corroded connections. Tighten any loose wires carefully. Clean any corrosion with a wire brush. Good connections ensure the switch sends signals properly.
Troubleshooting Common Issues
Troubleshooting common issues with a Hayward flow switch can save time and money. Understanding typical problems helps find the right fix fast. This section covers common faults and simple ways to test the switch.
Flow switches control water flow in pools and spas. Faulty switches can cause equipment to stop working. Testing helps identify if the switch is the problem or if other parts need attention.
No Continuity Detected
Use a multimeter to check continuity across the flow switch terminals. No continuity means the switch is open and not detecting flow. This often happens when the switch is stuck or damaged inside.
Inspect the switch for dirt or debris blocking movement. Clean the switch carefully and retest. If still no continuity, the switch likely needs replacement.
Intermittent Activation
Intermittent activation means the switch turns on and off randomly. This can cause pump issues or false alarms. Check for loose wiring or corroded terminals. Tighten or clean connections as needed.
Sometimes, low flow or air bubbles cause the switch to activate irregularly. Ensure proper water flow and remove trapped air from the system. Test again for consistent switch operation.
Flow Switch Replacement Signs
Replace the flow switch if it fails tests repeatedly or physical damage is visible. Cracks, corrosion, or broken parts are clear signs. Also, frequent false triggers or no response during flow mean replacement is necessary.
Using a faulty flow switch risks damaging pool equipment. New switches ensure reliable control and safety for your system.
Maintaining Your Flow Switch
Maintaining your Hayward flow switch helps keep your pool system working well. Regular care prevents damage and costly repairs. Simple steps protect the flow switch’s performance and extend its life.
Regular Inspection Tips
Check the flow switch every few weeks. Look for cracks, rust, or leaks around the device. Make sure all wires are secure and not worn out. Notice any unusual noises or slow response during operation. Early detection of problems saves time and money.
Cleaning Procedures
Turn off the pool pump before cleaning. Remove debris, dirt, and buildup from the switch housing. Use a soft brush or cloth to wipe the parts gently. Avoid harsh chemicals that can damage the switch. Rinse with fresh water and dry completely before reassembling.
When To Schedule Professional Service
Call a professional if the switch shows signs of failure. Persistent leaks, faulty readings, or no response need expert attention. Schedule service if you notice electrical problems or corrosion. Professionals can test and replace parts safely. Regular professional checks keep your system safe and efficient.
Frequently Asked Questions
What Is A Hayward Flow Switch Used For?
A Hayward flow switch senses water flow in your pool system. It helps protect the pump by turning it off if flow stops. This prevents damage from running the pump dry.
How Do I Know If My Flow Switch Is Faulty?
Look for no water flow or the pump not starting. Test the switch with a multimeter for electrical continuity. A faulty switch often causes pump shutdown or error codes.
What Tools Do I Need To Test A Hayward Flow Switch?
You need a multimeter, screwdriver, and possibly pliers. The multimeter checks electrical signals, while screwdrivers help open the switch housing. Always turn off power before testing.
How Do I Test The Electrical Continuity Of The Switch?
Set the multimeter to ohms and touch the probes to switch terminals. A reading near zero means the switch is closed and working. Infinite or no reading means the switch is open or broken.
Can I Test The Flow Switch Without Removing It?
Yes, you can test electrical continuity with the switch installed. However, checking mechanical operation might require removal to see if the paddle moves freely. Follow safety steps when testing installed switches.
What Causes A Hayward Flow Switch To Fail?
Common causes include debris blocking the paddle, wear and tear, or electrical faults. Lack of water flow or dirty water can damage the switch. Regular cleaning helps prevent failures.
How Often Should I Test My Hayward Flow Switch?
Test your flow switch at least once a year or if the pump acts up. Regular checks help catch issues early and keep your pool running smoothly. Testing is quick and easy.
Conclusion
Testing a Hayward flow switch helps keep your pool safe and running well. Follow each step carefully for the best results. Check the switch regularly to avoid bigger problems later. Simple tools and a bit of time make the job easy.
Stay on top of pool maintenance to enjoy clear, clean water. Regular checks save money and prevent damage. Keep your pool equipment in good shape with simple flow switch tests.