
Are your kitchen cabinets looking tired or outdated? You don’t have to spend a fortune on a full remodel to give your kitchen a fresh, stylish update.
Covering your cabinets with vinyl paper is an easy and affordable way to transform your space quickly. In this guide, you’ll learn simple steps to apply vinyl paper like a pro, saving you time and frustration. Ready to see your kitchen in a whole new light?
Keep reading to discover how you can make your cabinets look brand new without breaking the bank.
Choosing Vinyl Paper
Choosing the right vinyl paper is the first step to a successful kitchen cabinet makeover. This choice affects the look, feel, and durability of your cabinets. A good vinyl paper can protect surfaces and give your kitchen a fresh style.
Types Of Vinyl Paper
Vinyl paper comes in many types. Matte vinyl has a soft, non-shiny finish. It hides fingerprints and scratches well. Glossy vinyl looks shiny and bright. It reflects light and makes colors pop. Textured vinyl mimics wood, stone, or fabric. It adds depth and a natural feel to cabinets. Pick a type that suits your kitchen’s style and daily use.
Selecting The Right Design
Design choices affect the kitchen’s mood. Solid colors offer a clean, modern look. Wood grain designs add warmth and traditional charm. Patterns can bring energy and fun to the space. Choose a design that matches your kitchen theme and personal taste. Simple designs often last longer in style.
Measuring Your Cabinets
Measure each cabinet door and drawer carefully. Include edges and any curves or trims. Write down the height and width of each piece. Add extra inches to your measurements for error. This ensures you have enough vinyl to cover all surfaces fully. Proper measurements prevent waste and save money.
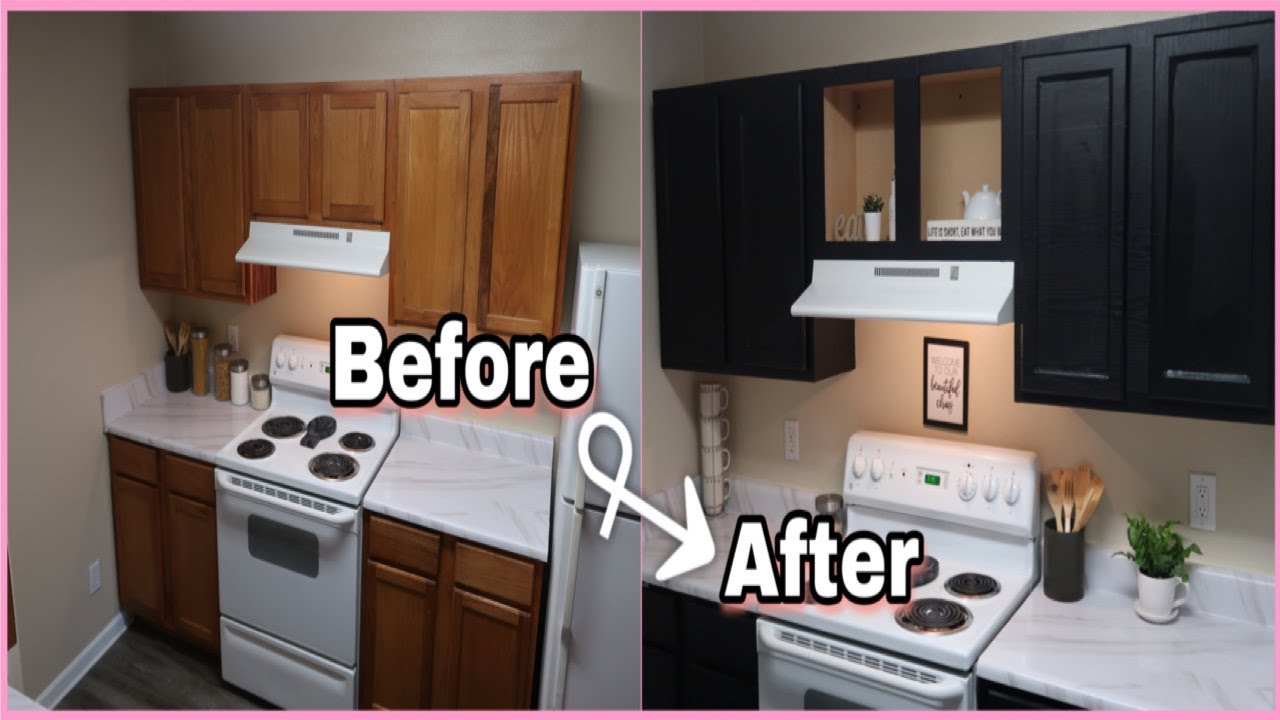
Credit: www.youtube.com
Preparing Cabinets
Preparing your kitchen cabinets is an important first step before applying vinyl paper. This process helps the vinyl stick better and last longer. Proper preparation makes sure your cabinets look smooth and neat after covering.
Cleaning Surfaces
Start by cleaning the cabinet surfaces thoroughly. Use warm water and mild soap to remove grease and dirt. Wipe the cabinets with a soft cloth to avoid scratches. Let the surfaces dry completely before moving on.
Removing Hardware
Take off all handles, knobs, and hinges from the cabinet doors. This step makes it easier to apply vinyl paper evenly. Keep the hardware in a safe place for reinstallation later. Removing hardware also prevents damage during the process.
Sanding For Better Adhesion
Lightly sand the cabinet surfaces with fine-grit sandpaper. This roughens smooth finishes and helps the vinyl stick better. Wipe away sanding dust with a clean cloth. Avoid sanding too hard to prevent damage to the cabinets.
Cutting Vinyl Paper
Cutting vinyl paper for kitchen cabinets needs care and precision. The right cut ensures a smooth fit and neat look. This section covers key steps to cut vinyl paper correctly.
Start with accurate measuring and use templates for better results. Follow cutting tips to avoid mistakes and waste.
Measuring Panels
Measure each cabinet panel carefully. Use a tape measure for accuracy. Write down the width and height of each panel. Double-check measurements before cutting. Remember, small errors can cause big problems.
Using Templates
Create templates from paper or cardboard. Cut them to match the panel size. Place templates on vinyl paper to trace shapes. Templates help avoid repeated measuring. They keep cuts consistent and precise.
Cutting Tips
Use a sharp utility knife or scissors. Cut slowly along the traced lines. Keep the vinyl flat and smooth while cutting. Avoid jagged edges by steady hands. Cut a little outside the lines to trim later. Clean cuts make the vinyl look professional.

Credit: www.youtube.com
Applying Vinyl Paper
Applying vinyl paper to kitchen cabinets is a careful but simple process. It needs patience and a steady hand for the best results. This step-by-step guide helps you apply vinyl smoothly and neatly.
Peeling And Positioning
Start by peeling a small section of the vinyl’s backing. Do not remove it all at once. Align the vinyl carefully with the cabinet surface. Hold the vinyl in place and slowly peel away the backing as you press the vinyl down. This keeps the paper from folding or sticking incorrectly.
Smoothing Out Bubbles
Use a plastic card or squeegee to smooth the vinyl. Move from the center outward to push air bubbles away. Work slowly and gently to avoid tearing the vinyl. Small bubbles can be popped with a pin and smoothed again.
Trimming Excess Edges
After the vinyl is fully applied, trim the edges with a sharp utility knife. Cut close to the cabinet edges for a clean finish. Take care not to cut into the cabinet surface. Neat edges make the cabinets look polished and professional.
Reattaching Hardware
After covering your kitchen cabinets with vinyl paper, reattaching the hardware is the next step. This process brings your cabinets back to life and keeps everything functional. Careful handling prevents damage to the new vinyl surface. Follow simple steps to secure your handles and knobs properly.
Replacing Handles And Knobs
Start by lining up the handles and knobs with the existing holes. Use the original screws whenever possible for a snug fit. If screws are missing or too short, buy replacements at a hardware store. Tighten screws gently to avoid cracking the vinyl paper. Take your time to align each piece straight for a clean look.
Checking For Secure Fit
Once all hardware is in place, test each handle and knob. Pull gently to ensure they hold firm without wobbling. Loose hardware can damage the vinyl or fall off later. Tighten screws a little more if needed. Avoid over-tightening, which can tear the vinyl surface. A secure fit keeps your cabinets looking good and working well.
Maintaining Vinyl-covered Cabinets
Maintaining vinyl-covered cabinets helps keep them looking fresh and new. Proper care extends the life of the vinyl and protects your kitchen’s style. Simple steps can prevent damage and keep cleaning easy.
Cleaning Tips
Use a soft cloth or sponge to clean the vinyl surface. Mild soap and warm water work best. Avoid harsh chemicals or abrasive cleaners that can wear the vinyl. Wipe spills quickly to prevent stains. Dry the surface with a clean cloth after cleaning.
Avoiding Damage
Keep sharp objects away from the vinyl to prevent scratches. Avoid using scouring pads or rough brushes. Do not expose vinyl to high heat or direct sunlight for long periods. Use cabinet handles gently to avoid peeling or lifting edges. Be careful with sticky tape or glue, as they can damage the surface.
When To Replace Vinyl
Replace vinyl if it starts peeling or bubbling. Faded or cracked vinyl also needs replacement. If cleaning does not remove stains, consider new vinyl. Damaged vinyl can ruin the cabinet’s look. Fresh vinyl keeps your kitchen bright and tidy.
Troubleshooting Common Issues
Covering kitchen cabinets with vinyl paper can be simple but may cause some problems. These issues can affect the look and durability of your project. Fixing them quickly keeps your cabinets looking great.
Dealing With Wrinkles
Wrinkles happen when the vinyl is not applied smoothly. Warm the vinyl slightly with a hairdryer. Use a flat tool to press the vinyl from the center outward. This helps push wrinkles out and smooth the surface. Work slowly to avoid tearing the vinyl.
Fixing Peeling Edges
Peeling edges occur when the vinyl does not stick well. Clean the edges with rubbing alcohol to remove dirt or oil. Apply a small amount of strong glue under the lifting edge. Press down firmly and hold until it sticks. Trim any loose bits to keep a neat look.
Handling Air Bubbles
Air bubbles form if air gets trapped under the vinyl. Use a pin to gently poke a small hole in the bubble. Press the air out using a flat tool. Work from the hole toward the edge. This stops the bubble without damaging the vinyl.

Credit: www.amazon.com
Frequently Asked Questions
How Do I Prepare Cabinets Before Applying Vinyl Paper?
Clean the cabinet surface thoroughly to remove grease and dirt. Lightly sand to create a smooth base. Wipe with a damp cloth to remove dust. Ensure cabinets are dry before applying vinyl paper for better adhesion.
Can Vinyl Paper Cover Damaged Kitchen Cabinets?
Vinyl paper can hide minor scratches and stains. However, it won’t fix deep dents or structural damage. Repair damaged areas before applying vinyl for a smooth finish and long-lasting results.
What Tools Are Needed To Apply Vinyl Paper On Cabinets?
You’ll need vinyl paper, a utility knife, a squeegee or credit card, measuring tape, and a clean cloth. These tools help measure, cut, and smooth the vinyl for a professional look.
How Long Does Vinyl Paper Last On Kitchen Cabinets?
Vinyl paper typically lasts 5 to 7 years with proper care. Avoid excessive moisture and harsh cleaning agents to extend its lifespan. Regular gentle cleaning helps maintain its appearance.
Conclusion
Covering kitchen cabinets with vinyl paper is simple and affordable. It gives your kitchen a fresh, new look without much effort. Choose the right vinyl and take your time to apply it smoothly. Small bubbles or wrinkles can be fixed easily.
This DIY project saves money and adds style to your space. Try it yourself and enjoy a bright, updated kitchen today.