
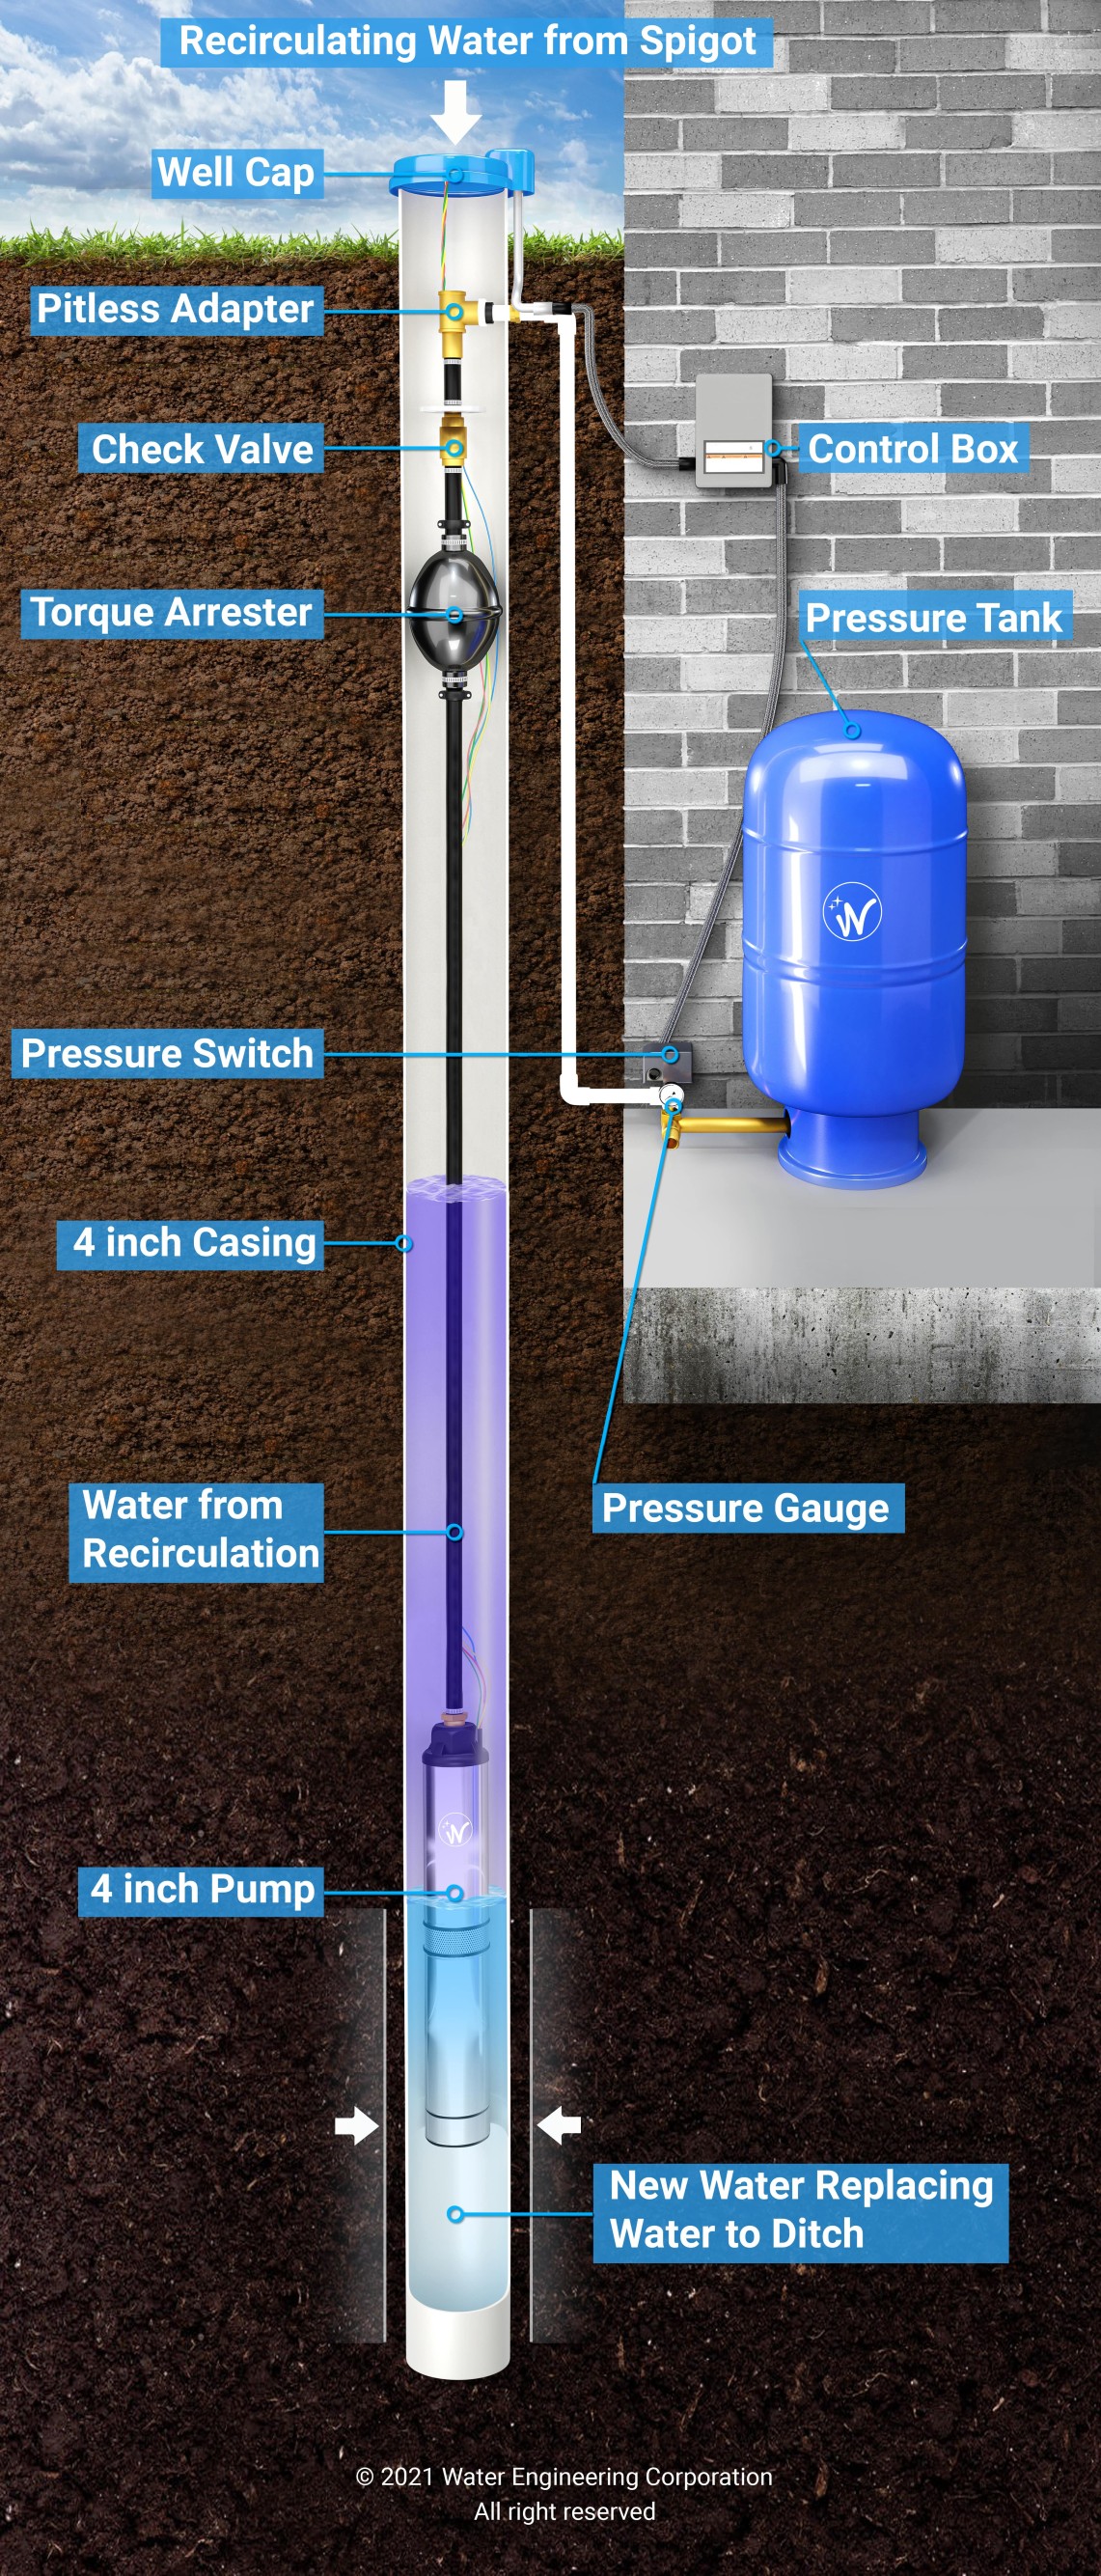
Are you looking to make your well pump more convenient and easy to use? Adding a spigot to your well pump can give you quick access to water without the hassle of dragging around hoses or buckets.
Imagine turning a simple handle and having water flow right where you need it—no fuss, no mess. In this guide, you’ll learn exactly how to add a spigot to your well pump step-by-step. Whether you’re a beginner or have some DIY experience, this article will give you clear instructions and helpful tips to get the job done right.
Keep reading, and you’ll have that spigot up and running in no time!
Choosing The Right Spigot
Choosing the right spigot for your well pump is key to making the setup work well. The spigot controls water flow and must fit your needs perfectly. Picking the wrong type or size can cause leaks or low water pressure. Consider the spigot’s type, material, and size carefully before buying. This helps ensure a long-lasting, efficient connection.
Types Of Spigots
Several spigot types suit different needs. The ball valve spigot offers easy on/off control. It is simple to use and durable. Gate valve spigots control flow with a turning wheel. They work well for precise water flow. Frost-free spigots prevent freezing in cold weather. Choose a type that matches your climate and use.
Materials And Durability
Spigots come in brass, stainless steel, and plastic. Brass spigots resist rust and last long outdoors. Stainless steel is strong and handles pressure well. Plastic spigots are cheap but can crack in cold weather. Pick a material that fits your budget and climate. Durability matters for spigots connected to well pumps.
Sizing Your Spigot
Size affects water flow and ease of use. Common spigot sizes are ¾ inch or 1 inch. Check your well pump’s output pipe size first. The spigot must match or connect easily with adapters. Too small a spigot reduces water flow. Too large may not fit or cause leaks. Measure carefully for the best fit.

Credit: diy.stackexchange.com
Gathering Tools And Materials
Adding a spigot to your well pump needs careful preparation. Gathering the right tools and materials makes the job easier and safer. Having everything ready saves time and helps avoid mistakes.
Essential Tools
Start with a pipe wrench to tighten connections. A drill with the right bit will make holes. Use a screwdriver for screws and clamps. A tape measure helps check lengths. A pipe cutter or hacksaw cuts pipes cleanly. Have pliers to grip small parts. A level keeps your spigot straight.
Required Materials
Get the correct spigot size for your well pump. Use PVC or metal pipes to connect it. Teflon tape seals threaded joints well. Hose clamps secure hoses tightly. PVC primer and cement join plastic pipes strongly. Also, have pipe fittings like elbows or tees. Make sure all parts fit your pump system.
Safety Gear
Wear safety goggles to protect your eyes from debris. Gloves keep your hands safe from sharp edges. Use ear protection if using loud power tools. Closed-toe shoes protect your feet from falling items. Work in a well-lit area to see clearly. Keep a first aid kit nearby for minor injuries.
Preparing The Well Pump
Preparing your well pump is the first step before adding a spigot. This process ensures safety and prevents damage. Taking the right precautions helps you work smoothly. Follow these simple steps carefully.
Shutting Off The Water Supply
Turn off the main water supply to the well pump. This stops water from flowing during installation. Locate the shut-off valve near the pump. Close it fully to avoid leaks or spills.
Draining The System
Drain the water remaining in the pipes. Open a faucet or valve to let water run out. This step prevents water pressure from causing problems. Make sure all water drains before continuing.
Locating The Installation Point
Find the best spot to install the spigot on the pump pipe. Choose a place that is easy to access. Check that the pipe is strong and free of damage. Mark the spot clearly to guide your work.
Credit: www.wecofilters.com
Installing The Spigot
Installing a spigot on your well pump lets you easily access water outdoors. This step-by-step process helps you connect the spigot securely and prevent leaks. Follow these simple instructions to add a spigot safely and correctly.
Marking And Drilling The Hole
First, choose a spot on the pump pipe for the spigot. Use a marker to mark the exact drilling point. Make sure the spot is flat and easy to reach.
Next, drill a hole with the correct size drill bit. Drill slowly to avoid cracking the pipe. Clean any debris around the hole after drilling.
Attaching The Spigot
Insert the spigot into the drilled hole carefully. Align the spigot so it fits straight and tight. Use screws or clamps to secure it firmly to the pipe.
Check the fit by turning the spigot handle. It should move smoothly without wobbling or leaking.
Sealing And Waterproofing
Apply waterproof sealant around the spigot base. This stops water from leaking through the connection. Use plumber’s tape on threaded parts for a tight seal.
Allow the sealant to dry fully before using the spigot. Test the spigot by running water to confirm no leaks appear.
Testing And Maintenance
Testing and maintenance are key to keeping your well pump spigot working well. Regular checks help spot small problems early. This saves money and effort in the long run. Simple care routines keep water flowing smoothly and safely from your spigot.
Checking For Leaks
Look closely at all connections around your spigot. Water drops or wet spots show leaks. Check the pipe joints, valve, and spigot base. Tighten any loose fittings carefully. Use plumber’s tape on threads to stop leaks. Fix leaks quickly to avoid water waste and damage.
Regular Maintenance Tips
Clean your spigot and pump area often. Remove dirt, leaves, and debris around the setup. Turn the spigot on and off to keep parts moving. Inspect the pump’s pressure switch and wiring for damage. Replace worn washers and seals yearly. Lubricate moving parts if the manufacturer suggests it.
Troubleshooting Common Issues
Spigot not delivering water? Check the pump power and circuit breaker. No water flow may mean a clogged pipe or blocked spigot. Low water pressure often signals a leak or worn pump parts. Strange noises mean the pump needs attention. Follow manufacturer guides for fixing or call a professional if unsure.

Credit: diy.stackexchange.com
Enhancing Your Setup
Enhancing your well pump setup improves convenience and efficiency. Small upgrades can make a big difference in water access and system performance. Consider practical additions that fit your needs and budget. These enhancements help you use water more easily and safely from your well.
Adding A Hose Connection
Installing a hose connection lets you attach garden hoses directly to the spigot. This makes watering plants and washing cars easier. Use a standard hose bib to connect your hose securely. Ensure the connection is tight to prevent leaks. A hose connection adds flexibility to your water use.
Using A Backflow Preventer
A backflow preventer stops dirty water from flowing back into your well. It protects your water supply from contamination. Install it after the spigot to keep water clean and safe. This device is simple and cost-effective. It helps maintain good water quality for your home and garden.
Upgrading To An Automated System
Automated systems control water flow without manual effort. Sensors and timers can turn the pump on or off automatically. This upgrade saves time and ensures water is available when needed. It also reduces water waste by controlling usage. Automation brings convenience and better control to your well setup.
Frequently Asked Questions
What Tools Do I Need To Add A Spigot To My Well Pump?
You need a spigot, pipe fittings, Teflon tape, a wrench, and a drill. These tools help connect the spigot securely to your well pump.
How Do I Connect A Spigot To The Well Pump Pipe?
Turn off the pump and drain water. Attach the spigot using pipe fittings and seal with Teflon tape for a tight fit.
Can I Add A Spigot To Any Type Of Well Pump?
Most well pumps can have a spigot added, but check your pump type first. Some pumps may need special fittings or adapters.
How Do I Prevent Leaks After Installing A Spigot?
Use Teflon tape on all threaded connections and tighten fittings well. Inspect the spigot for leaks by turning on the pump slowly.
Is It Safe To Install A Spigot On My Well Pump Myself?
Yes, with basic plumbing skills and proper tools, you can install it safely. Always turn off power and water before starting work.
How Much Water Pressure Will A Spigot Affect On My Well Pump?
A spigot usually does not reduce water pressure noticeably. Proper installation ensures steady flow without pressure loss.
What Maintenance Does A Spigot On A Well Pump Need?
Check for leaks regularly and tighten connections if needed. Clean the spigot to prevent blockages and ensure smooth water flow.
Conclusion
Adding a spigot to your well pump is a smart way to get water easily. Follow the steps carefully to avoid leaks and damage. Use the right tools and materials for a secure fit. Check your connections regularly to keep everything working well.
This small project can save time and effort in your daily water use. Remember, safety first. Take your time and enjoy the benefits of having a spigot on your well pump. Simple changes can make a big difference.