
Have you noticed worn spots on your kitchen cabinets stealing the shine from your entire space? Those small patches might seem like a minor issue, but they can make your kitchen look tired and neglected.
The good news is, fixing them is easier than you think. You’ll discover simple, effective ways to restore your cabinets and bring back that fresh, polished look you deserve. Keep reading, and by the end, your kitchen will feel like new again.
Identify Worn Spots
Identifying worn spots on kitchen cabinets is the first step to restoring their look. Careful inspection helps find areas that need repair. Knowing the type of damage guides the right fix.
Take your time checking each cabinet door and drawer. Look closely at edges, corners, and spots near handles. These areas often show wear first.
Check Cabinet Surfaces
Look over all cabinet surfaces under good light. Use a flashlight if needed to see dull or faded areas. Touch the surfaces to feel rough or uneven spots. Notice any discoloration or scratches that stand out.
Check inside cabinets too. Wear can happen inside from spills or cleaning. Look for water stains or peeling paint inside the doors.
Spot Different Damage Types
Wear shows in many ways. Scratches, dents, and chips are common. Scratches are thin lines on the finish. Dents are small depressions from bumps. Chips are pieces missing from edges.
Look for fading or discoloration caused by sunlight or heat. Water damage causes swelling or peeling paint. Some spots may have mold or mildew if moisture is present.
Knowing the damage helps choose the right repair method. Simple scratches need different care than water stains or chips.

Credit: www.reddit.com
Gather Repair Materials
Gathering the right materials is the first step to fixing worn spots on kitchen cabinets. This makes the repair process smoother and helps you get better results. Having everything ready saves time and avoids frustration.
Choose The Right Tools
Select tools that fit the size and type of damage. A small putty knife works well for filling dents and scratches. Sandpaper with fine grit helps smooth the surface before painting. Use a clean cloth for wiping dust and dirt. A small paintbrush or foam brush offers better control for applying paint or stain.
Select Matching Paint And Stains
Match paint or stain to the cabinet’s original color. Test a small area first to see how it looks. Use paint designed for wood surfaces for better adhesion. Stains should be similar in shade and finish to blend well. Proper color matching hides the repair and keeps cabinets looking fresh.
Prepare Cabinet Surfaces
Preparing your kitchen cabinet surfaces is a key step before fixing worn spots. It ensures the new finish sticks well and lasts longer. Proper preparation also makes your cabinets look smooth and fresh.
Start with cleaning and sanding to remove dirt and rough edges. Then, remove any old finish to create a clean base for repairs. These steps help you get the best results and avoid future damage.
Clean And Sand Worn Areas
Begin by wiping the cabinets with a damp cloth. Use mild soap to remove grease and grime. Let the surface dry completely before sanding.
Next, sand the worn spots gently with fine-grit sandpaper. This smooths out rough patches and removes loose paint or varnish. Sand in the direction of the wood grain for a better finish.
Clean off the dust with a soft cloth after sanding. A clean surface helps the new paint or stain stick better.
Remove Old Finish
Use a chemical paint stripper or sanding to remove the old finish. Follow the product instructions carefully for safe use. Apply the stripper evenly over the worn areas and wait as directed.
Scrape off the old finish with a plastic scraper. Avoid damaging the wood by working gently.
After removing the finish, sand the surface lightly to smooth it out. Clean away dust and residue with a damp cloth. Let the surface dry fully before moving to the next step.
Apply Wood Filler
Applying wood filler is a key step to fix worn spots on kitchen cabinets. It fills holes, scratches, and gouges, restoring a smooth surface. Wood filler blends well with the cabinet’s wood, making repairs less noticeable. This process strengthens damaged areas and prepares them for sanding and painting.
Fill Scratches And Gouges
Start by cleaning the worn spots with a dry cloth. Scoop out a small amount of wood filler using a putty knife. Press the filler firmly into the scratches and gouges. Overfill slightly to ensure full coverage. Remove excess filler by smoothing it out with the putty knife. Let the filler settle and dry before moving to the next step.
Smooth And Let Dry
Once the wood filler is dry, use fine-grit sandpaper to smooth the surface. Sand gently until the filled area matches the cabinet’s surface. Wipe away dust with a clean cloth. Allow the filler to dry fully, usually a few hours. This creates a solid base for painting or staining, ensuring a neat finish.
Sand And Smooth Repairs
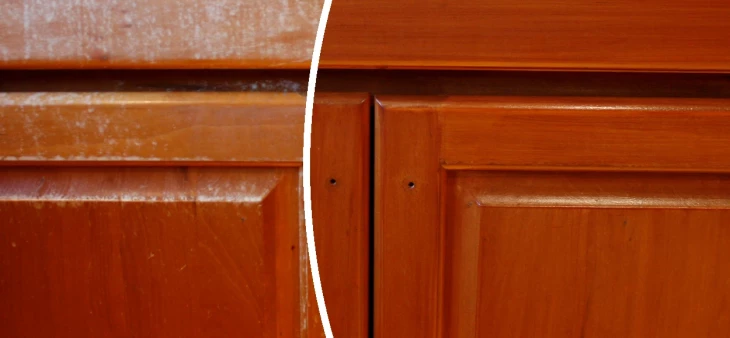
Sanding and smoothing are key steps to fix worn spots on kitchen cabinets. These steps prepare the surface for painting or staining. Sanding removes old finish and evens out rough areas. Smoothing helps create a clean, flat surface. This makes repairs less noticeable and cabinets look new again.
Take your time with sanding. Use the right sandpaper grit for best results. Start with a coarser grit to remove damaged material. Follow with a finer grit to smooth the surface. Proper sanding ensures better adhesion for paint or stain.
Blend Edges Seamlessly
Blend edges carefully between the worn spot and surrounding area. Sand lightly beyond the damaged spot. This prevents sharp lines or bumps after finishing. Use gentle, circular motions to fade the edges. The goal is a smooth transition that hides the repair. Avoid sanding too deep or unevenly.
Dust Removal Techniques
Remove dust completely before applying paint or stain. Dust can cause bumps and uneven finish. Use a soft brush or cloth to wipe away sanding dust. Vacuuming helps clean tight corners and crevices. For best results, use a tack cloth to pick up fine particles. A clean surface leads to a smoother, long-lasting finish.
Credit: www.nhance.com
Stain Or Paint Cabinets
Fixing worn spots on kitchen cabinets often means choosing between stain or paint. Both options protect wood and improve appearance. Stain keeps the natural grain visible. Paint covers the wood completely for a fresh look. The choice depends on your style and the cabinet’s condition. Proper application ensures a lasting, smooth finish.
Match Original Color
Start by finding a stain or paint that matches the original color. Test a small hidden area first. This helps avoid color mistakes. Use a color chart or take a cabinet door to the store. Lighting can change how the color looks. Matching the original color keeps cabinets looking uniform and neat.
Use Multiple Coats
Apply several thin coats rather than one thick coat. Thin coats dry faster and stick better. Let each coat dry completely before adding the next. This prevents drips and uneven spots. Multiple coats build a strong, even layer. The finish lasts longer and looks smooth.
Seal And Protect Finish
Sealing and protecting the finish on kitchen cabinets helps keep them looking new. It prevents damage from water, heat, and daily wear. A good sealant adds a layer of defense to worn spots. This step is key for long-lasting cabinet beauty.
Choose Suitable Sealants
Select a sealant made for wood cabinets. Polyurethane and varnish are popular choices. They create a hard, clear finish that resists scratches and stains. Water-based sealants dry fast and have low odor. Oil-based ones offer stronger protection but take longer to dry.
Check the sealant label to ensure it works on your cabinet’s finish type. Test it on a hidden spot first. This avoids any unwanted color changes or damage.
Apply Even Coats
Use a clean brush or foam applicator to spread the sealant. Apply thin, smooth coats to avoid drips and bubbles. Let each coat dry completely before adding the next. Two to three coats usually give good protection.
Lightly sand between coats with fine-grit sandpaper. This helps the next layer stick well and creates a smooth surface. Wipe away dust before applying the next coat. Even coats ensure a strong, lasting finish on worn spots.
Maintain Cabinet Appearance
Keeping kitchen cabinets looking good takes regular care. Worn spots can make cabinets look old and tired. Maintaining their appearance helps your kitchen feel fresh and clean. Small efforts prevent bigger problems later.
Simple habits protect the wood and finish. Clean cabinets carefully and avoid harsh chemicals. Watch for damage early to fix it fast. Good care keeps cabinets strong and beautiful.
Regular Cleaning Tips
Dust and wipe cabinets often to stop dirt buildup. Use a soft cloth and mild soap with water. Avoid soaking the wood. Dry cabinets right after cleaning. Clean handles and edges where grime collects. This keeps the finish smooth and shiny.
Never use abrasive cleaners or scrub brushes. They can scratch or remove the finish. Test any cleaner on a small area first. Clean spills quickly to stop stains or water damage. Regular cleaning keeps cabinets looking new longer.
Prevent Future Wear
Use cabinet liners to protect shelves and drawers. They absorb spills and reduce scratches. Open and close doors gently to avoid chips. Keep sharp objects away from cabinet surfaces. Avoid leaning or placing heavy items on doors.
Control kitchen humidity to protect wood. Use a vent or open windows while cooking. Avoid direct sunlight on cabinets to stop fading. Use furniture polish or wax for extra protection. These steps help your cabinets last many years.

Credit: www.youtube.com
Frequently Asked Questions
How Do I Repair Small Worn Spots On Cabinets?
To fix small worn spots, clean the area first. Then, apply wood filler or touch-up marker. Sand lightly and finish with matching paint or stain for a smooth look.
What Materials Are Best For Fixing Worn Cabinet Spots?
Use wood filler, touch-up markers, or wax sticks for worn spots. Choose products that match your cabinet’s color and finish. These materials blend well and provide a durable repair.
Can I Fix Worn Spots Without Sanding The Cabinets?
Yes, for minor wear, use touch-up markers or wax sticks. These products don’t require sanding and quickly conceal damage. For larger spots, light sanding may be necessary.
How Long Does It Take To Fix Worn Cabinet Spots?
Fixing small worn spots usually takes 15 to 30 minutes. Drying time for filler or paint may add extra time. Overall, it’s a quick DIY task.
Conclusion
Worn spots on kitchen cabinets can look old and tired. Fixing them brings new life to your kitchen. Use simple steps to clean, sand, and paint. Small repairs save money and improve your home’s look. Taking time to care for cabinets keeps them strong.
A fresh finish makes your kitchen feel bright again. You don’t need to replace cabinets to see big changes. Try these tips and enjoy a nicer kitchen space.