
If you’re planning to plumb a kitchen sink with a disposal and dishwasher, you might feel a bit overwhelmed. But don’t worry—this task is easier than it seems once you know the right steps.
Imagine having your kitchen sink, garbage disposal, and dishwasher all working smoothly together without leaks or clogs. That’s exactly what you’ll learn here. By the end of this guide, you’ll have the confidence and know-how to tackle the job yourself, saving time and money.
Ready to get started? Let’s dive in and make your kitchen plumbing hassle-free!

Credit: www.amazon.com
Gathering Tools And Materials
Before starting to plumb a kitchen sink with a disposal and dishwasher, gather all tools and materials. Having everything ready saves time and avoids frustration during the job. Prepare a clean workspace near the sink for easy access to parts.
Essential Plumbing Tools
Several key tools make plumbing easier and faster. A pipe wrench helps tighten and loosen pipes securely. Channel lock pliers grip pipes and fittings firmly. A plumber’s putty knife is useful for applying sealant around the sink drain. An adjustable wrench fits various nuts and bolts. A screwdriver, both flat and Phillips head, is necessary for many connections. A tubing cutter or hacksaw cuts pipes to the right length. A bucket catches water spills during disassembly. Finally, a flashlight helps see under the sink in dark spaces.
Required Parts And Supplies
Start with a new sink drain assembly, designed for disposals. A dishwasher tailpiece connects the dishwasher drain hose to the sink drain. Use flexible drain hoses that fit your dishwasher and disposal models. PVC pipes and fittings join the sink, disposal, and drain lines. Plumber’s putty seals the drain flange to the sink. Teflon tape wraps threaded connections to prevent leaks. Hose clamps secure the dishwasher drain hose. Don’t forget rubber gaskets and washers for tight seals. Make sure all parts match your sink and appliance sizes for proper fit.
Credit: www.graines-voltz.com
Preparing The Sink Area
Preparing the sink area is the first step in plumbing a kitchen sink with a disposal and dishwasher. This step ensures the workspace is safe and ready for new installations. Proper preparation prevents leaks and other problems later on. Follow these simple steps carefully before starting the plumbing work.
Turning Off Water Supply
Start by shutting off the water supply to the sink. Locate the shutoff valves under the sink or the main water valve in your home. Turn the valves clockwise to close them completely. Double-check by turning on the faucet to see if water stops flowing. This step protects you from water spills during plumbing.
Removing Old Fixtures
Next, remove the old sink fixtures carefully. Use a wrench to loosen nuts and bolts holding the sink, faucet, and pipes. Disconnect any water lines and drain pipes attached to the old setup. Take out the disposal unit and dishwasher connections if present. Clean the area to remove debris and old sealant before installing new parts.
Installing The Disposal Unit
Installing the disposal unit is an important step in plumbing your kitchen sink. It helps grind food waste and sends it safely down the drain. This process needs careful attention to ensure the unit fits well and works properly.
Start by securing the disposal under the sink. Then, connect it to the sink drain to allow smooth water flow. Follow each step carefully for a successful installation.
Mounting The Disposal
Begin by turning off the power to avoid accidents. Remove the existing drain assembly from the sink. Attach the mounting ring provided with the disposal to the sink drain opening. Use plumber’s putty to create a watertight seal between the sink and the mounting ring.
Next, secure the mounting ring tightly using the screws. Lift the disposal unit and align it with the mounting ring. Twist it until it locks in place. Make sure the unit feels secure and does not move.
Connecting To The Sink Drain
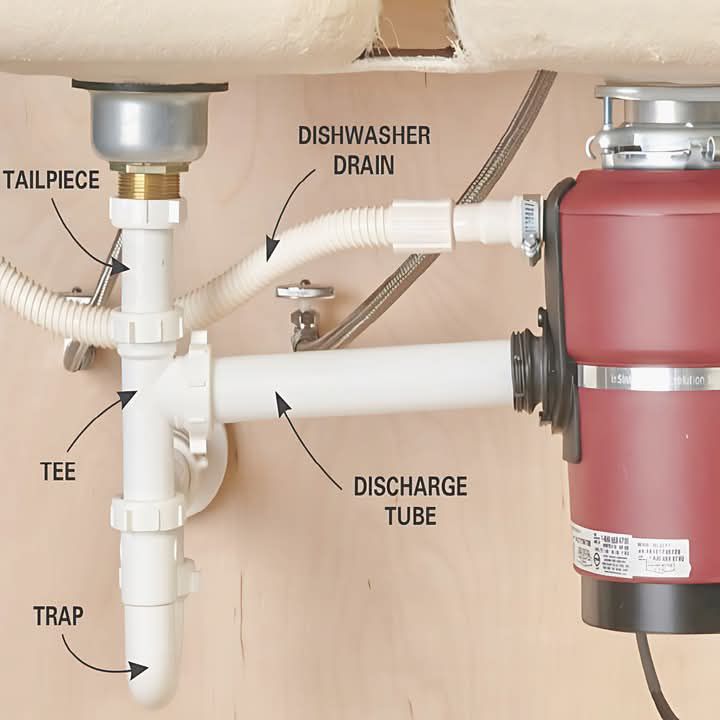
Attach the disposal’s discharge tube to the drain pipe. Use a slip joint or a clamp to secure the connection. Tighten it to prevent leaks but avoid overtightening. Connect the dishwasher drain hose to the disposal’s dishwasher inlet if needed. Ensure all connections are tight and properly aligned.
Finally, restore power and test the disposal. Run water and turn on the unit to check for leaks and proper operation. Adjust connections if you notice any issues.
Setting Up Dishwasher Drain
Setting up the dishwasher drain is an important step when plumbing a kitchen sink. This process connects the dishwasher to the disposal, allowing wastewater to flow out safely. Proper setup prevents leaks and ensures smooth operation. Follow the steps carefully for a secure and efficient drain connection.
Attaching Drain Hose To Disposal
First, locate the dishwasher drain port on the disposal unit. Remove the knockout plug inside the port using a screwdriver or hammer. Insert the dishwasher drain hose into the open port. Push it in firmly to create a tight fit. This connection allows dishwasher water to drain through the disposal.
Securing Hose Connections
Next, secure the hose with a hose clamp. Slide the clamp over the hose and tighten it with a screwdriver. Check that the hose does not slip or move. Tight connections prevent leaks and keep the drain working properly. Inspect all connections for a snug fit before running the dishwasher.
Connecting Water Lines
Connecting the water lines is a key step in plumbing a kitchen sink with a disposal and dishwasher. This process supplies water to the faucet and dishwasher, ensuring they work properly. Proper connections prevent leaks and water damage.
Start by identifying the hot and cold water lines under the sink. Use the right tools to attach the supply tubes tightly. Secure connections help avoid water flow issues.
Hooking Up Hot And Cold Water
Begin with the cold water line. Attach the supply tube to the cold water valve. Tighten it by hand, then use a wrench for a firm fit. Repeat the same for the hot water line, connecting it to the hot water valve.
Make sure the supply tubes are not twisted or bent. Straight lines reduce stress on the connections. Proper alignment helps water flow smoothly to the faucet and dishwasher.
Checking For Leaks
Turn on the water supply slowly after connecting both lines. Watch the connections closely. Look for any water dripping or moisture forming around the fittings.
Tighten any loose connections immediately. A small leak can cause big problems over time. Use a dry cloth to spot hidden leaks by wiping around the joints.
Repeat the check after running water for a few minutes. Leak-free connections mean your plumbing is secure and ready to use.
Credit: www.doityourself.com
Assembling The Drain Pipes
Assembling the drain pipes for a kitchen sink with a disposal and dishwasher requires careful steps. Proper assembly ensures no leaks and smooth drainage. This process involves fitting the pipes securely and connecting them to the main drain line.
Each part must fit tightly to avoid water damage. Use the right tools and check all connections. Follow the steps below to assemble the drain pipes correctly.
Installing P-trap
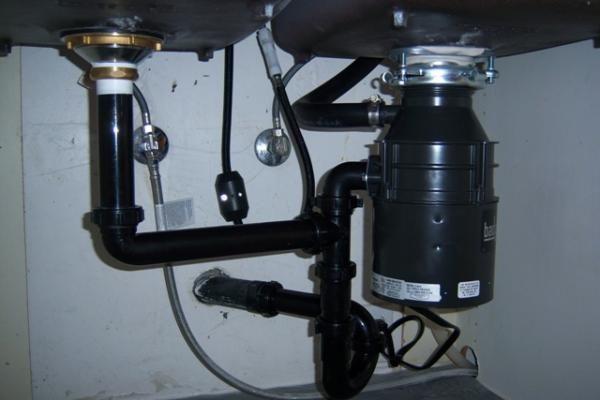
The P-trap prevents sewer gases from entering your home. Start by attaching the P-trap to the sink drain tailpiece. Make sure the slip nuts and washers are in place before tightening. Do not overtighten to avoid cracking the pipes.
Adjust the P-trap so it aligns with the waste arm pipe. The trap must slope downward slightly toward the drain line. This angle allows water to flow out easily and traps debris inside.
Linking To Main Drain
Connect the P-trap outlet to the main drain pipe. Use a waste arm pipe and fittings that match your plumbing system. Secure all connections with slip nuts and washers.
Check for any gaps or loose parts. Once connected, run water through the sink to test for leaks. Tighten any loose fittings to ensure a watertight seal.
Testing The System
Testing the plumbing system after installation is crucial. It ensures everything works properly. This step helps catch leaks or other issues early. A smooth-running kitchen sink with a disposal and dishwasher depends on thorough testing.
Running Water And Disposal
Turn on the water supply slowly. Check that water flows through the sink drain without pooling. Next, switch on the disposal unit. Listen for any unusual noises or vibrations. The disposal should run smoothly without rattling or grinding. Run cold water while the disposal operates. This helps clear any debris and prevents clogs.
Inspecting For Issues
Look under the sink carefully for leaks. Check all pipe joints and connections. Use a dry cloth to spot moisture or drips. Test the dishwasher drain hose connection. It should be secure and free from water leaks. Watch for slow draining or gurgling sounds. These signs could indicate a blockage or loose fitting. Tighten any loose connections. Fix issues immediately to avoid water damage.
Troubleshooting Common Problems
Troubleshooting common problems helps keep your kitchen sink, disposal, and dishwasher working well. Small issues can cause big headaches if ignored. Understanding basic fixes saves time and money.
Leaks and blockages are the most frequent problems. Both can stop your kitchen sink from draining properly. You can fix many issues yourself with simple tools and steps.
Fixing Leaks
Check under the sink for wet spots or drips. Leaks often come from loose connections or worn-out seals. Tighten all nuts and fittings carefully. Use plumber’s tape on threaded joints to stop leaks.
Inspect the disposal and dishwasher hoses. Cracks or holes cause water to leak. Replace damaged hoses quickly. Make sure all hose clamps are secure and tight.
Look at the sink drain and trap. Replace old or cracked washers and gaskets. Use a wrench to tighten the slip nuts but avoid over-tightening, which can cause damage.
Clearing Blockages
Slow draining water signals a blockage. Use a plunger to clear minor clogs in the sink drain. For tougher clogs, a drain snake helps reach and remove debris.
Run water while the disposal is on to flush out food scraps. Never put fibrous or hard items down the disposal. They cause jams and blockages.
Dishwasher blockages often happen in the drain hose or air gap. Detach the hose and check for clogs. Clean any buildup or debris carefully before reconnecting.
Frequently Asked Questions
How Do I Connect A Dishwasher To A Kitchen Sink Drain?
To connect a dishwasher, use a dishwasher drain hose. Attach it to the dishwasher inlet on the disposal or sink drain. Secure with a clamp to prevent leaks. This allows wastewater from the dishwasher to flow properly into the sink’s drainage system.
What Is The Best Way To Install A Garbage Disposal?
Turn off the power before installation. Attach the disposal to the sink flange using a mounting ring. Connect the disposal’s drain outlet to the sink drain pipe. Ensure all connections are tight to prevent leaks. Follow manufacturer instructions for safe and proper installation.
Can I Use The Same Drain Line For Disposal And Dishwasher?
Yes, both can share the same drain line. Connect the dishwasher drain hose to the disposal’s dishwasher inlet. This setup allows waste from both appliances to flow through one drain line efficiently without clogging.
How Do I Prevent Leaks When Plumbing A Kitchen Sink?
Use plumber’s putty or silicone sealant on sink flanges. Tighten all connections properly but avoid over-tightening. Check for leaks by running water after installation. Replace worn-out washers and use hose clamps on flexible hoses for a secure fit.
Conclusion
Plumbing a kitchen sink with a disposal and dishwasher can seem tough. Follow each step carefully and take your time. Use the right tools and check all connections for leaks. A well-plumbed sink helps your kitchen work smoothly every day.
Remember, safety matters—turn off water and power before starting. With patience, you can do this job yourself. Keep your kitchen clean and running without trouble. Simple steps lead to great results.