
Are your kitchen cabinets looking worn out and peeling? You don’t have to replace them to give your kitchen a fresh, new look.
Repainting your cabinets is a cost-effective way to transform your space and make it feel brand new. But if you rush into it without the right steps, you might end up with more peeling and frustration. In this guide, you’ll discover simple, clear steps to repaint your peeling kitchen cabinets like a pro.
By following these tips, you’ll save time, avoid common mistakes, and achieve a smooth, lasting finish that will make your kitchen shine. Ready to get started? Let’s dive in!
Credit: www.hometalk.com
Assessing Cabinet Condition
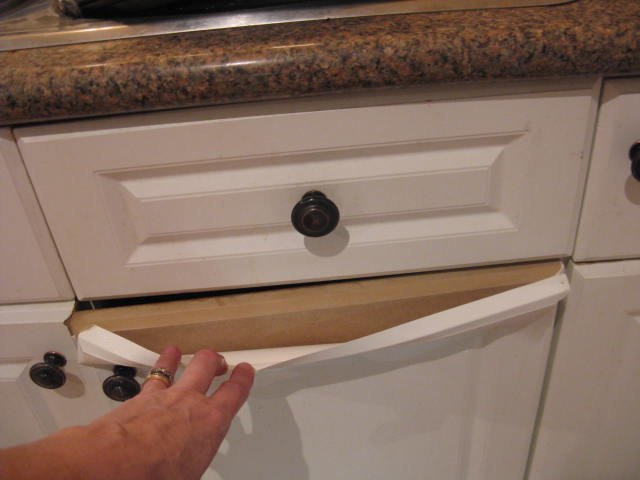
Before repainting peeling kitchen cabinets, check their condition carefully. This step helps you know the work needed. It saves time and prevents problems later. You will see if repairs or cleaning are required. A good start leads to a smooth painting job and lasting results.
Look closely at all cabinet surfaces. Small cracks or bubbles can grow bigger. Check inside and outside of doors and drawers. Take notes about the damage and areas needing extra care.
Identify Peeling Areas
Find all spots where paint is peeling or flaking. Use your fingers to gently scrape loose paint. Mark these places with tape or a pencil. Peeling paint shows weak spots that need scraping and sanding. This step ensures new paint sticks well and looks smooth.
Check For Moisture Damage
Look for signs of water damage like swelling, dark spots, or soft wood. Moisture can cause paint to peel and wood to rot. Open cabinets to check inside shelves and corners. Fix leaks or dry wet areas before painting. Dry surfaces help paint last longer.
Evaluate Surface Prep Needs
Check if cabinets need cleaning or sanding. Remove grease, dirt, and old paint dust. Sand rough or shiny spots to make surfaces smooth. Proper surface prep helps paint stick and look even. Skipping this step can cause peeling again.
Gathering Supplies
Before repainting peeling kitchen cabinets, gather all necessary supplies. This step saves time and helps avoid interruptions during work. Having the right materials ready makes the project smoother and more efficient.
Essential Tools
Start with basic tools like sandpaper and a scraper. Sandpaper helps smooth rough cabinet surfaces. A scraper removes old, peeling paint. Use a clean cloth to wipe dust and dirt. You will also need brushes or rollers for applying paint. Painter’s tape protects areas you don’t want to paint. A drop cloth keeps floors clean from paint spills.
Choosing The Right Paint
Select a paint designed for kitchen cabinets. Look for durable, washable formulas. Semi-gloss or satin finishes work well. They resist stains and are easy to clean. Choose a paint that sticks well to wood and laminate. This prevents peeling and chipping after repainting.
Safety Equipment
Protect yourself while working. Use gloves to keep paint off your skin. Wear a mask to avoid inhaling dust and fumes. Safety goggles protect your eyes from splashes. Good ventilation helps reduce harmful paint fumes. Open windows or use fans to keep air moving.
Preparing Cabinets For Painting
Preparing your kitchen cabinets for painting is a vital step to ensure a smooth, lasting finish. Peeling paint must be properly addressed before applying new paint. This process requires removing hardware, cleaning surfaces, and sanding old paint.
Removing Hardware
Start by taking off all cabinet doors, drawers, and hardware. Remove handles, knobs, and hinges carefully. This step makes it easier to paint every surface evenly. Use a screwdriver to avoid damage. Label the hardware to keep track of each piece.
Cleaning Surfaces
Clean all cabinet surfaces thoroughly. Use warm water mixed with mild soap. Wipe down with a soft cloth to remove grease and dirt. Rinse with clean water and let dry completely. Clean surfaces help paint stick better and last longer.
Sanding Peeling Paint
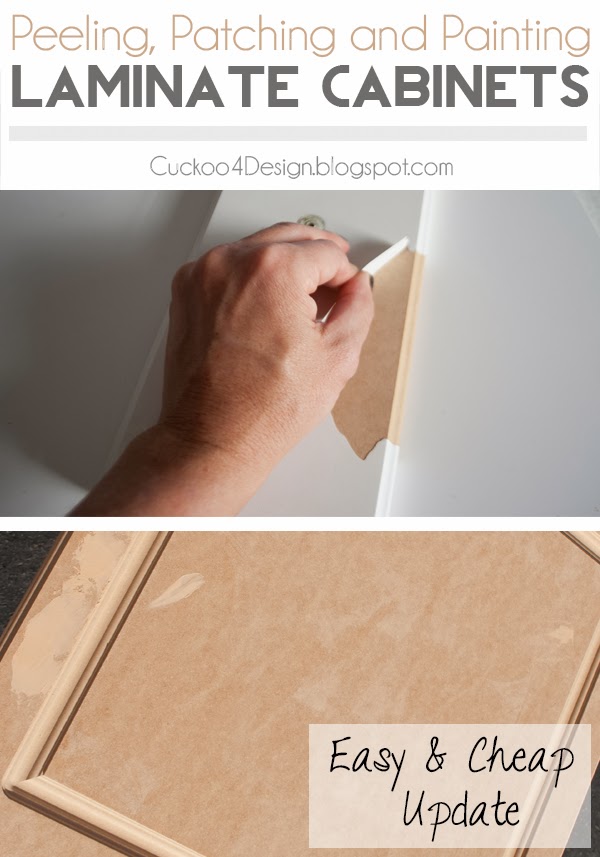
Sand the peeling paint areas gently using medium-grit sandpaper. Smooth rough edges and remove loose paint flakes. Sand entire cabinet surfaces lightly to create a better grip for paint. Wipe away dust with a damp cloth before painting. Proper sanding prevents peeling and ensures a smooth finish.
Credit: cuckoo4design.com
Fixing Surface Imperfections
Fixing surface imperfections is a key step before repainting peeling kitchen cabinets. This process ensures a smooth and even finish. It helps the new paint stick better and last longer. Skipping this step can cause the paint to peel again quickly. Take time to repair all cracks, holes, and rough spots. This improves the cabinet’s look and durability.
Filling Cracks And Holes
Start by filling all cracks and holes with wood filler or putty. Use a small putty knife to press the filler into gaps. Smooth the surface as much as possible. Let the filler dry completely before moving on. Drying time depends on the product but usually takes a few hours.
Smoothing With Sandpaper
Once the filler is dry, sand the surface with fine-grit sandpaper. Sanding removes bumps and rough edges. It creates a smooth base for the paint. Use gentle, even strokes to avoid damaging the cabinet. Wipe away dust with a damp cloth before the next step.
Priming For Better Adhesion
Apply a good primer to all repaired areas. Primer helps paint stick well and last longer. It also blocks stains and old paint colors from showing through. Use a brush or roller to spread primer evenly. Let it dry fully before painting your cabinets.
Painting Cabinets
Painting kitchen cabinets can bring new life to your space. It covers peeling paint and refreshes the look. The right approach helps the paint last longer. Preparation and technique matter a lot. This section guides you through painting cabinets step by step.
Selecting Painting Technique
Choose between brushing, rolling, or spraying. Brushing works well for small areas and corners. Rollers cover flat surfaces quickly and smoothly. Spraying gives the smoothest finish but needs more prep. Pick a technique based on your skill and tools.
Applying Paint Coats
Start with a thin, even coat of paint. Thick coats cause drips and uneven texture. Use light, steady strokes for brushing or rolling. For spraying, keep the nozzle moving to avoid buildup. Apply at least two coats for good coverage.
Allowing Proper Drying Time
Let each coat dry fully before adding the next. Drying time depends on paint type and room temperature. Usually, wait 2 to 4 hours between coats. Rushing causes smudges and peeling later. Patience ensures a strong, smooth finish.
Credit: www.reddit.com
Finishing Touches
Finishing touches are key to completing your kitchen cabinet makeover. These final steps ensure your cabinets look neat and last longer. Taking time here adds value to your hard work.
Reattaching Hardware
Start by putting back all handles and knobs. Use a screwdriver to secure them tightly. Check each piece for damage before attaching. Replace any broken hardware for a fresh look.
Cleaning Up Workspace
Clear your area of dust and paint spots. Use a damp cloth to wipe surfaces clean. Dispose of used tape and paper properly. A clean space helps prevent dirt from sticking to wet paint.
Maintaining Fresh Cabinets
Keep cabinets clean by wiping them weekly. Use mild soap and water for easy cleaning. Avoid harsh chemicals that can peel paint again. Regular care keeps your cabinets looking new longer.
Frequently Asked Questions
How Do I Prepare Peeling Cabinets For Repainting?
Start by cleaning the cabinet surface thoroughly. Remove grease and dirt with a degreaser. Sand peeling areas to smooth edges. Fill cracks or holes with wood filler. Wipe dust off before priming. Proper prep ensures a long-lasting paint job.
What Type Of Paint Works Best For Kitchen Cabinets?
Use durable, water-based acrylic or enamel paint. These paints resist moisture, stains, and wear. Satin or semi-gloss finishes provide an easy-to-clean surface. Avoid flat paints as they chip easily. Proper paint choice improves appearance and longevity.
Can I Repaint Cabinets Without Sanding?
Light sanding or deglossing is essential. It helps paint adhere properly and prevents peeling. Skip sanding only if cabinets have a smooth, glossy finish and you use a bonding primer. Sanding ensures a smooth, durable finish.
How Long Does It Take To Repaint Kitchen Cabinets?
Repainting typically takes 2 to 4 days. Time varies by cabinet size and drying times. Allow primer and paint to dry fully between coats. Patience ensures a smooth, professional-looking finish.
Conclusion
Peeling kitchen cabinets can look old and worn out. A fresh coat of paint brings new life to your space. Proper prep work helps the paint stick better and last longer. Choose paint made for kitchen use to resist moisture and stains.
Take your time with each step for best results. Your kitchen will feel cleaner and brighter afterward. A little effort can make a big difference in your home. Try it yourself and enjoy the fresh, updated look.