
If you’ve ever struggled with a shower valve that’s hard to control or just doesn’t look right, you’re not alone. The Old Style Old Moen Shower Valve has a reputation that stands the test of time.
But why do so many homeowners still trust it? Whether you’re fixing an old bathroom or looking to upgrade without losing that classic feel, understanding this valve can save you time, money, and frustration. Keep reading to discover what makes the Old Style Old Moen Shower Valve a smart choice for your shower—and how it can improve your daily routine.
Identifying Old Style Moen Valves
Old Style Moen shower valves have a classic design that many homeowners still use. Knowing how to identify these valves helps with repairs and replacements. These valves have unique features that set them apart from newer models. Recognizing these traits saves time and ensures you get the right parts.
Common Models And Features
Old Style Moen valves often have brass or metal bodies. They usually feature a single handle for both hot and cold water. Some models use a cartridge system inside to control water flow. The valve trim is simple, with fewer decorative parts than modern versions. Most have a round or oval handle shape. They might also show the Moen logo or have a stamped model number.
Signs Your Valve Needs Repair
Leaks around the handle or valve area are common signs of wear. Difficulty turning the handle or uneven water temperature means trouble. Low water pressure can also indicate valve issues. Rust or corrosion on visible parts suggests the valve may fail soon. Strange noises or dripping sounds during use are warning signs. Catch these signs early to avoid bigger plumbing problems.

Credit: www.reddit.com
Tools And Materials Needed
Preparing to repair an Old Style Old Moen shower valve requires some basic tools and parts. Having the right materials ready makes the job easier and faster. This list covers the essentials for a smooth repair process.
Essential Repair Tools
- Adjustable wrench – for loosening and tightening nuts
- Screwdrivers (flathead and Phillips) – to remove screws
- Allen wrench set – needed for set screws on the valve
- Plumber’s grease – to lubricate parts and prevent leaks
- Needle-nose pliers – to grab small parts
- Teflon tape – to seal threaded connections
- Utility knife – for cutting old seals or caulk
- Bucket or towel – to catch water drips
Recommended Replacement Parts
- Moen cartridge – the main valve part that controls water flow
- O-rings and washers – to replace worn seals and stop leaks
- Valve seat – if the valve has corrosion or damage
- Handle kit – for worn or broken handles
- Retainer clips – to secure the cartridge inside the valve
Step-by-step Repair Process
Repairing an old style Moen shower valve can seem tough. Follow these simple steps to fix it safely and correctly. This guide helps you understand each part of the process. Take your time and work carefully.
Shutting Off Water Supply
First, turn off the water supply to the shower. Locate the main water valve or the shower’s local shutoff valve. Turn it clockwise to stop the water flow. Check if the water is off by turning the shower handle. No water means you are ready to proceed.
Removing The Valve Handle
Next, remove the shower valve handle. Look for a small screw on the handle. Use a screwdriver to remove this screw. Gently pull the handle away from the wall. Be careful not to break or damage it during removal.
Inspecting The Cartridge
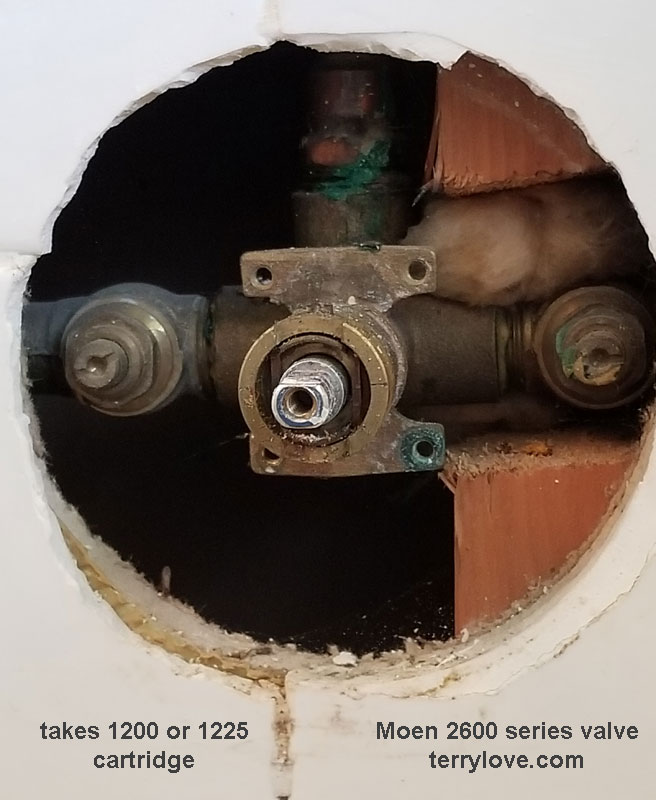
Behind the handle, you will see the cartridge. Check the cartridge for signs of damage or wear. Look for cracks, mineral build-up, or broken parts. A damaged cartridge often causes leaks or poor water flow. Decide if you need to clean or replace it.
Replacing The Cartridge
To replace, pull the old cartridge straight out. Use pliers if it is stuck, but be gentle. Insert the new cartridge in the same position. Make sure it fits firmly and aligns with the valve body. This step is key to stopping leaks and restoring function.
Reassembling The Valve
Finally, put the valve handle back on. Secure the handle with the screw you removed earlier. Tighten the screw but avoid over-tightening. Turn the water supply back on slowly. Test the shower to ensure it works well and no leaks appear.
Credit: terrylove.com
Troubleshooting Common Issues
Troubleshooting common issues with the Old Style Old Moen shower valve helps maintain a smooth shower experience. These valves are reliable but may face problems over time. Simple fixes can restore proper function quickly. Understanding the symptoms is the first step to solving problems.
Leaking Valve Solutions
A leaking valve wastes water and raises bills. Start by turning off the water supply. Remove the valve handle carefully. Check the cartridge for damage or buildup. Clean or replace the cartridge if needed. Use plumber’s grease on seals to prevent leaks. Tighten all parts securely without overdoing it. Test the valve after reassembly to ensure no leaks remain.
Low Water Pressure Fixes
Low water pressure reduces shower comfort. First, check if the showerhead is clogged. Soak it in vinegar to remove mineral deposits. Inspect the valve cartridge for blockages. Clean or replace the cartridge if necessary. Ensure the water supply valves are fully open. Sometimes, pipes may have buildup reducing flow. Consult a professional for pipe cleaning if simple fixes fail.
Temperature Control Problems
Inconsistent water temperature can cause discomfort. The valve cartridge often causes this issue. Remove and inspect the cartridge for wear or mineral deposits. Replace it if it looks worn out. Check the mixing valve for proper function. Adjust the temperature limit stop if water gets too hot. Regular maintenance keeps temperature control steady and safe.
Upgrading Your Old Moen Valve
Upgrading your old Moen shower valve can improve your bathroom’s function and safety. Old valves might leak or fail to control water temperature well. New valves offer better performance and save water. It is easier than many think to replace the valve and enjoy modern benefits.
Choosing the right upgrade depends on your current valve type and bathroom needs. Some newer models fit directly into old plumbing, reducing hassle. A careful upgrade gives you better control over water flow and temperature. It also helps avoid costly repairs later on.
Benefits Of Modern Valve Upgrades
Modern valves improve water temperature control. They reduce sudden changes in water heat. This protects you from scalding or cold water shocks. New valves often use less water, saving money on utility bills. Many designs also last longer and need less maintenance. Comfort and safety both get better with an upgrade.
Compatible Upgrade Options
Moen offers several upgrade valves that fit older systems. Cartridge-style valves often replace old ones without changing pipes. Pressure-balancing valves help keep water temperature steady. Thermostatic valves add precise control and prevent temperature swings. Check your old valve model to find matching upgrades. Some options require minor plumbing work but offer better results.
Installation Tips For New Valves
Turn off the main water supply before starting. Remove the old valve carefully to avoid pipe damage. Use a wrench to loosen fittings but avoid forcing them. Clean the pipe threads to ensure a tight seal. Apply plumber’s tape before attaching the new valve. Test the valve for leaks and proper function after installation. Seek professional help if unsure about any step.

Credit: www.reddit.com
Maintenance Tips For Longevity
Keeping your Old Style Old Moen Shower Valve in good shape helps it work longer. Regular care prevents problems and saves money. Follow simple steps to keep the valve clean and running smoothly.
Routine Cleaning Practices
Turn off the water before cleaning the valve. Use a soft cloth to wipe away dirt and soap residue. Avoid harsh chemicals that damage the valve’s finish. Clean the valve face and handles gently. Check for mineral buildup and remove it using a vinegar solution. Rinse well and dry with a soft towel. Clean the valve every few weeks to maintain its look and function.
Preventing Future Valve Issues
Check for leaks around the valve regularly. Tighten loose parts carefully to avoid damage. Replace worn-out washers and seals on time. Avoid forcing the handles to prevent breakage. Flush the valve by running water through it occasionally. This removes trapped debris inside. Schedule professional inspections for deep maintenance every year. Simple care steps reduce valve problems and extend its life.
Frequently Asked Questions
What Is An Old Style Moen Shower Valve?
An old style Moen shower valve controls water flow and temperature. It is known for its simple, durable design. Many homes still use this reliable valve model.
How Do I Identify My Old Moen Shower Valve Model?
Look for a model number on the valve or trim plate. You can also check Moen’s website with photos. This helps you find the right replacement parts or guides.
Can Old Moen Shower Valves Be Repaired Easily?
Yes, many old Moen valves can be fixed by replacing worn parts. Common fixes include changing cartridges or washers. Repair kits are available online or at hardware stores.
Why Is My Old Moen Shower Valve Leaking?
Leaks often happen due to worn seals or cartridges inside the valve. Mineral buildup can also cause drips or leaks. Replacing these parts usually stops the leak quickly.
Are Old Moen Shower Valves Compatible With New Parts?
Some parts fit both old and new Moen valves, but not all. Check the model number and part compatibility before buying. Moen offers guides to help match parts correctly.
How Do I Maintain My Old Moen Shower Valve?
Regular cleaning prevents buildup and keeps the valve working well. Avoid harsh chemicals that can damage parts. Lubricating moving parts helps the valve last longer.
Should I Replace Or Repair My Old Moen Shower Valve?
Repair if the valve works but has minor issues like leaks. Replace if the valve is very old or parts are unavailable. A new valve can improve shower performance and water efficiency.
Conclusion
Old style Moen shower valves offer reliable and simple control. They last long and fit many bathroom designs. Easy to fix and maintain, they save time and money. Choosing one means trusting a well-known brand with a good track record.
These valves keep your shower experience smooth and comfortable. A smart choice for those who value quality and ease. Simple, strong, and dependable—just what you need in a shower valve.