
Are you dreaming of a sleek, modern curbless shower but worried about the hassle of cutting joists? You’re not alone.
Many homeowners want that smooth, open look without the headache of major structural changes. The good news? You can build a curbless shower without cutting into your joists, saving time, money, and stress. In this guide, you’ll discover simple, practical steps to make your bathroom safer, stylish, and more accessible—all without complicated construction.
Keep reading to learn how to transform your shower space with ease and confidence.
Choosing The Right Location
Choosing the right location is key to building a curbless shower without cutting joists. The right spot makes the project easier and safer. It helps you avoid damage to the floor structure. It also keeps your bathroom strong and durable. Take time to study your space before starting.
Assessing Floor Structure
Check the floor layout under your bathroom. Find the joists and note their direction. Joists support the floor and hold weight. Avoid cutting or weakening them. Use a stud finder to locate joists precisely. Mark their position on the floor. Measure the distance between joists. This helps pick a spot that fits your shower base.
Look for areas with enough space between joists. Wide gaps make it easier to install a curbless shower pan. Avoid spots with plumbing or electrical wiring below. This prevents costly repairs later. A strong floor means a safe shower area.
Selecting A Suitable Spot
Pick a place near existing plumbing lines. This lowers installation costs and work. Choose a flat or slightly sloped floor area. It allows water to drain without extra work. Avoid corners with low headroom or tight spaces. A spacious spot makes cleaning and moving easier.
Consider bathroom layout and use. The shower should fit well with other fixtures. Pick a location that feels natural to enter and exit. Also, think about lighting and ventilation. A well-lit, dry space improves comfort and safety.
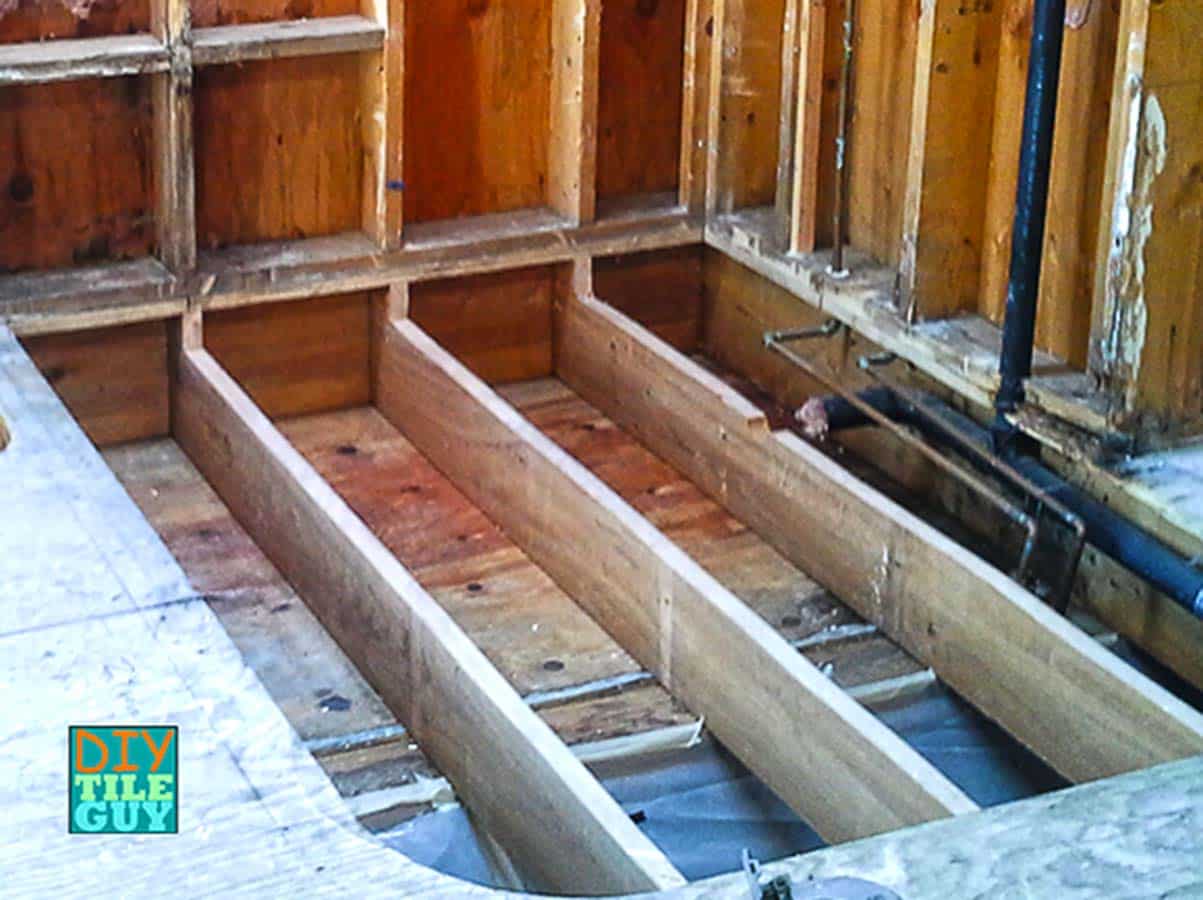
Credit: www.diytileguy.com
Materials And Tools Needed
Building a curbless shower without cutting joists requires specific materials and tools. These help create a safe, waterproof, and sturdy shower base. Choosing the right supplies makes the process easier and ensures long-lasting results.
Waterproofing Supplies
Waterproofing prevents water damage and mold growth. Use a waterproof membrane or liquid waterproofing product. Also, get waterproof tape for seams and corners. Make sure the materials are suitable for wet areas. Proper waterproofing is key to a durable shower.
Drain Systems
Select a linear or point drain designed for curbless showers. These drains fit flush with the floor for smooth water flow. Use a drain with a proper slope to avoid pooling water. Secure the drain firmly to the plumbing system. A good drain system keeps the shower dry and safe.
Framing And Support Tools
Strong framing supports the shower floor without joist cutting. Use metal or wood framing materials rated for bathrooms. Have a level, measuring tape, and saw for precise cuts. A drill and screws will help assemble the frame. Proper tools make the framing process fast and accurate.
Preparing The Shower Base
Preparing the shower base is the first step in building a curbless shower. A strong, level base ensures proper drainage and prevents water damage. It also supports the shower floor and helps avoid costly repairs later. The goal is to create a stable, sloped surface that directs water toward the drain without cutting joists.
Installing A Pre-sloped Shower Pan
A pre-sloped shower pan offers a ready-made slope for water drainage. These pans come with built-in angles that guide water to the drain quickly. They reduce the need for complex carpentry or joist cutting. Install the pan directly on the subfloor, ensuring it fits snugly between joists. Seal all edges to prevent leaks and keep the base waterproof.
Using Adjustable Shower Bases
Adjustable shower bases allow fine-tuning the slope without altering joists. These bases have height-adjustable legs or supports. You can level the base and set the right angle for drainage. They work well on uneven floors and save time on site preparation. Secure the base firmly and check the slope with a level to ensure proper water flow.
Creating The Drainage System
Creating the drainage system is a key step in building a curbless shower. Proper drainage keeps water flowing away quickly. This prevents water damage and mold growth. The challenge is to build a good system without cutting the joists.
Careful planning helps place the drain in the right spot. Using the right type of drain adds flexibility. These choices make the process easier and protect your floor structure.
Positioning The Drain Without Joist Cuts
Joists support the floor, so cutting them weakens the structure. Place the drain between joists to avoid cutting. Measure the space carefully before installation. Use a drain model that fits in the available space. This keeps the floor strong and safe.
Consider moving the drain location slightly to fit between joists. Small adjustments save time and effort. Check the slope of the shower floor. It must direct water toward the drain without extra cuts.
Using Linear Drains For Flexibility
Linear drains run along one edge of the shower floor. They need less space and fewer cuts. This design fits well in tight spaces between joists. Linear drains make the floor slope simpler and more even.
These drains come in many sizes and styles. Choose one that matches your shower size. They improve water flow and reduce standing water. Linear drains also give a modern, clean look to the shower.
Waterproofing Techniques
Waterproofing is a key step in building a curbless shower. It protects your floor and walls from water damage. Proper waterproofing keeps moisture out and prevents leaks. This section covers two main techniques: applying waterproof membranes and sealing joints and corners. Follow these steps carefully to ensure a strong water barrier.
Applying Waterproof Membranes
Waterproof membranes create a protective layer on shower surfaces. Use a flexible, durable membrane designed for wet areas. Clean the floor and walls before application. Cut the membrane to fit the shower area. Apply it smoothly, avoiding bubbles and wrinkles. Overlap edges to ensure full coverage. Press the membrane firmly into place for a tight seal. Allow it to dry completely before the next step.
Sealing Joints And Corners
Joints and corners are weak spots for water leaks. Use waterproof tape or fabric to reinforce these areas. Apply a waterproof sealant along edges and seams. Smooth the sealant to fill gaps and cracks. Check that all corners have continuous coverage. Let the sealant cure according to the manufacturer’s instructions. Proper sealing prevents water from seeping into the structure.
Credit: plankandpillow.com
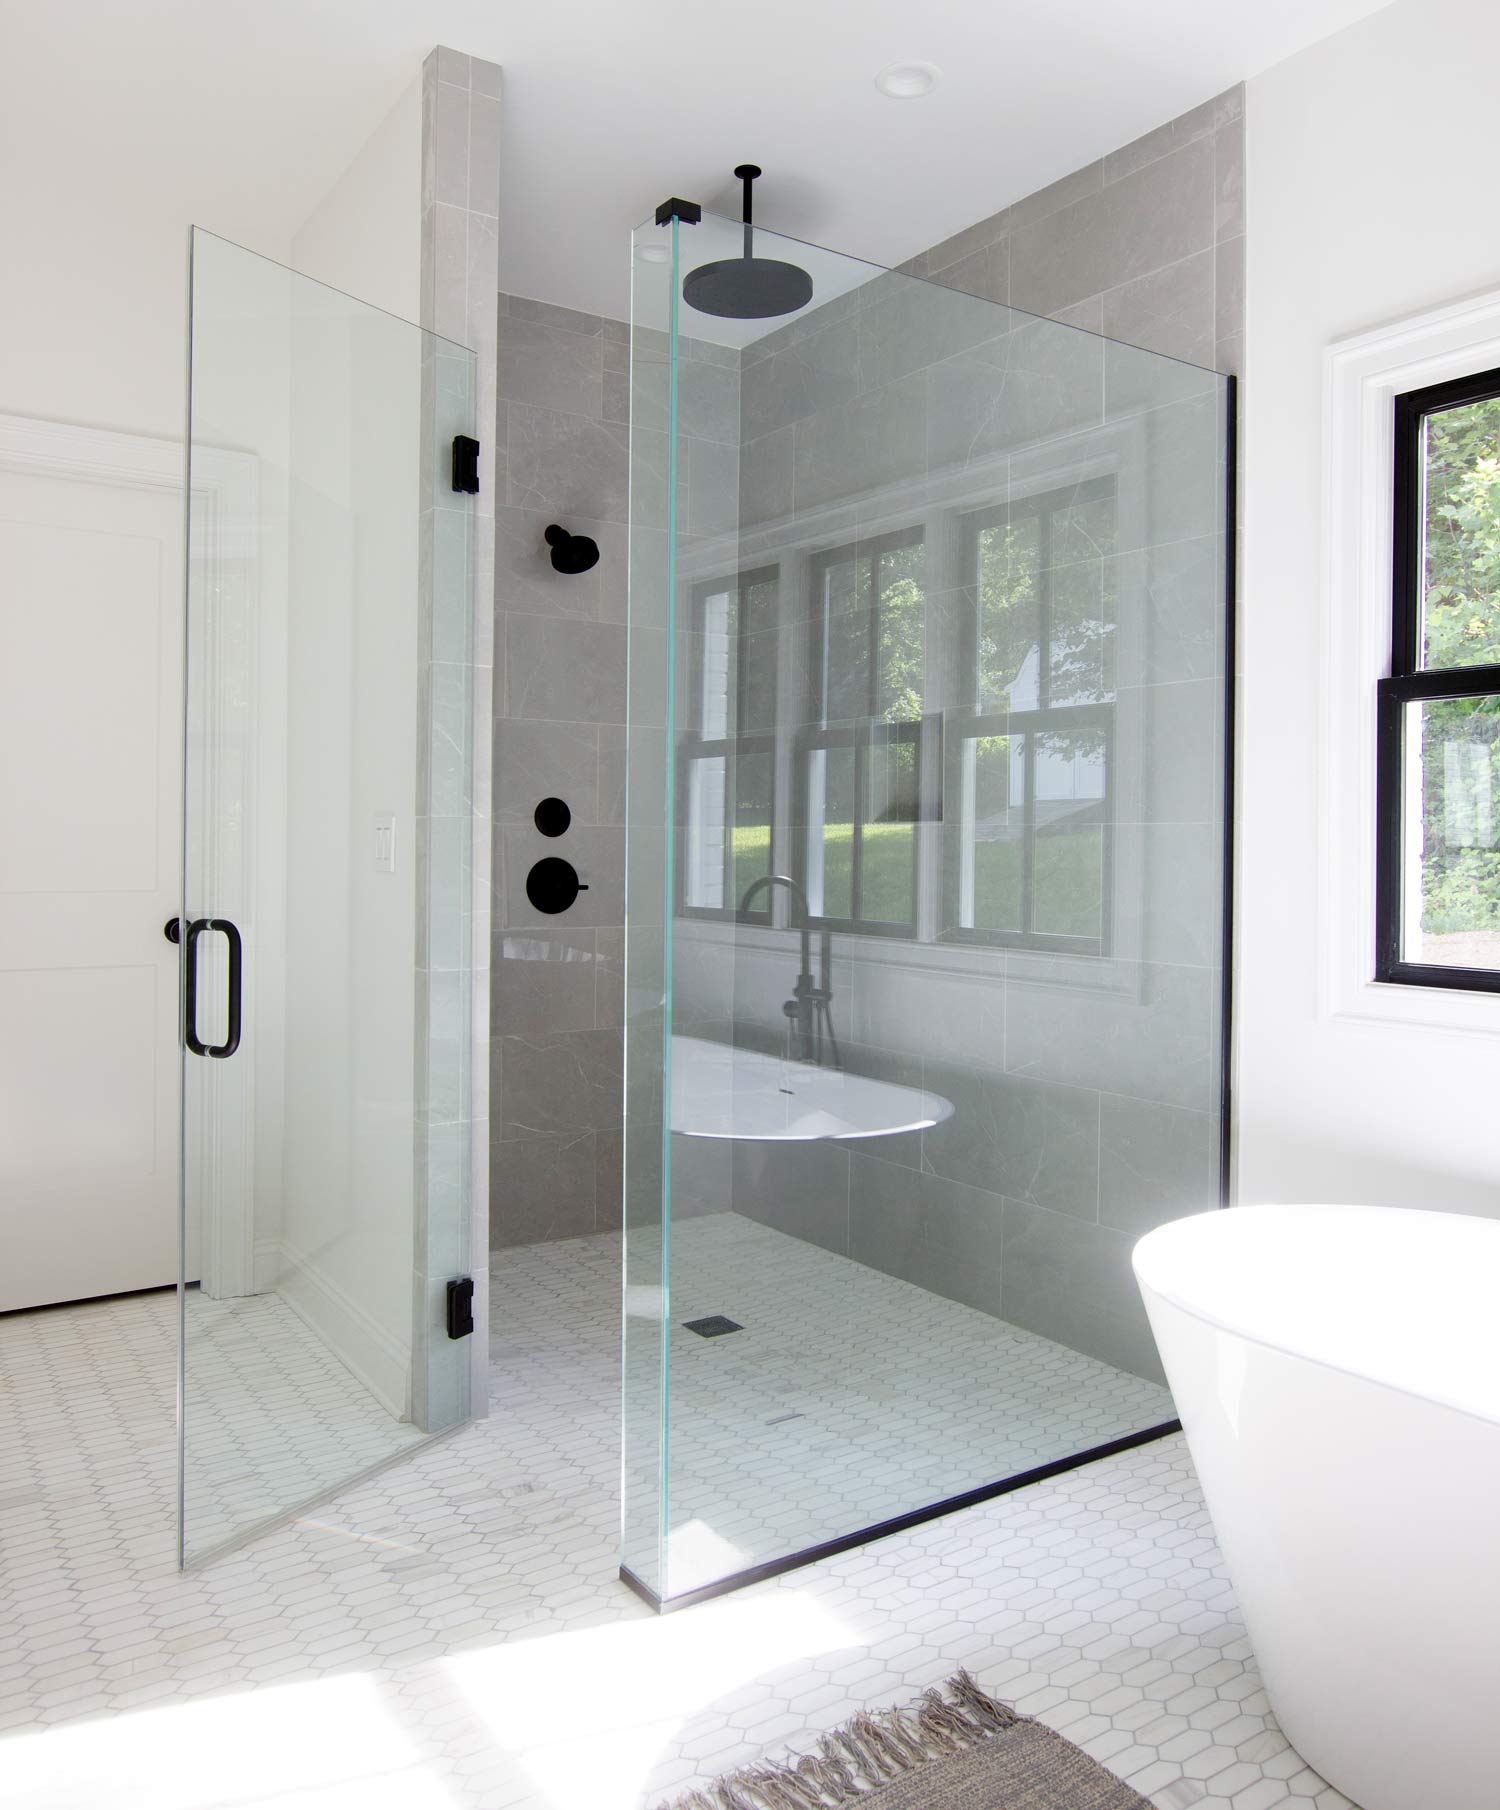
Building The Curbless Entry
Building a curbless entry creates a smooth path into the shower. It removes the need for a step or raised edge. This style improves bathroom accessibility and gives a modern look. Careful planning ensures the floor slopes properly to avoid water pooling. The process focuses on a seamless transition from the bathroom floor to the shower base.
Let’s explore how to build the curbless entry without cutting joists. This method keeps the floor structure strong and stable.
Leveling The Floor Transition
Start by checking the floor height where the shower will be. Use a level tool to find uneven spots. Add a layer of mortar or self-leveling compound to create a flat surface. The floor must slope gently toward the drain, about 1/4 inch per foot. This slope guides water away efficiently. Avoid sharp drops or bumps that can cause tripping or water buildup.
Ensuring Slip Resistance
Safety is key at the shower entry. Choose materials with textured or matte finishes to prevent slipping. Non-slip tiles or specialized coatings work well. Test the surface by wetting it to check grip. Adding small, slip-resistant strips can increase traction. Proper drainage also helps keep the area dry and safer to walk on.
Tiling And Finishing Touches
Tiling and finishing touches make your curbless shower look complete and stylish. These steps protect your shower area from water damage. They also add a smooth and clean surface that feels good underfoot. Careful tile selection and proper sealing ensure your shower stays beautiful for years.
Choosing Suitable Tiles
Select tiles that resist water and slipping. Porcelain and ceramic tiles work well for showers. Choose smaller tiles or textured ones for better grip. Pick colors and patterns that match your bathroom style. Make sure the tiles are rated for floor use. Avoid glossy tiles that get slippery when wet.
Grouting And Sealing
Use water-resistant grout to fill gaps between tiles. It stops water from seeping through and causing damage. Apply grout evenly and clean off extra quickly. Seal the grout after it dries to block moisture. Use a grout sealer every year for lasting protection. Seal the edges where tiles meet walls or floors to prevent leaks.

Credit: plankandpillow.com
Maintenance Tips
Maintaining a curbless shower without cutting joists is simple with regular care. Proper maintenance keeps your shower safe and clean. It also helps avoid costly repairs. Focus on key areas like drains and waterproofing layers.
Cleaning Drains Regularly
Drains collect hair, soap, and dirt. These can cause blockages and slow water flow. Clean your shower drain at least once a month. Remove the drain cover carefully. Use a small brush or a drain snake to clear debris. Flush the drain with hot water to remove buildup. Clear drains prevent water pooling and bad smells.
Inspecting Waterproofing Layers
Waterproofing protects your floor and walls from moisture damage. Check the waterproofing layer every six months. Look for cracks, bubbles, or peeling. Any damage can let water seep into the structure. Fix small issues immediately with waterproof sealant. For big problems, call a professional. Keeping waterproofing intact stops mold and wood rot.
Frequently Asked Questions
What Is A Curbless Shower And Why Build One?
A curbless shower has no raised edge or step. It creates a smooth floor, making the bathroom look modern and easy to clean.
How To Build A Curbless Shower Without Cutting Joists?
Use a shallow drain system designed for low floor height. Build a strong, waterproof base that slopes gently to the drain.
What Materials Work Best For Curbless Shower Floors?
Waterproof membranes and slip-resistant tiles are ideal. These materials protect the floor and keep it safe when wet.
Can I Avoid Floor Joist Cutting By Raising The Subfloor?
Yes, raising the subfloor slightly can help. This method gives room for proper drainage without cutting joists.
How To Ensure Proper Drainage In A Curbless Shower?
Create a gentle slope toward the drain, about 1/4 inch per foot. This prevents water from pooling on the floor.
Is Professional Help Needed For Curbless Shower Installation?
Consulting a professional is smart for complex layouts. Basic projects can be DIY with good planning and the right tools.
What Are Common Mistakes To Avoid When Building Curbless Showers?
Avoid poor waterproofing and incorrect slope angles. These cause leaks and water damage over time.
Conclusion
Building a curbless shower without cutting joists is possible. It saves time and protects your home’s structure. Using the right materials and techniques makes the process easier. Planning well helps avoid mistakes and extra costs. This method keeps your bathroom modern and accessible.
You can enjoy a sleek, open shower space. Start with simple steps and follow safety tips. Your bathroom will look fresh and clean without major work. Take your time and do it right. The result will be worth the effort.