
If you’re planning a bathroom remodel or building a new shower, knowing how to rough in your shower drain is key. Getting this step right saves you time, money, and headaches down the road.
You might think it’s complicated, but with the right guidance, you can handle it like a pro. You’ll discover simple, clear steps to rough in your shower drain perfectly. Keep reading to learn how to set up your drain so everything flows smoothly and your shower stays leak-free for years to come.
Choosing The Right Drain Type
Choosing the right drain type for your shower is important for proper water flow and bathroom design. The drain affects how water drains and how easy it is to clean. It also impacts the overall look of the shower area. Understanding the differences between drain types helps you make a smart choice that fits your needs.
Standard Vs Linear Drains
Standard drains are round or square and sit in the center of the shower floor. They are common and fit most shower designs well. Water flows toward the middle where the drain is located.
Linear drains are long and narrow, usually placed along one edge of the shower. They allow water to flow in one direction. Linear drains help create a modern, sleek look and can make shower floors easier to slope for drainage.
Material Options
Drain materials affect durability and appearance. Stainless steel is strong, rust-resistant, and easy to clean. It fits modern and traditional styles.
Plastic drains are affordable and lightweight but may not last as long. Brass drains resist corrosion and look elegant but cost more. Choose a material that matches your bathroom style and budget.
Drain Size Considerations
The drain size impacts how well water drains from the shower. Larger drains handle more water but need more floor space. Smaller drains save space but may clog more easily.
Check local building codes for minimum drain size requirements. Match the drain size to your shower’s water flow and usage to avoid water pooling.

Credit: www.lowes.com
Planning The Drain Location
Planning the drain location is a key step in shower installation. The right spot ensures water flows well and avoids leaks. Careful planning saves time and money later. Let’s explore how to choose the best place for your shower drain.
Ideal Placement In Shower Base
Place the drain at the lowest point of the shower base. This helps water flow directly to the drain. Center placement works for most showers. It allows water to drain evenly from all sides. In corner showers, place the drain near the corner but still low. Avoid placing it too close to the shower walls. This can cause water pooling and slow drainage.
Slope Requirements For Proper Drainage
The shower floor must slope toward the drain. A slope of about 1/4 inch per foot is ideal. This gentle slope guides water without causing tripping hazards. Make sure the slope is consistent across the entire shower base. Uneven slopes lead to water pooling and damage over time. Use a level tool to check the slope during installation.
Avoiding Common Placement Mistakes
Don’t place the drain where water may get trapped. Avoid spots behind fixtures or near doors. These areas can block water flow. Never set the drain too high above the shower floor. This causes slow drainage and standing water. Also, avoid placing the drain too close to the shower edge. Water might spill outside the shower area. Proper placement prevents costly repairs and keeps your shower dry.
Preparing The Plumbing Rough-in
Preparing the plumbing rough-in is a key step for a successful shower drain installation. This phase sets the foundation for proper water flow and drainage. Getting it right helps avoid leaks and drainage problems later.
Start by planning the drain location carefully. The pipes need to fit within the walls and floor without conflict. Proper venting must also be considered to prevent sewer gases from entering the bathroom.
Measuring And Marking Drain Position
Measure the shower base carefully. Mark the exact spot for the drain on the subfloor. Double-check these marks to avoid mistakes.
Make sure the drain is centered or aligned with the shower drain hole. Accurate marking saves time during pipe installation.
Cutting And Fitting Drain Pipes
Use the correct pipe cutter for clean cuts. Cut pipes to fit the marked drain position. Avoid rough or uneven edges.
Fit the pipes tightly together. Use primer and cement for PVC pipes to secure joints. Proper fitting prevents leaks and water damage.
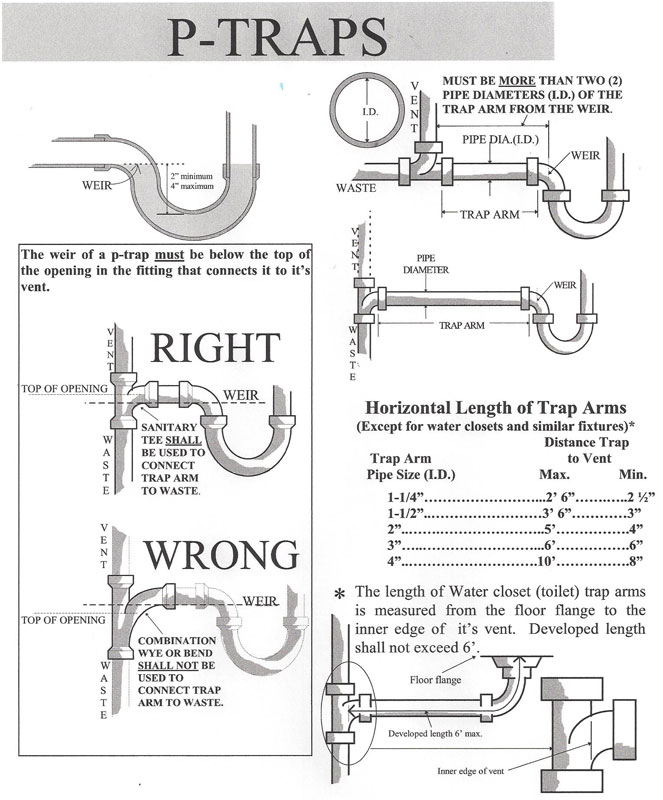
Ensuring Proper Pipe Venting
Install vent pipes to allow air flow in the drainage system. Proper venting stops water traps from drying out.
Check local plumbing codes for vent pipe height and placement. Correct venting reduces odor and improves drainage speed.

Credit: diy.stackexchange.com
Installing The Drain Assembly
Installing the shower drain assembly is a key step in the rough-in process. It ensures water flows smoothly and prevents leaks. This step requires careful attention to detail and proper fitting of all parts. A well-installed drain assembly provides a strong foundation for your shower’s plumbing.
Sealing Techniques To Prevent Leaks
Use plumber’s putty or silicone sealant around the drain flange. Press it firmly to create a tight seal with the shower base. Avoid gaps where water can escape. Wrap plumber’s tape around threaded connections for extra protection. Tighten all parts securely, but do not overtighten. Proper sealing helps avoid water damage and costly repairs.
Connecting To Main Waste Line
Attach the drain pipe to the main waste line with the right fittings. Use PVC or ABS glue to join pipes firmly. Check pipe alignment to prevent stress on joints. Ensure the pipe slopes downward for proper drainage. A good connection prevents clogs and backups in your shower drain system.
Testing For Drain Functionality
Run water through the drain to check flow speed. Look for any leaks around seals and joints. Use a flashlight to inspect hidden areas for moisture. Fix leaks immediately by resealing or tightening parts. Testing early avoids damage and ensures the drain works well.
Common Installation Challenges
Installing a shower drain rough-in can be tricky. Many challenges come up during the process. Knowing these common problems helps you plan better.
Rough-in means placing the drain pipe before the final floor and walls go in. This step must be done right to avoid leaks and drainage problems later. Mistakes made now can cause costly repairs.
Dealing With Uneven Floors
Uneven floors make it hard to set the drain level. A drain not level stops water from flowing properly. Water can pool, causing mold and damage. Use a level tool to check the floor. Add extra mortar or a thin layer of concrete to fix dips. This creates a flat base for the drain.
Handling Tight Spaces
Showers often have small spaces for drain pipes. Tight spots limit your movement and pipe size. Choose compact drain models to fit better. Cut pipes carefully to avoid cracks. Work slowly and double-check measurements before installing. Tight spaces need patience and precision.
Correcting Drainage Issues Early
Drainage problems can ruin a shower’s function. Check the slope of drain pipes during rough-in. Pipes must slope downward at about 1/4 inch per foot. This slope helps water flow away quickly. Fix any wrong slopes before closing walls or floors. Early corrections save big headaches later.
Tools And Materials Needed
Preparing for a shower drain rough-in requires the right tools and materials. Using proper supplies ensures a smooth installation. It helps prevent leaks and other problems later. Gather everything before starting the project.
Essential Plumbing Tools
Basic plumbing tools make the job easier and faster. A pipe wrench helps tighten or loosen pipes. A hacksaw cuts pipes to the correct length. A tape measure ensures accurate measurements. A level checks if pipes slope correctly for drainage. A screwdriver is useful for securing parts. A bucket and rags keep the workspace clean. A plunger can help clear minor clogs during testing.
Recommended Sealants And Pipes
Use high-quality pipes designed for shower drains. PVC pipes are common because they resist corrosion. ABS pipes work well in many plumbing systems too. Sealants prevent leaks at pipe joints. Use plumber’s putty to seal drain fittings. PVC cement bonds pipe connections tightly. Teflon tape wraps around threaded joints to stop leaks. Choose materials rated for wet environments and durability.
Safety Equipment
Safety matters in plumbing projects. Wear gloves to protect your hands from sharp edges. Safety glasses shield your eyes from debris or splashes. A dust mask prevents inhaling dust when cutting pipes. Closed-toe shoes protect your feet from dropped tools. Make sure the work area is well-lit and ventilated. Keep a first aid kit nearby for minor injuries.
Code Compliance And Inspections
Ensuring your shower drain rough-in follows code rules is essential. Code compliance keeps your plumbing safe and reliable. Inspections verify that all work meets local standards. This process helps prevent leaks and costly repairs later.
Understanding codes and inspections early saves time and hassle. Knowing what inspectors look for makes the process smooth. Proper preparation helps pass inspections quickly and easily.
Local Plumbing Codes To Follow
Every area has specific plumbing codes for drains. These rules cover pipe size, slope, and materials. Codes also regulate venting and trap placement. Follow local codes exactly to avoid fines or rework. Check your city or county website for details. Consult a licensed plumber to ensure compliance.
Scheduling Inspections
Plan inspections before covering pipes with walls or flooring. Contact your local building department to arrange a visit. Schedule inspections early to fix any issues on time. Inspectors will check pipe slope, venting, and connections. Passing inspections keeps your project on track.
Documentation Tips
Keep all permits and inspection reports in one place. Take clear photos of rough-in work before closing walls. Record dates and names of inspectors who visit. Good records help if questions arise later. Well-organized paperwork speeds up final approvals.
Credit: terrylove.com
Frequently Asked Questions
What Is A Rough-in For Shower Drain?
A rough-in is the initial plumbing setup for a shower drain. It includes placing pipes before the shower floor is installed.
How Deep Should A Shower Drain Rough-in Be?
The shower drain rough-in should be about 2 to 4 inches below the finished floor. This depth ensures proper water flow and drainage.
What Pipe Size Is Needed For Shower Drain Rough-in?
A 2-inch diameter pipe is standard for shower drain rough-ins. It handles water flow well and fits common shower drains.
Can I Install A Shower Drain Rough-in Myself?
Yes, but it requires basic plumbing skills and tools. Make sure to follow local codes and measure accurately.
When Should The Shower Drain Rough-in Be Installed?
Install the rough-in after framing and before pouring the shower floor. This timing avoids rework and ensures proper pipe placement.
What Materials Are Used For Shower Drain Rough-in?
PVC or ABS plastic pipes are commonly used for shower drain rough-ins. They are durable, easy to cut, and affordable.
How To Check If Shower Drain Rough-in Is Correct?
Check the slope of the pipe; it should slope down 1/4 inch per foot. Also, test for leaks before closing walls or floors.
Conclusion
Planning the rough-in for a shower drain is key for a smooth installation. Measure carefully and check local codes before you start. Keep the drain slope steady to avoid water pooling. Use the right materials to prevent leaks and damage.
Taking time now saves repair costs later. A well-done rough-in means your shower will drain properly. Simple steps make a big difference in the long run. Stay patient and follow the basics for best results.