
To fix a situation where you find your sony headphones not charging, you should first try a different USB cable and a wall adapter that provides sufficient power. Most charging issues happen because the cable is damaged or the power source doesn’t supply enough current to the internal battery. If the charging light remains off after testing a new cable, the issue is likely a dirty charging port or a deep discharge of the battery, which should be addressed by a professional technician.
Fixing Sony headphones not charging issues
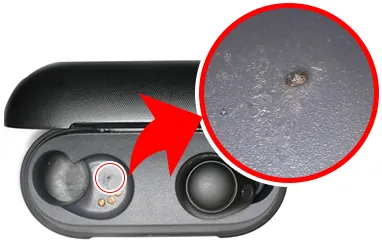
The primary reason for power issues is often a buildup of debris or lint inside the USB-C or micro-USB port. Over time, pocket lint or dust gets pushed into the port when you plug in the cable. This prevents the metal pins from making a solid connection.
If the pins can’t touch, the circuit remains open and the battery receives no power. Use a non-conductive wooden toothpick to gently scrape the bottom of the port. If you see compacted gray fuzz, you have found the culprit.
Another common cause is the use of a cable that only supports data transfer rather than power delivery. Many thin, inexpensive cables included with small electronics aren’t built to handle the amperage required for modern lithium-ion batteries. If you use a cable designed for a computer mouse, it may not trigger the charging circuit in your headphones. Always check the cable quality; if the wire feels flimsy, it may not be built to handle the necessary current.
Finally, the battery management system can sometimes “lock” if the charge drops to zero for a long time. This is a safety feature designed to prevent the battery from becoming unstable. When this happens, the device may appear completely dead.
If your headphones fail to show a light after ten minutes, try a high-output wall brick instead of a laptop port. A laptop port often limits output, while a wall charger provides the necessary power to wake a dormant lithium cell, a task that should be handled by a technician if the device remains unresponsive.
Clean the charging port carefully
You should inspect the charging port for any visible obstructions before trying other fixes. If you see dust or lint, use a non-conductive tool like a wooden toothpick to gently clear the opening. Never use a metal needle or a paperclip, as these can easily bridge the pins and cause a short circuit that permanently destroys the charging board.
If the port looks clean, use a small amount of 90% or higher isopropyl alcohol on a soft, clean toothbrush. Lightly scrub the pins inside the port to remove invisible oxidation or oils. Ensure the headphones are powered off completely before you start this process. Wait a few minutes for the alcohol to evaporate fully before you attempt to plug in a charging cable again.
This fix is intended for people who can see debris or suspect moisture has caused minor corrosion. If the port feels loose or “wiggles” when you insert a cable, the internal solder joints are likely broken. In that case, don’t attempt to force the connection, as you may damage the motherboard. This type of hardware repair requires professional tools and should be handled by an authorized service center.
If you’re unsure if the port is damaged, check the cable fit. A healthy port provides a firm, tactile click when the cable is inserted. If the cable slides in without resistance or falls out under its own weight, the port’s internal retention clips are worn. Cleaning won’t fix this mechanical failure, and attempting to bend the clips yourself often leads to snapping the port pins entirely.
Test different cables and power sources
You need to isolate the power source to ensure the problem isn’t your wall outlet or computer port. Start by connecting the headphones to a dedicated wall charger rather than a computer USB port. Many computers limit power output, which is often too low to charge a battery that has been fully depleted. A standard smartphone wall brick usually provides enough power for most models, but if the device still fails to charge, consult a technician.
If you have another device that uses the same cable, plug that device in to verify the cable works. If your phone charges with the cable but your headphones do not, the cable is likely fine, and the issue is with the headphones themselves. If nothing charges with that cable, you have identified a faulty accessory and simply need a replacement.
Check the port for compacted lint or debris before assuming the hardware is dead. Use a wooden toothpick to gently clear the cavity, as metal tools can short the pins. If the port looks clean but the connection feels loose, the internal solder joints may be fractured.
Always verify that the cable is pushed all the way into the port. Some protective cases on headphones can prevent the connector from seating fully, leaving a small gap that stops the charge. If you have to hold the cable at a specific angle to get the light to turn on, the cable is failing internally and must be replaced immediately. Continuing to use a frayed cable risks shorting out the internal charging controller, which is a permanent, non-repairable failure.
Reset the device settings
A software glitch can sometimes prevent the battery management chip from acknowledging a power source. Most models allow you to perform a hardware reset by holding down the power button and the volume or pairing buttons at the same time for about 10 seconds. This forces the internal controller to reboot and clear any temporary errors that might be blocking the charging process.
This method is useful if the device is responsive but simply refuses to accept a charge. If the headphones are completely unresponsive and don’t show a light even after a reset, you may be dealing with a failed battery cell. Batteries have a finite lifespan and will eventually stop holding a charge after hundreds of cycles. If your unit is quite old, it’s likely that the battery has reached the end of its useful life.
If the reset doesn’t work, check if your device has a “battery care” or “optimized charging” feature enabled in the companion app. Sometimes these features pause charging at 80% to protect the battery, which can be mistaken for a failure to charge. If you’re unable to access the app, try to charge the device in a different environment, as extreme heat or cold can cause the sensors to stop the charging process for safety.
Common myths about charging
Never put electronics in the freezer. Condensation forms inside the unit as it warms, creating moisture that causes short circuits and permanently corrodes internal components. If you have already exposed a device to extreme cold, keep it powered off until it reaches room temperature to prevent a catastrophic failure.
Modern devices are designed to draw only the power they need. Using a high-wattage laptop charger won’t harm your headphones because the internal power management chip acts as a gatekeeper. If you use a charger that provides less than the required wattage, however, the device may charge at a fraction of the speed or refuse to charge entirely.
Keeping a battery at 100% for days increases internal chemical stress. Remove the cable once the indicator light turns off to prolong the cell’s lifespan.
Shaking the device does nothing to remove debris. You risk dropping the unit, which often cracks the casing or dislodges internal ribbon cables. Use a wooden toothpick to gently clear port obstructions instead.
How to maintain your device battery
| If you’re doing this | Do this instead | Why |
|---|---|---|
| Charging overnight | Unplug when full | Prevents heat stress |
| Using a laptop port | Use a wall adapter | Provides faster, steady current |
| Storing at 0% power | Store at 50% charge | Prevents deep discharge lock |
| Ignoring a loose port | Repair or replace | Prevents shorting the board |
| Leaving in a hot car | Store in a cool room | Heat degrades lithium cells |
Most users assume that keeping a battery between 20% and 80% is only for long-term storage. In reality, maintaining this range during daily use significantly slows chemical aging. If your device feels warm to the touch while charging, remove the protective case immediately. Trapped heat acts as a catalyst for capacity loss.
If you must store a device for more than a month, power it down completely. A battery left in a powered-on state will drain faster due to background processes, potentially dropping below the critical voltage threshold. Once a battery drops below this internal safety limit, the controller may permanently disable the cell to prevent a fire hazard.
Never rely on third-party charging cables that lack safety certifications. A cheap cable often fails to regulate voltage, causing micro-surges that degrade the battery’s health over time.
Frequently asked questions
How long should I charge them before they turn on?
You should allow the device to charge for at least 30 minutes before expecting it to power on. If the battery was completely dead, the internal controller needs to reach a minimum voltage threshold before it will respond to the power button. If there’s still no response after 60 minutes, the battery is likely dead or the charging circuit has failed.
Is it safe to use a third-party cable?
Yes, it’s safe to use a third-party cable as long as it’s a high-quality USB-C or micro-USB cable that meets standard electrical specifications. Avoid the cheapest cables found at gas stations, as they often have poor shielding and inconsistent wiring. A high-quality cable will ensure the correct voltage is delivered to the battery without causing overheating or intermittent connections.
Why does the charging light blink red?
A blinking red light usually indicates a charging error or that the battery is too cold or too hot to charge safely. Disconnect the cable and bring the headphones into a room-temperature environment for one hour. If the light continues to blink red after the device reaches room temperature, it suggests a hardware failure within the battery or the power management system.
Can I replace the battery myself?
No, you shouldn’t attempt to replace the battery yourself because the internal components are glued or soldered in place. Opening the casing often requires specialized tools that can damage the plastic housing and void your warranty. If the battery is no longer holding a charge, contact an authorized service provider to perform the replacement safely.
What happens if I keep using a bad cable?
If you continue to use a damaged cable, you risk creating a short circuit that can burn out the charging port or the main motherboard. A faulty cable can cause the pins to arc or overheat, leading to physical melting of the port’s plastic housing. Once the port is physically damaged, the cost of repair often exceeds the value of the headphones.
Conclusion
If these quick checks don’t get your device powered up again, it’s time to reach out to Sony’s support team. They’ll help you determine if your warranty covers a repair or a replacement. Don’t let a dead battery keep you from your music; they’re usually happy to help you get back on track.
