
To keep pipes from freezing during winter, you should select high-quality self-regulating cables, as the best heat tape pipe heating cables automatically adjust their output based on the surrounding temperature. These systems prevent burst pipes by maintaining a constant, safe temperature, which is more reliable than manual, constant-wattage heating cords. This guide covers the specific installation techniques, safety requirements, and maintenance schedules you need to ensure reliable operation throughout the coldest months of the year.
Choosing the Right Pipe Heating System
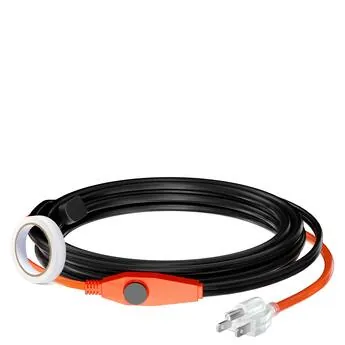
When selecting a heating cable, you’re choosing between self-regulating and constant-wattage options. Self-regulating cables are the industry standard for residential plumbing because they change their heat output at every point along the pipe. If one section of the pipe is exposed to a cold draft, the cable increases heat locally; if another part is in a warmer area, it reduces output. This efficiency saves energy and prevents the cable from overheating itself.
The primary misconception is that you can wrap these cables as tightly as you want to get more heat. In reality, overlapping a standard constant-wattage cable can cause it to melt its own insulation or the plastic pipe it’s meant to protect.
While self-regulating cables are safer in this regard, you should still follow the manufacturer’s spacing guidelines to ensure even heat distribution. If you’re protecting metal pipes, you have more flexibility, but plastic pipes require careful adherence to the temperature ratings provided by the manufacturer.
These cables are designed for pipes located in unheated crawl spaces, garages, or exterior walls. They aren’t intended for use inside the pipe unless the product is explicitly rated for “internal use” by the manufacturer. Using an external cable inside a water line can contaminate your drinking water supply or cause a short circuit. Always check the packaging for the “UL” or “ETL” mark, which confirms the product meets Underwriters Laboratories safety standards for electrical heating equipment.
Installing Heating Cables on Pipes
- Clean the pipe surface thoroughly to remove any oil, rust, or debris. A clean surface ensures the heat transfers evenly from the cable to the pipe wall.
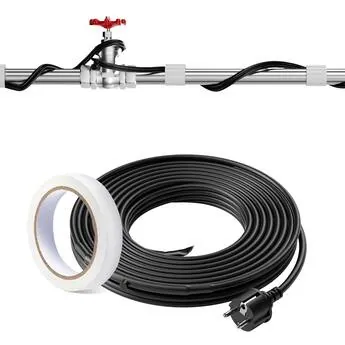
- Run the cable straight along the length of the pipe. If your pipe diameter is larger than 1 inch, you may need to spiral the cable, but don’t overlap it unless the specific model allows it.
- Secure the cable using the manufacturer-provided tape or high-temperature glass-fiber tape. Never use standard duct tape or plastic zip ties, as these can melt when the cable reaches its operating temperature.
- Apply thermal insulation over the cable and the pipe. The insulation is essential; without it, the heat escapes into the air rather than staying in the pipe.
- Plug the system into a Ground Fault Circuit Interrupter (GFCI) outlet. This is a mandatory safety requirement to prevent electrical shock in damp environments.
- Test the system by verifying that the indicator light is on, or by feeling for a slight warmth after 30 minutes of operation in sub-freezing conditions.
The critical judgement call is the thickness and type of insulation you add over the cable. If you use too little insulation, the cable will work constantly to fight the cold air, which shortens its lifespan. If you use the correct R-value insulation, the cable cycles on and off as needed, which preserves the heating element for many years.
Performance Guide by Pipe Type
| Situation | What to use | How long | What to watch for |
|---|---|---|---|
| Metal pipe (indoors) | Self-regulating cable | Entire winter | Corrosion at contact points |
| PVC/Plastic pipe | Low-wattage cable | Entire winter | Heat deformation |
| Outdoor exposed | Heavy-duty jacketed | Frozen season | Ice buildup under tape |
| Short pipe runs | Constant-wattage | As needed | Overheating at overlaps |
| Long main lines | Self-regulating | Continuous | Voltage drop at end |
Metal pipes conduct heat efficiently, but they also act as a grounding path. If you notice rust forming at the cable contact points, the cable sheath has likely been compromised by galvanic corrosion. Replace the section immediately to prevent a short circuit.
Plastic pipes can’t dissipate heat like metal. If you exceed 5 watts per foot on PVC, you risk softening the pipe wall, which leads to slow leaks or structural failure. Always verify the manufacturer’s temperature rating before installation.
For outdoor runs, moisture is your primary enemy. If you see ice building up underneath the heat tape, the insulation isn’t sealed correctly. Water ingress will freeze and expand, eventually tearing the cable away from the pipe surface.
Constant-wattage cables are dangerous if they overlap. If you must cross them, ensure you have at least two inches of air gap or use a ceramic spacer. Otherwise, the concentrated heat will melt the cable jacket within minutes.
On runs exceeding 100 feet, voltage drop becomes a reality. If the end of the line feels cold to the touch, your power supply is insufficient for the length of the run. Switch to a higher gauge lead wire or install a secondary power injection point midway through the system.
Achieving Professional Results
Experienced installers always prioritize the connection point where the cable meets the power cord. This “cold lead” transition is the most common failure point. By using a manufacturer-approved sealant or a specialized junction box, you ensure that moisture can’t enter the electrical connection. If you leave this connection exposed to condensation or dripping water, it will eventually cause a short circuit, which trips the GFCI and leaves your pipes unprotected.
Secure the junction box to a wall stud or joist rather than letting it hang by the cable itself. The weight of the cord can pull the internal connections loose over time. If you notice the GFCI tripping immediately upon activation, check the cold lead first, as moisture ingress at the connection point is a common cause of ground faults.
Another detail that separates pros from beginners is how they manage the cable at valves and fittings. Instead of pulling the cable tight, they leave a small loop or “service loop” at each valve. This allows you to remove the valve for maintenance later without having to cut the heating cable. If you pull the cable too tight across a fitting, you’ll be forced to discard the entire heating system the first time you need to repair a leak.
Always leave at least six inches of slack at every elbow or tee. This extra length accounts for the thermal expansion of the pipe during temperature swings. Without this slack, the cable can stretch and eventually snap at the connection point.
Finally, don’t rely on the cable to thaw an already frozen pipe. These systems are designed to keep liquid water flowing; they aren’t powerful enough to melt a solid block of ice inside a pipe without causing significant electrical stress.
If your pipes are already frozen, use a hair dryer or warm towels on the exposed section first. Once the water starts to drip, you can engage the heating cable to maintain the flow. Attempting to force a thaw with the cable risks overheating the plastic sheath, which permanently ruins the cable’s insulation.
Managing Common Heating Cable Issues
| What you notice | What it usually means | What to do first |
|---|---|---|
| GFCI trips instantly | Short circuit in cable | Unplug and inspect for cuts |
| Pipe freezes anyway | Poor insulation | Add more foam wrapping |
| Cable is very hot | Overlapping | Unwind and space evenly |
| No heat at all | Blown fuse or trip | Reset the GFCI outlet |
If your GFCI trips the moment you plug the cable in, look for nicks in the outer jacket caused by zip ties pulled too tight or sharp metal edges on the pipe. A single exposed copper strand touching the pipe will trigger the safety mechanism immediately. If the cable looks pristine, use a multimeter to check for continuity across the prongs; a reading of zero indicates a dead short that requires a full replacement.
When pipes freeze despite active cables, the issue is often heat loss rather than cable failure. Check the thickness of your foam insulation. If you use insufficient insulation, the cable may not retain enough heat to prevent freezing. Add a second layer of closed-cell foam and seal every seam with foil tape to prevent drafts from reaching the pipe.
Overheating usually stems from the cable crossing over itself. This creates a “hot spot” that melts the internal insulation and ruins the heating element. Never let the cable touch itself, and maintain at least a half-inch gap between parallel runs. If you find a section that feels brittle or shows discoloration, the internal wiring is compromised and the cable must be discarded.
Finally, if the cable remains cold, verify the power source first. Test the outlet with a lamp to ensure it has power. If the outlet works but the cable remains dead, the internal thermostat has likely failed. Replace the entire unit, as these sealed components can’t be repaired.
Regulatory Standards and Safety Rules
Electrical heating cables must be installed in accordance with the National Electrical Code (NEC) in the United States. Specifically, Article 427 addresses the requirements for fixed electric heating equipment for pipelines and vessels. The NEC requires that all heating cables be protected by a GFCI device to prevent accidental electrocution, especially in damp crawl spaces or basements where water leaks are possible.
Install a standard 5mA GFCI device as required by the National Electrical Code for personnel protection. Standard breakers often trip prematurely due to the high inrush current typical of heating cables during cold startups. Using the higher threshold prevents nuisance tripping while maintaining the safety mandated by code.
Never modify the length of a self-regulating cable unless the manufacturer explicitly states it is “field-cuttable.” Cutting a cable not designed for it ruins the internal parallel circuit, rendering safety features useless. If you have a long run, buy a cable pre-rated for that specific length.
Many installers mistakenly overlap self-regulating cables to use up extra slack. This creates a hot spot that can melt the outer jacket and cause a fire. If you have excess cable, loop it loosely around the pipe instead of crossing it over itself.
If your pipe is plastic rather than metal, you must apply aluminum tape along the entire length of the cable. Plastic doesn’t conduct heat effectively, so the tape acts as a heat sink to prevent the pipe from warping or cracking.
Always verify your local electrical codes with a licensed electrician before connecting the system to your home’s main power. A professional can ensure your breaker panel has the necessary capacity to handle the startup load without overloading your existing circuits.
Maintaining Your Heating System
Once the weather warms up, you should turn off the system to save energy and extend the life of the internal heating core. Most self-regulating cables don’t have an on/off switch, so you’ll need to unplug them at the outlet.
Before you store the cables, inspect the outer jacket for signs of cracking or rodent damage. If the outer layer is compromised, the cable is no longer safe for use in damp conditions and must be replaced. A simple trick is to run a dry cloth along the length of the cable; any fraying or deep nicks will snag the fabric immediately.
If you leave the cable wrapped on the pipe during the summer, ensure it remains dry. If you live in a region with high humidity, consider sealing the ends of your pipe insulation with waterproof tape to prevent moisture from trapping against the pipe.
When you plug the system back in at the start of the next winter, always press the “test” button on your GFCI outlet first. If the outlet doesn’t trip, the device is faulty and must be replaced before you trust it with your plumbing protection.
Many homeowners mistake a warm cable for a working one, but heat isn’t a guarantee of safety. If the cable feels hot to the touch while the ambient temperature is above 50 degrees Fahrenheit, the internal thermostat has likely failed in the closed position. This wastes electricity and creates a fire hazard. In this case, disconnect the power immediately.
If you’re unsure, use a non-contact voltage tester to confirm the cable is drawing power only when the temperature drops below your system’s specific activation threshold. Always prioritize a functional GFCI over the cable itself, as a short circuit in a damp crawlspace is a significant risk that no amount of insulation can mitigate.
Choosing Alternative Heating Solutions
In some cases, heat tape is the wrong solution. If you have a very long outdoor pipe run, the electrical load might be too high for a standard household circuit, making a recirculating hot water pump a better, more energy-efficient choice. If your pipes are located in a wall cavity that’s accessible, adding fiberglass or spray foam insulation is often enough to keep the water from freezing without needing any electrical cables at all.
If you’re dealing with a commercial-scale project or a pipe that carries non-potable liquids, standard residential heat tape won’t suffice. These situations require industrial-grade trace heating systems that use different voltage requirements and specialized controllers. In these instances, you should contact a mechanical engineer who specializes in fluid transport systems to design a solution that matches the specific thermal requirements of your infrastructure.
Related guides
- Best Battery Operated Heated Blanket for Camping: Top 10 Picks in 2026
- Can I Cook Frozen Meat in a Slow Cooker? Why It Is Unsafe in 2026
Frequently Asked Questions
Can I leave heat tape plugged in all year?
No, you should unplug the system when temperatures stay above freezing. Leaving the cable powered on during summer wastes electricity and accelerates component wear. Always check your manufacturer’s guidelines, as some models include automatic thermostats that handle power cycling for you.
Is it safe to wrap heating cable around plastic pipes?
Yes, it’s safe if you use a cable specifically rated for plastic pipes. Because plastic dissipates heat slowly, using the wrong cable can cause localized melting. Always ensure the cable contacts the pipe directly and is covered by the required thickness of insulation for even heat distribution.
How do I know if my heat tape is working?
You can verify operation by checking the indicator light found on most modern cables. If your cable lacks a light, wait for temperatures to drop below 35°F and feel the insulation for consistent warmth. If the cable remains cold despite the outlet having power, the internal circuit is likely broken.
How much electricity does heat tape use?
The consumption depends on the length of the cable and the local temperature, but most residential cables draw between 3 and 7 watts per foot. If you have a 50-foot cable running during a cold snap, it will use roughly 250 to 350 watts while it’s active. Because self-regulating cables cycle off when the pipe is warm, the actual daily usage is usually much lower than the peak wattage suggests.
What happens if I overlap the cable?
Overlapping a constant-wattage cable can create dangerous hot spots that melt insulation and pipes. While self-regulating cables reduce output when touching, you should still avoid overlapping to ensure even heat distribution. If you have extra length, run the cable in a straight line or a loose spiral.
Conclusion
Checking your setup before the first deep freeze arrives is the best way to avoid unexpected plumbing emergencies. Once you’ve verified that your connections are secure and the insulation is properly placed, you’ll have peace of mind knowing your home’s water lines are protected. Don’t wait until it’s freezing outside to get started.