
If you’re planning a shower remodel or building a new one, waterproofing between the cement board and shower pan is a step you can’t afford to miss. Getting this right means you protect your bathroom from leaks, mold, and costly damage.
But how do you ensure a perfect seal in this tricky spot? You’ll discover simple, effective techniques that make waterproofing easy and reliable. Keep reading to learn how to safeguard your shower and enjoy peace of mind for years to come.
Choosing The Right Cement Board
Choosing the right cement board is key for a strong, lasting shower base. The right board stops water from damaging walls and floors. It creates a solid base for tiles and prevents mold growth. Knowing the types of cement boards helps you pick the best one for your shower.
Types Of Cement Boards
Cement boards come in different types, each with unique features. Standard cement board is made from cement and fiberglass mesh. It is strong and water-resistant. Another type is fiber cement board, which is lighter and easier to cut. Some boards have added water barriers for extra protection. Choose a board that fits your bathroom’s needs and budget.
Benefits For Shower Installations
Cement boards provide a stable, moisture-resistant surface. They do not swell or warp when wet. This keeps tiles firmly in place for years. Cement boards also reduce the risk of mold and mildew. Their durability makes them perfect for wet areas like showers. Using cement boards improves the shower’s safety and lifespan.
Preparing The Surface
Before installing cement board, clean the shower pan and walls. Remove dirt, dust, and loose particles. Make sure the surface is dry and smooth. Cut the cement board to fit the shower area. Leave small gaps between boards for expansion. Attach the boards securely with corrosion-resistant screws. Proper preparation ensures a waterproof, long-lasting shower base.
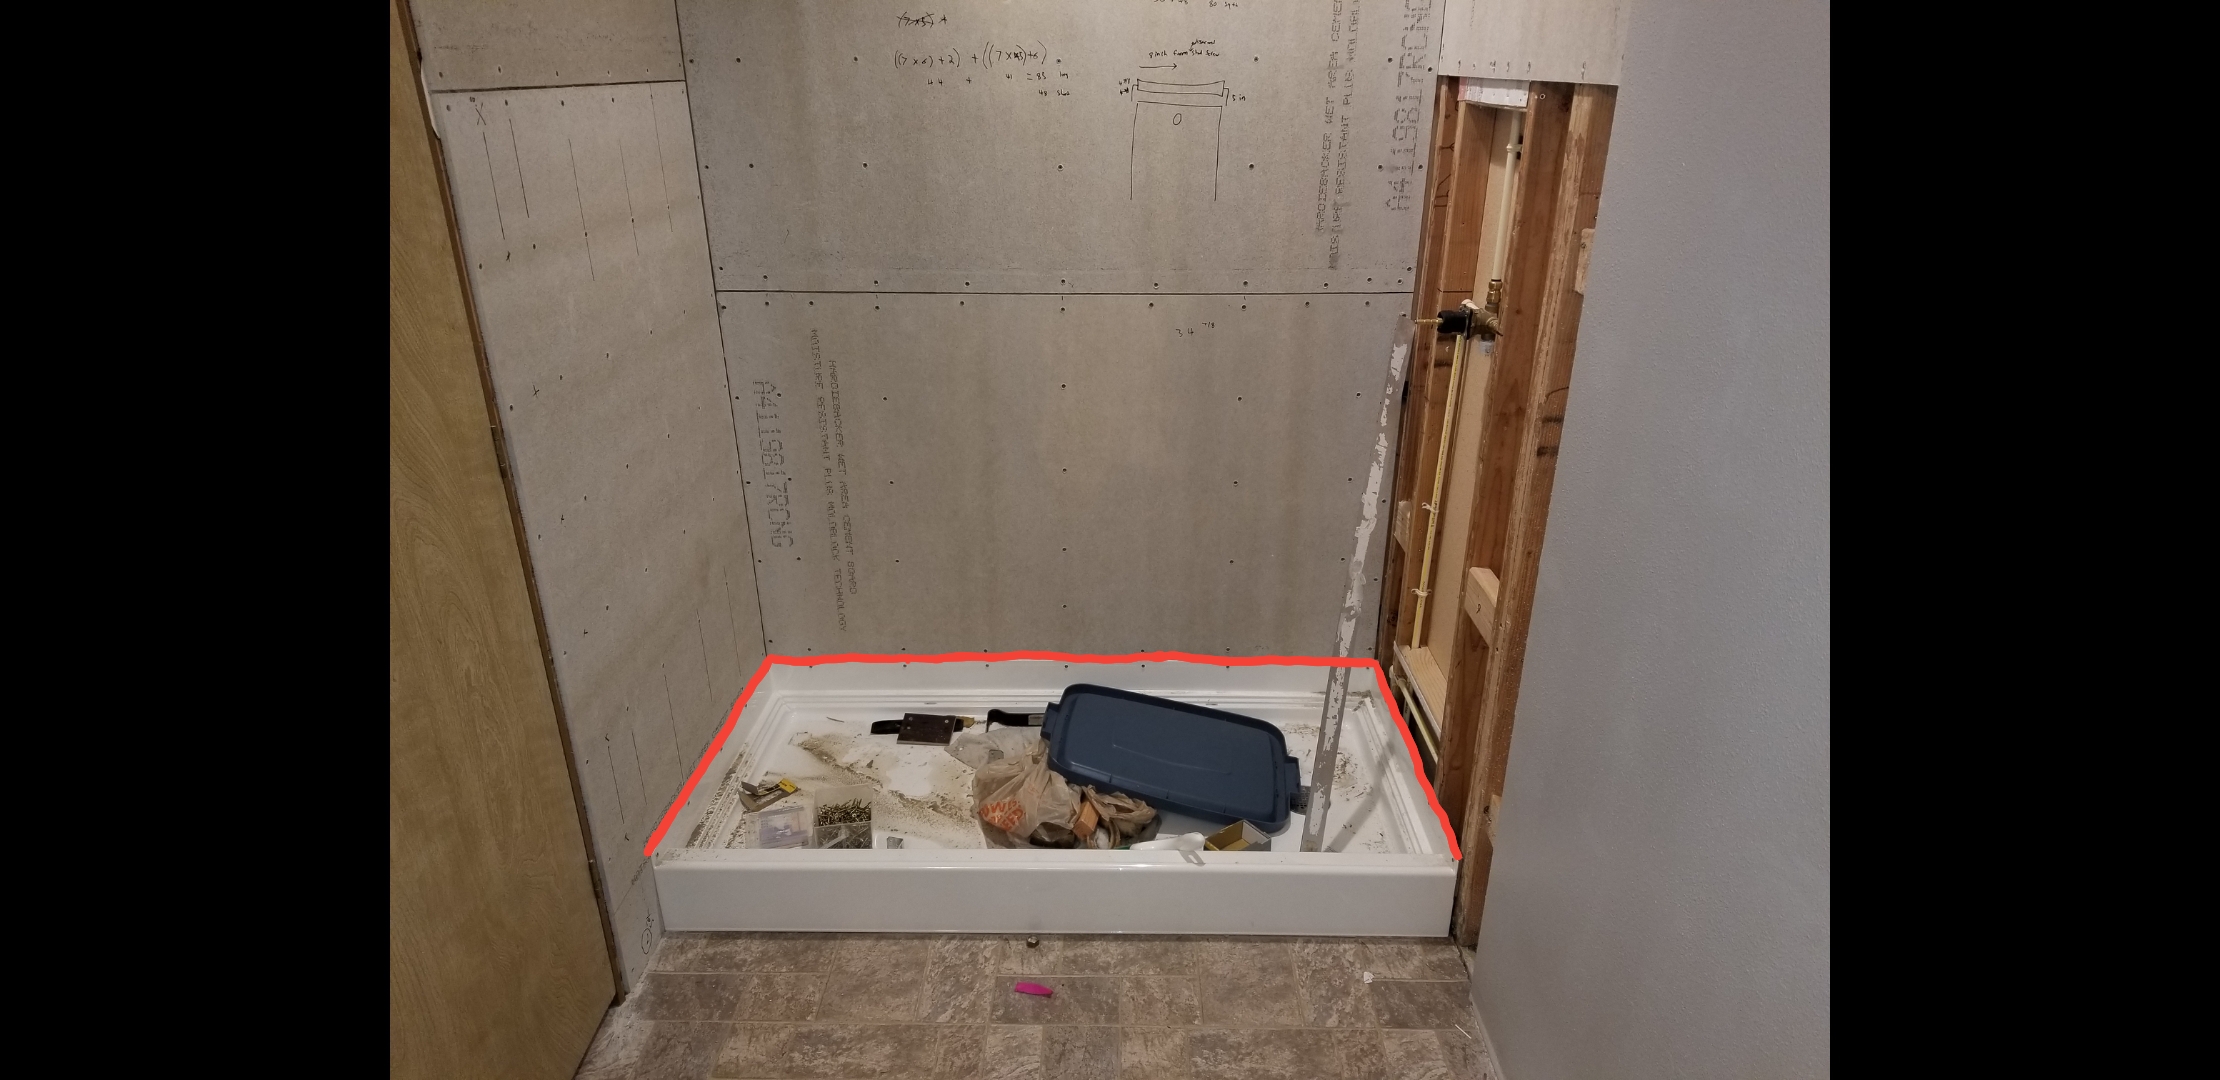
Credit: terrylove.com
Selecting A Shower Pan
Selecting the right shower pan is a key step in waterproofing between the cement board and the shower pan. The shower pan collects water and directs it to the drain. Choosing the correct pan helps prevent leaks and water damage. It also ensures a smooth installation and a durable shower base.
Common Materials
Shower pans come in several materials. Acrylic pans are lightweight and easy to clean. Fiberglass pans are affordable and simple to install. Tile-ready pans offer a sturdy base for custom tile work. Each material has benefits and limits. Pick one that fits your budget and style.
Sizing And Fit
Measure your shower space carefully before buying. The pan must fit snugly between the walls. A tight fit reduces water leaks. Standard sizes are common but custom sizes may be needed. Check the thickness to match your cement board and tile setup.
Drain Placement Considerations
Drain location affects water flow and plumbing connection. Common drain spots are center, corner, or offset. Match the pan’s drain hole to your plumbing layout. Proper alignment makes installation easier and avoids future leaks. Plan drain placement early to save effort later.
Waterproofing Materials
Choosing the right waterproofing materials is key to protecting the space between the cement board and the shower pan. These materials stop water from seeping into walls and floors. This prevents mold, mildew, and costly damage. Good waterproofing creates a strong barrier that lasts for years.
Several types of materials work well for this task. Each has its own purpose and benefits. Understanding these options helps in creating a durable, leak-free shower installation.
Membranes And Sealants
Membranes are thin sheets that block water. They come in rolls or sheets and are easy to apply. Sealants fill gaps and cracks to stop water leaks. Together, membranes and sealants form a tight shield. They protect the joint between cement board and shower pan effectively.
Waterproofing Tapes
Waterproofing tapes add extra protection at seams. They stick firmly to surfaces and seal joints. These tapes are flexible and resist moisture well. Applying tape over seams helps prevent water from sneaking in. They are simple to use and improve overall waterproofing strength.
Liquid Waterproofing Products
Liquid waterproofing products spread easily with a brush or roller. They dry to form a seamless, water-resistant layer. These liquids fill small cracks and cover uneven surfaces. They work great for hard-to-reach spots. Liquid products offer strong protection that bonds tightly to cement board and shower pan.
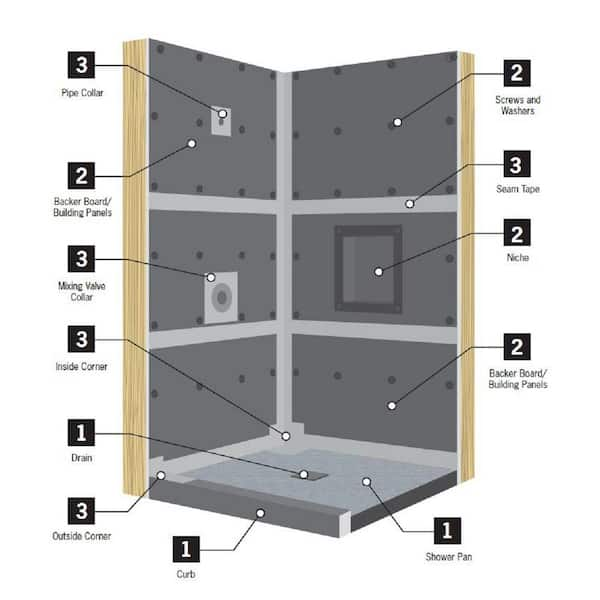
Credit: www.homedepot.com
Step-by-step Waterproofing Process
Waterproofing between the cement board and shower pan is essential for a leak-free shower. This step-by-step process helps protect your bathroom from water damage. Follow each step carefully for the best results.
Surface Preparation
Start by cleaning the cement board and shower pan surface. Remove dust, dirt, and debris. Make sure the area is dry before moving on. Check for any cracks or holes and fill them with waterproof sealant. Smooth the surface to ensure good adhesion.
Applying Waterproof Membranes
Use a waterproof membrane designed for showers. Cut the membrane to fit the area between the cement board and shower pan. Apply a thin layer of thin-set mortar or adhesive to help the membrane stick. Press the membrane firmly onto the surface, avoiding air bubbles. Overlap edges to create a continuous barrier.
Sealing Joints And Corners
Apply waterproof tape or mesh to all joints and corners. Use a waterproof sealant to cover the tape for extra protection. Smooth the sealant evenly to prevent gaps. Pay special attention to corners where leaks often start. Let the sealant dry completely before continuing.
Testing For Leaks
After waterproofing, test the area for leaks. Fill the shower pan with water and check for any signs of seepage. Inspect joints and corners carefully. Keep the water standing for a few hours to ensure the seal holds. Fix any leaks before installing tiles or finishing the shower.
Common Installation Mistakes
Installing waterproofing between the cement board and shower pan is vital for preventing leaks. Mistakes during this process can cause water damage and costly repairs. Understanding common errors helps ensure a strong, lasting seal.
Many problems arise from small oversights. Avoiding these mistakes saves time and money. Proper installation protects the home and keeps showers dry.
Improper Sealing Techniques
Using the wrong sealant or applying it unevenly leads to gaps. These gaps allow water to seep through and damage walls. Sealant must be applied smoothly and cover all joints fully. Skipping corners or edges weakens the waterproof barrier.
Ignoring Manufacturer Guidelines
Each product comes with specific instructions. Ignoring these rules risks poor adhesion and failure. Following guidelines ensures compatibility between the cement board and shower pan. This practice improves the overall durability of the waterproofing system.
Overlooking Drain Compatibility
The drain must fit correctly with the shower pan and cement board. Poor fit causes leaks around the drain area. Using mismatched parts or failing to seal the drain properly invites water intrusion. Always check drain compatibility before installation.
Maintenance Tips
Maintaining the waterproofing between your cement board and shower pan is key to keeping your bathroom dry and safe. Proper care helps prevent water damage, mold, and costly repairs. Small efforts can extend the life of your waterproofing system and keep your shower in top shape.
Regular Inspections
Check the waterproof area often for cracks or gaps. Look closely at seams where the cement board meets the shower pan. Catching issues early stops water from seeping through. Use a flashlight to spot hard-to-see problems. Make inspections a habit every few months.
Repairing Minor Damage
Fix small cracks or holes right away. Use waterproof sealant or patch kits designed for cement board. Smooth the surface to keep water from pooling. Even tiny repairs help keep moisture out. Avoid letting damage grow into bigger problems.
Preventing Mold And Mildew
Keep the shower area dry after use. Wipe down walls and floors with a towel. Good ventilation helps reduce humidity. Use a fan or open a window to air out the space. Clean regularly with mold-resistant products to stop growth.
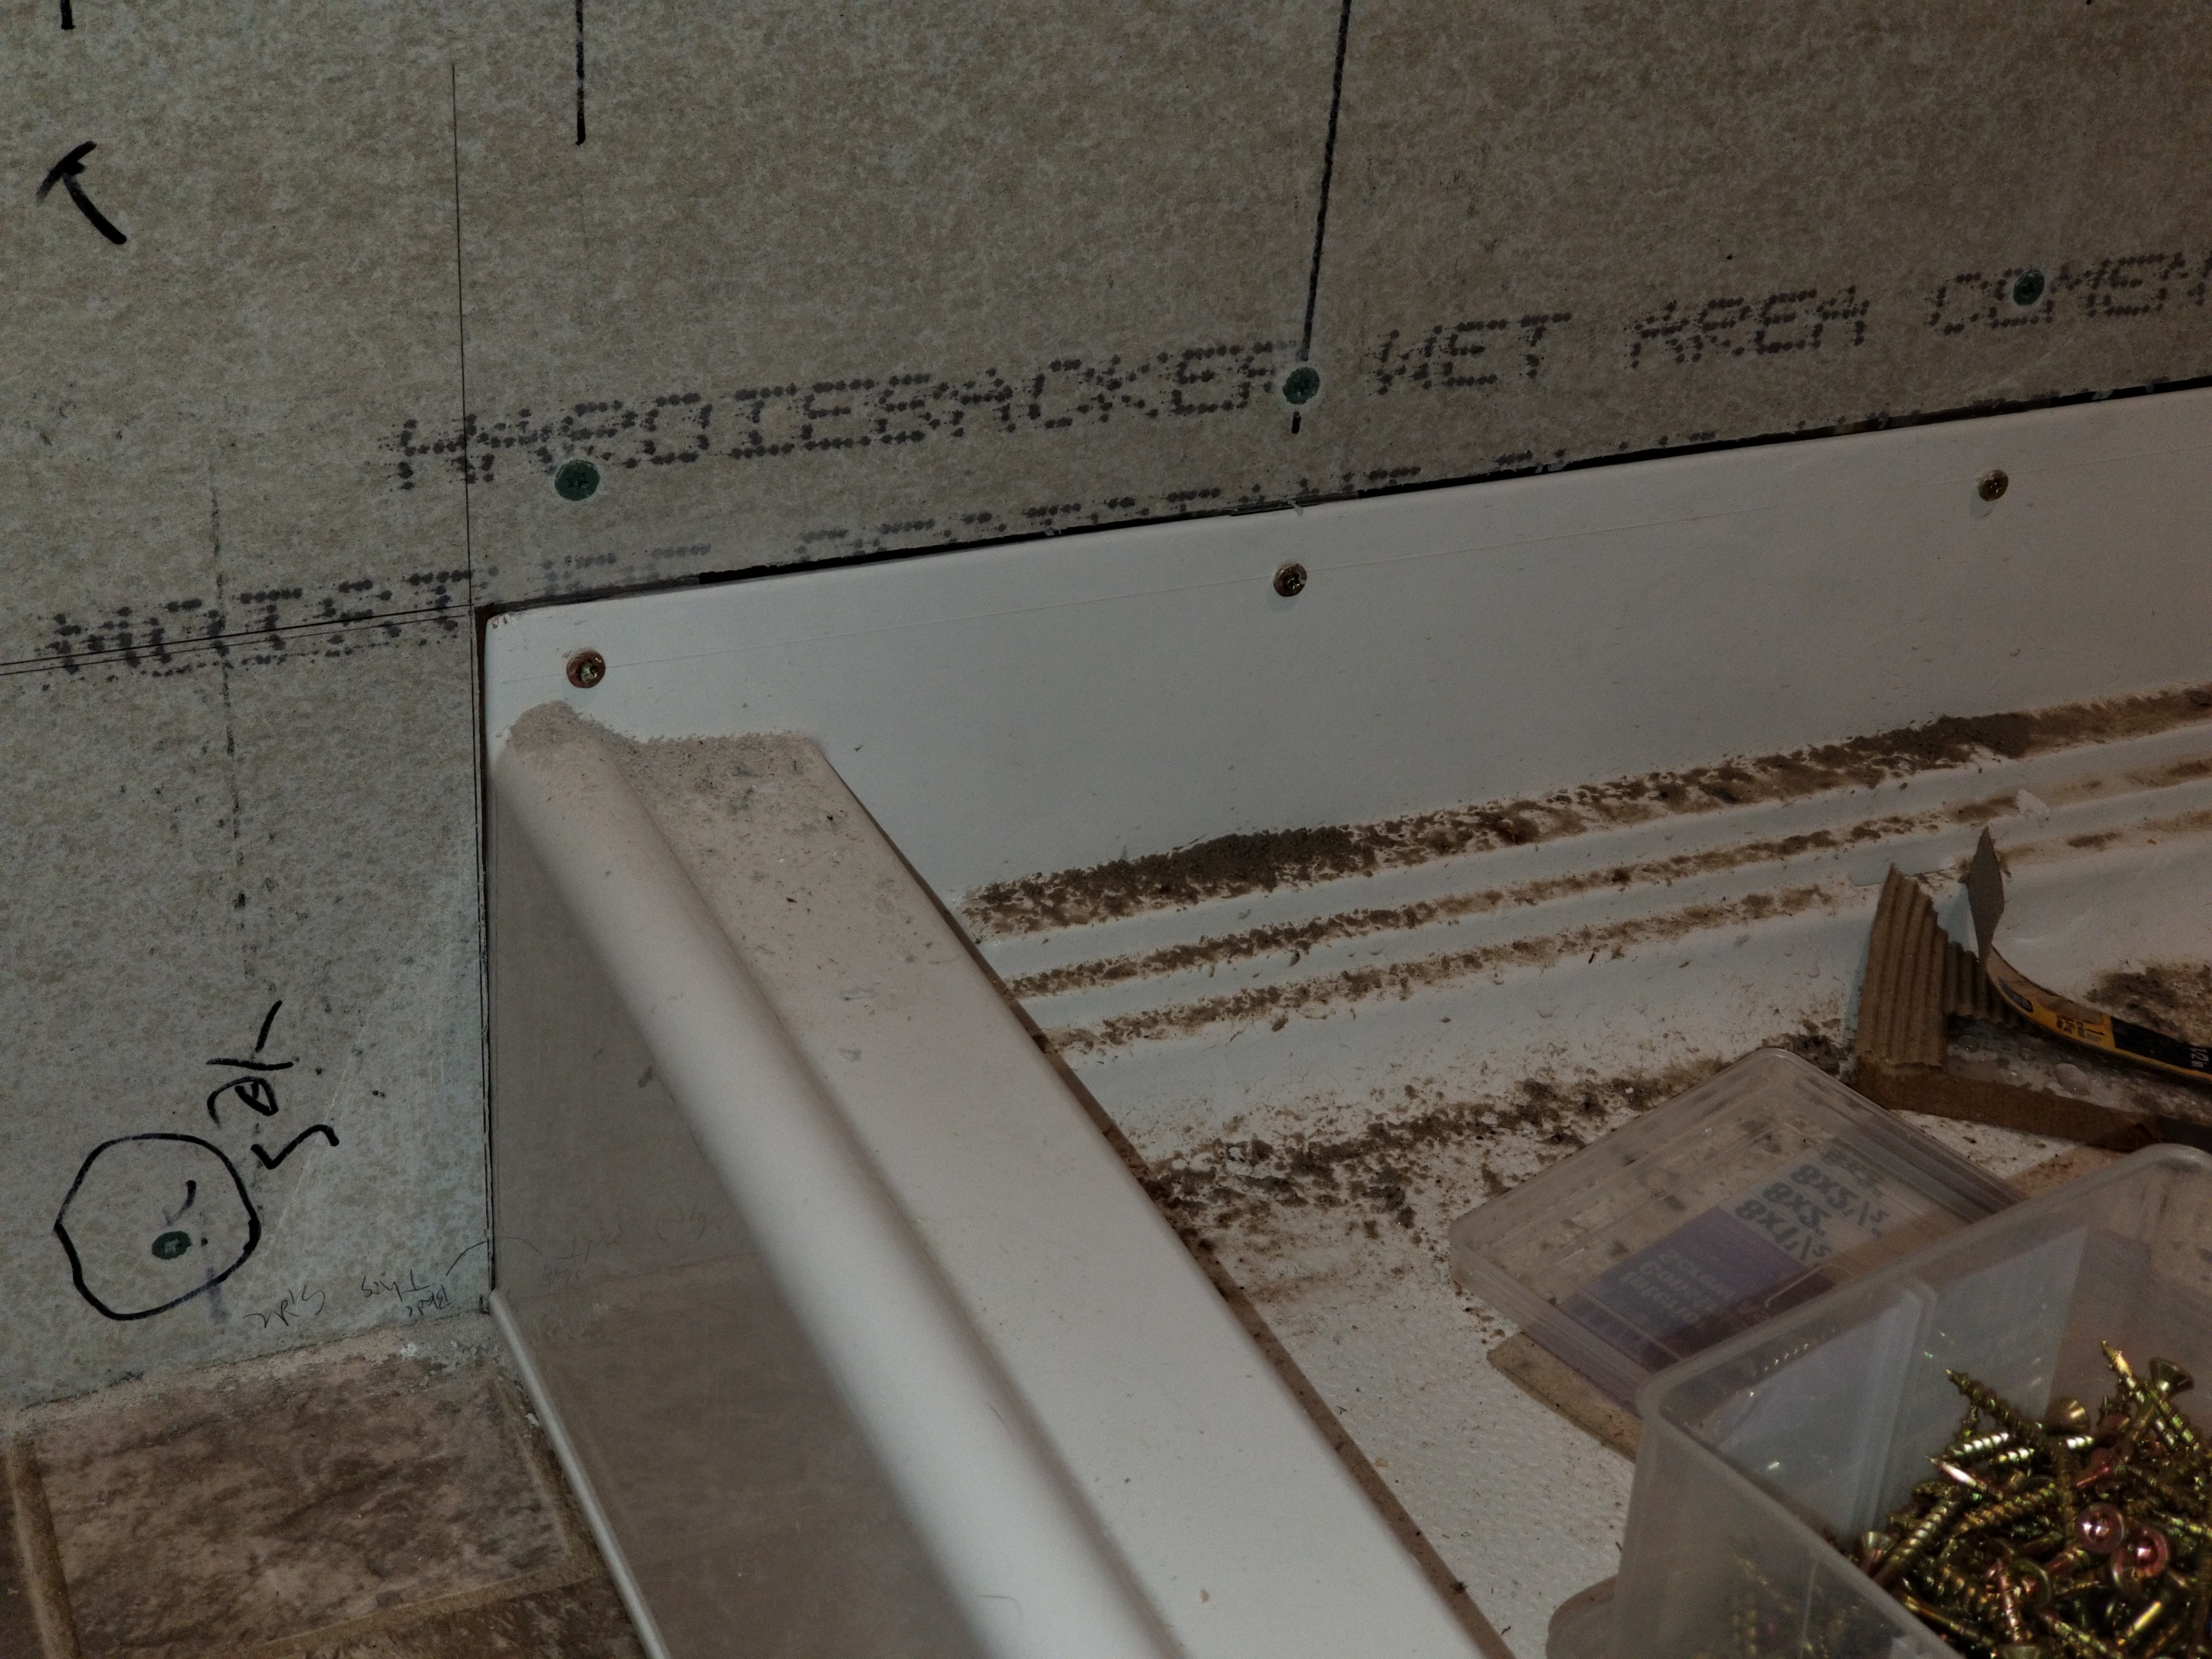
Credit: terrylove.com
Frequently Asked Questions
What Is The Best Waterproofing Method Between Cement Board And Shower Pan?
A liquid waterproof membrane is ideal between cement board and shower pan. It seals gaps and prevents water leaks effectively.
Can I Use Regular Caulk For Waterproofing In This Area?
Regular caulk is not enough for waterproofing here. Use a waterproof membrane or specialized sealant for a strong barrier.
How Do I Prepare Cement Board Before Waterproofing?
Clean the cement board surface and remove dust or debris. Ensure it is dry and free of loose particles before applying waterproofing.
Should Waterproofing Overlap Both Cement Board And Shower Pan?
Yes, waterproofing must overlap both surfaces. This overlap creates a continuous barrier to stop water from seeping through.
How Long Should Waterproofing Dry Before Tiling?
Waterproofing usually needs 24 hours to dry fully. Check product instructions, as drying times can vary by type and brand.
Can Waterproofing Fail Between Cement Board And Shower Pan?
Waterproofing can fail if not applied correctly or if gaps remain. Proper sealing and curing time are essential to prevent leaks.
Is It Necessary To Waterproof Behind The Cement Board?
Yes, waterproofing behind the cement board adds extra protection. It helps stop water damage inside the wall structure.
Conclusion
Proper waterproofing between the cement board and shower pan protects your bathroom. It stops water from seeping into walls and floors. Use the right materials and follow steps carefully. This prevents mold, damage, and costly repairs. Remember, small gaps can cause big problems later.
Take your time and seal every joint well. A dry, safe shower lasts much longer. Simple care now saves trouble in the future. Waterproofing is key to a strong, lasting shower area.