
Is your kitchen tap mixer dripping or just not working like it used to? Changing it might seem tricky, but you can do it yourself with the right steps.
Imagine saving money, avoiding a plumber’s wait, and giving your kitchen a quick upgrade. In this guide, you’ll find simple, clear instructions that make the whole process easy to follow. By the end, you’ll feel confident handling your kitchen tap mixer like a pro.
Ready to get started? Let’s dive in!

Credit: www.airtasker.com
Tools And Materials Needed
Changing a kitchen tap mixer needs the right tools and materials. Proper preparation helps the task go smoothly. Gather everything before starting to avoid delays and frustration.
Essential Tools
You need a few basic tools for this job. An adjustable wrench helps loosen nuts. A basin wrench is useful for hard-to-reach places. Screwdrivers, both flat and Phillips, will come in handy. Have a bucket ready to catch water drips. Also, keep some cloths nearby to wipe spills.
Choosing The Right Mixer
Select a mixer that fits your sink and plumbing. Measure your current tap before buying. Check the number of holes in your sink. Pick a mixer that matches your kitchen style. Look for models with good reviews and warranties. This ensures you get a reliable product that lasts.
Safety Precautions
Turn off the water supply before starting work. Open the tap to drain leftover water. Use gloves to protect your hands from sharp edges. Work in a well-lit area to see clearly. Keep electrical devices away from water. Follow all instructions carefully to avoid accidents.
Preparing For The Replacement
Preparing for the replacement of your kitchen tap mixer is an important first step. It helps ensure the process goes smoothly and safely. Taking time to get ready avoids surprises during installation.
Start by understanding the tasks you need to complete. This includes stopping the water flow, clearing the area, and removing the old tap mixer. Each step sets the stage for a quick and clean swap.
Turning Off Water Supply
Locate the water valves under the sink. Turn both the hot and cold valves clockwise to close them. This stops water from flowing while you work.
Open the tap to release any water left in the pipes. This prevents leaks during removal. Double-check that no water comes out before moving on.
Clearing The Workspace
Remove all items from under the sink and around the tap. This gives you room to work and keeps things dry. Lay down a towel or cloth to catch drips or debris.
Keep tools and new parts close by. Organizing your space helps you stay focused and work faster.
Removing Old Tap Mixer
Use a wrench to loosen the nuts holding the tap in place. Turn counterclockwise until the tap is free. Be careful not to damage pipes or fittings.
Disconnect the water supply hoses from the tap. Remove the tap from the sink carefully. Clean the area before fitting the new mixer.
Installing The New Tap Mixer
Installing the new kitchen tap mixer is a key step to ensure your sink works perfectly. Take your time to fit it right. Follow simple steps to place and connect the mixer securely. This will help avoid leaks and keep your kitchen neat.
Positioning The Mixer
Start by placing the new mixer over the sink hole. Make sure it fits well and sits flat on the surface. Align the mixer so the handles are easy to reach. Check that the spout can turn freely without hitting the sink edges.
Securing The Fittings
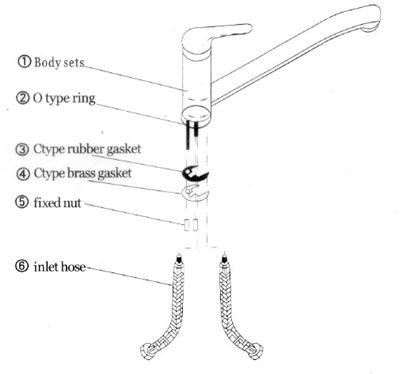
Under the sink, secure the mixer with the provided fittings. Tighten the mounting nut by hand first. Use a wrench to make it firm, but do not overtighten. The mixer should not move or wobble. Proper tightening keeps the tap steady during use.
Connecting Water Lines
Attach the hot and cold water supply lines to the mixer. Match the lines to the correct inlets, usually marked red for hot and blue for cold. Use plumber’s tape on the threads to prevent leaks. Tighten the connections with a wrench carefully. Check for any drips before finishing.
Testing And Finishing Touches
After installing your new kitchen tap mixer, testing and finishing touches are essential. This step ensures everything works well and looks tidy. Proper checks prevent future problems and keep your kitchen safe.
Checking For Leaks
Turn on the water supply slowly. Watch all joints and connections closely. Look for any drops or wet spots. Even small leaks can cause damage over time. Tighten fittings gently if you see water escaping. Use a dry cloth to help spot moisture clearly.
Adjusting Water Flow
Test both hot and cold water flows. Adjust the handles to get the right pressure. Make sure the water mixes smoothly. Avoid very strong pressure that can splash. Also, check if water flows evenly from the spout. Adjust valves under the sink if needed.
Cleaning Up
Wipe the tap and sink area clean. Remove any dirt or fingerprints left from installation. Clear away tools and old parts. Check for leftover packaging or debris. A clean workspace helps keep your kitchen neat and ready for use.
Troubleshooting Common Issues
Troubleshooting common issues with your kitchen tap mixer helps keep your kitchen working well. Many problems are simple and can be fixed without a plumber. Knowing what to check saves time and money.
Leaks And Drips
Leaks and drips waste water and can cause damage. Check the tap’s washers and seals first. Worn-out washers often cause drips. Tighten or replace loose washers to stop leaks. Also, clean the valve seat if it looks dirty or rough. If the leak continues, the cartridge inside the mixer might need replacing.
Low Water Pressure
Low water pressure can make washing dishes slow and frustrating. Start by checking the aerator on the tap’s spout. Dirt and mineral build-up often block water flow. Unscrew the aerator and clean it well. Also, check valves under the sink to ensure they are fully open. If pressure is still low, the cartridge inside the tap might be clogged or damaged.
Loose Fittings
Loose fittings cause wobbling taps and leaks. Use a wrench to tighten any loose nuts under the sink. Be careful not to overtighten as it can cause damage. Check the mounting nuts that hold the tap to the sink. Tighten them to secure the tap firmly. Loose fittings often cause leaks at the base of the tap or below the sink.

Credit: www.youtube.com
Credit: artofdiy.wordpress.com
Frequently Asked Questions
How Do I Turn Off Water Before Changing Kitchen Tap Mixer?
Turn off the main water supply to your kitchen. Open the tap to drain any remaining water. This prevents leaks and water damage during replacement.
What Tools Are Needed To Change A Kitchen Tap Mixer?
You need an adjustable wrench, screwdriver, basin wrench, and plumber’s tape. These tools help loosen fittings and seal connections properly.
How Long Does It Take To Replace A Kitchen Tap Mixer?
Replacing a kitchen tap mixer usually takes 30 to 60 minutes. Time depends on your experience and the tap model complexity.
Can I Replace The Kitchen Tap Mixer Myself?
Yes, with basic plumbing skills and proper tools, you can replace it. Follow safety steps and manufacturer instructions carefully to avoid damage.
Conclusion
Changing a kitchen tap mixer can be simple and quick. Follow each step carefully and take your time. Use the right tools and check for leaks after installation. A new tap mixer can improve your kitchen’s look and function. Enjoy the fresh, clean water flow every day.
Small repairs like this save money and keep your home working well. Try it yourself and gain confidence for future projects. It’s easier than you think.