
Is your shower arm loose or leaking? This small problem can turn your daily shower into an annoying experience.
But don’t worry—you don’t need to call a plumber or buy expensive tools. You can fix it yourself quickly and easily. You’ll learn simple steps to tighten your shower arm and stop leaks for good. Keep reading, and you’ll have your shower working perfectly in no time.
Tools And Materials Needed
Gathering the right tools and materials is the first step to tightening a shower arm. Having everything ready saves time and avoids frustration. This list covers simple items that most people can find easily.
Each tool has a specific purpose. Using them correctly ensures a firm, leak-free shower arm connection.
Adjustable Wrench
An adjustable wrench fits different sizes of nuts and bolts. It helps you grip and turn the shower arm without damaging it. This tool is essential for loosening and tightening connections.
Plumber’s Tape (teflon Tape)
Plumber’s tape seals pipe threads to prevent leaks. Wrap the tape around the threads of the shower arm before screwing it in. It creates a tight, water-resistant seal.
Rag Or Cloth
A rag protects the shower arm’s finish while you work. Place it between the wrench and the arm to avoid scratches. It also helps clean any dirt or old tape from the threads.
Pipe Joint Compound (optional)
Pipe joint compound adds extra sealing power. Apply a small amount to threads for a stronger hold. Use it with plumber’s tape for best results in areas with high water pressure.
Identify The Leak Source
Start by checking where water drips around the shower arm. Look closely at the joints and connections. Finding the exact leak spot helps fix it faster.
Check For Visible Water Drips
Start by looking closely at the shower arm connection. See if water drips from the joint between the arm and the wall pipe. Drips here often mean the connection is loose or the seal is worn out. Dry the area completely before inspecting to spot even small leaks.
Inspect The Shower Arm Threads
Remove the showerhead and check the threads on the shower arm. Look for cracks, rust, or worn-out tape. Damaged threads can cause leaks and make it hard to tighten the arm properly. Clean the threads well before trying to fix the leak.
Look For Water Stains Or Damage
Examine the wall around the shower arm for water stains or mold. These marks show where water has been leaking over time. Water stains can also mean the leak is behind the wall and might need extra repair steps.
Test Water Flow And Pressure
Turn on the shower and watch the water flow near the arm connection. Low pressure or uneven spray can mean a leak or blockage inside the arm. Pay attention to any sound of dripping or water running when the shower is off.
Turn Off Water Supply
Turning off the water supply is the first step to tighten a shower arm safely. It stops water from flowing while you work. This prevents leaks and water damage in your bathroom.
Knowing where to turn off the water helps you avoid surprises. Usually, the main water valve or a local shutoff valve controls the water to your shower. Make sure the water is completely off before starting.
Locate The Main Water Valve
The main water valve usually sits near the water meter or where the pipe enters your home. It controls water flow to the entire house. Turn it clockwise to close the valve and stop the water supply.
Find The Shower Shutoff Valve
Some homes have a shutoff valve just for the shower. It may be behind an access panel or under the sink nearby. Turn this valve clockwise to stop water only to the shower arm.
Test The Water Flow
After turning off the valve, open the shower faucet. Check if water still comes out. No water means it is safe to start tightening the shower arm. If water flows, turn the valve more tightly or try the main valve.

Credit: www.reddit.com
Remove The Shower Arm
Removing the shower arm is the first step to tightening it properly. The shower arm connects the showerhead to your plumbing inside the wall. Over time, this part can become loose or leak. Taking it off lets you check for damage or worn-out tape. This step also helps you apply new plumber’s tape for a better seal.
Before starting, gather the right tools. You will need a pipe wrench or adjustable wrench, plumber’s tape, and a cloth. Turn off the water supply to avoid any spills or sprays. Cover the shower arm with a cloth to protect its finish from scratches during removal.
Prepare The Area
Clear the space around the shower arm. Remove any shower curtains or doors that block access. Place a towel or bucket under the arm to catch any drips. Ensure good lighting to see the connections clearly.
Loosen The Shower Arm
Use the wrench to gently turn the shower arm counterclockwise. Hold the wall pipe steady to avoid damage. Do not force it too hard; this can break the pipe or fittings. If it feels stuck, apply some penetrating oil and wait a few minutes. Try loosening it again with steady pressure.
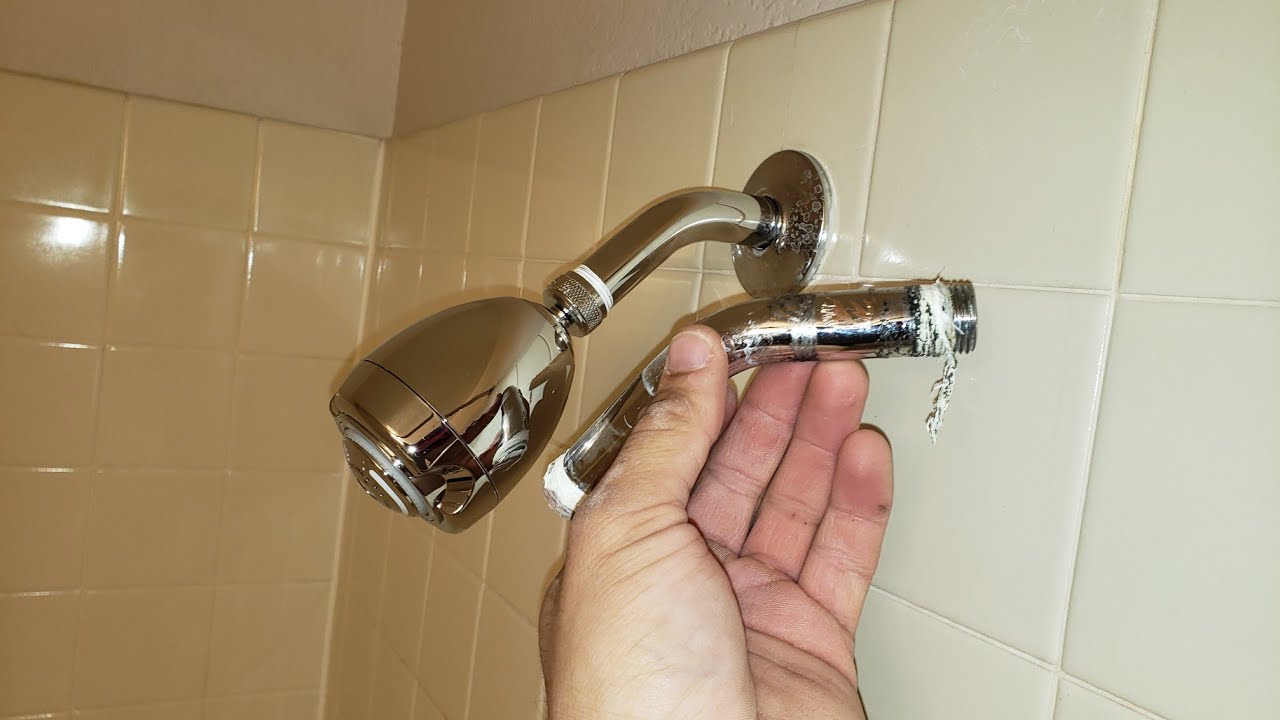
Once loose, keep turning by hand until the arm comes free. Pull it straight out carefully. Check the threads on both the arm and the wall pipe for dirt or damage. Clean any old tape or debris from the threads before proceeding.
Clean And Prepare Threads
Cleaning and preparing the threads of a shower arm is a crucial step. It ensures a tight and leak-free connection. Dirt, old tape, and rust can stop the shower arm from fitting properly.
Take your time to clean the threads well. This will make the tightening process easier and more effective.
Remove Old Tape And Debris
Use a cloth or brush to clear old plumber’s tape from the threads. Dirt and grime can stick to the tape. Scrape off any stuck bits gently with a small tool or your fingernail. Make sure the threads look clean and clear.
Clean Threads With Vinegar
Soak a cloth in white vinegar and wrap it around the threads. Let it sit for about 10 minutes. Vinegar helps remove mineral build-up and rust. After soaking, scrub the threads with a brush to clean them thoroughly.
Dry Threads Completely
Use a dry cloth to wipe the threads after cleaning. Moisture can stop the tape from sticking well. Make sure the threads are dry before moving to the next step. This helps create a strong seal and prevents leaks.

Credit: www.youtube.com
Apply Thread Seal Tape
Applying thread seal tape is a key step when tightening a shower arm. The tape helps stop leaks by sealing the connection. It wraps around the threads of the shower arm pipe. This creates a tight, water-resistant barrier.
Using thread seal tape is simple and quick. It prevents water from escaping through small gaps. This keeps your bathroom dry and avoids damage from leaks.
Choose The Right Thread Seal Tape
Select tape made for plumbing use. It is usually white and thin. Avoid using tapes meant for other jobs. Plumbing tape sticks well and resists water pressure.
Clean The Shower Arm Threads
Remove dirt or old tape from the threads. Use a cloth to wipe the pipe clean. Clean threads help the tape stick better. This ensures a stronger seal and no leaks.
Wrap The Tape Correctly
Start wrapping at the end of the pipe threads. Wrap the tape clockwise around the threads. Overlap each layer slightly. Usually, 2 to 3 layers are enough.
Press The Tape Firmly
Press the tape down as you wrap. Make sure it covers all threads evenly. Smooth out any wrinkles or bubbles. This prevents gaps where water could leak.
Trim Excess Tape
Cut off extra tape beyond the threads. Too much tape can block the shower arm. A clean finish helps the parts fit tightly together.
Reinstall And Tighten The Shower Arm
Reinstalling and tightening a shower arm is a key step in fixing leaks or wobbling. This part connects the showerhead to the water pipe inside the wall. Ensuring it is secure stops water from dripping and keeps the showerhead steady.
Follow these steps carefully to put the shower arm back in the right place. Use the right tools and materials to avoid damage or leaks.
Prepare The Shower Arm And Pipe
Clean the threads on both the shower arm and the pipe. Remove old tape or debris. Wrap new plumber’s tape around the pipe threads. This helps create a tight, leak-free seal.
Hand-tighten The Shower Arm
Insert the shower arm into the pipe carefully. Turn it clockwise by hand to avoid cross-threading. Stop when it feels snug and aligned with the wall.
Use A Wrench To Tighten
Wrap a cloth around the shower arm to protect its finish. Use an adjustable wrench to turn the arm further. Tighten it just enough to stop movement. Avoid over-tightening to prevent damage.
Check Alignment And Leak
Make sure the shower arm points in the right direction. Turn on the water and check for leaks. Tighten a little more if needed. The arm should not move or leak.
Check For Leaks
Checking for leaks is an important step after tightening your shower arm. Even a small leak can waste water and cause damage over time. Careful inspection helps you catch problems early.
Leaks often appear around the joints where the shower arm connects to the wall or the showerhead. Water dripping or pooling means a seal might not be tight enough. Fixing leaks quickly keeps your bathroom dry and safe.
Inspect The Shower Arm Joint
Start by looking closely at the joint between the shower arm and the wall pipe. Use a dry cloth to wipe the area clean. Turn on the water and watch for any drips or moisture forming.
Check The Showerhead Connection
Next, check where the showerhead attaches to the arm. A loose connection here can cause leaks. Tighten the showerhead gently and see if water still escapes.
Use Paper Towel For Leak Detection
Wrap a dry paper towel around the joints. Run the water for a minute. If the towel gets wet, it shows exactly where the leak is. This trick helps spot leaks that are hard to see.
Listen For Dripping Sounds
Sometimes leaks make soft dripping sounds. Stand quietly near the shower and listen. This method works well when leaks are slow and not obvious.
Repeat Tightening If Needed
If leaks appear, turn off the water and tighten the connections more. Avoid overtightening, as this can damage threads. Test again until no leaks show.
Tips For Preventing Future Leaks
Preventing leaks in your shower arm saves water and avoids damage. Small leaks can turn into big problems fast. Taking simple steps stops leaks before they start. These tips help keep your shower arm tight and secure.
Use Teflon Tape Properly
Wrap Teflon tape around the threads of the shower arm. This creates a tight seal that blocks water from escaping. Wrap the tape clockwise three to four times for best results. Avoid overlapping too much, which can cause uneven sealing.
Check For Corrosion Regularly
Inspect the shower arm for rust or corrosion. Corrosion weakens the metal and causes leaks. Clean the area gently with a wire brush if you spot rust. Replace the shower arm if corrosion is severe to prevent leaks.
Tighten Without Overdoing It
Use a wrench to tighten the shower arm carefully. Too tight can strip the threads or crack the pipe. Hand-tighten first, then use the wrench for a quarter turn. Stop tightening if you feel strong resistance.
Choose The Right Shower Arm
Match the shower arm size and thread type with your plumbing. Using the wrong size can cause gaps and leaks. Check the packaging or manual to find the correct fit. Quality materials last longer and resist leaks better.
Regularly Inspect And Maintain
Look at the shower arm every few months. Check for any signs of leaks or looseness. Early detection helps fix problems before water damage occurs. Tighten or replace parts as needed to keep everything secure.
Credit: www.youtube.com
Frequently Asked Questions
How Do I Tighten A Loose Shower Arm?
Use plumber’s tape on the threads and tighten with a wrench. Turn gently to avoid damage.
What Tools Do I Need To Tighten A Shower Arm?
You need an adjustable wrench and plumber’s tape. A cloth helps protect the finish.
Can I Tighten A Shower Arm Without Removing It?
Yes, wrap plumber’s tape and tighten with a wrench carefully. Avoid overtightening to prevent leaks.
How Much Plumber’s Tape Should I Use On Shower Arm?
Wrap the tape around the threads 3 to 4 times. This ensures a tight, leak-free seal.
Why Is My Shower Arm Leaking After Tightening?
The tape might be missing or damaged. Remove the arm, reapply tape, and tighten again.
How Do I Avoid Scratching My Shower Arm During Tightening?
Use a cloth around the arm before using the wrench. This protects the metal finish from scratches.
How Often Should I Check My Shower Arm For Tightness?
Check every 6 months or when you notice leaks. Regular checks prevent water damage and leaks.
Conclusion
Tightening a shower arm is a simple fix anyone can do. Use the right tools and follow the steps carefully. Avoid overtightening to prevent damage. Regular checks help keep your shower working well. A secure shower arm stops leaks and saves water.
Small efforts now prevent bigger problems later. Enjoy a steady, leak-free shower every day.