
Are you ready to give your cabinets a polished, finished look? Attaching cabinet end panel skins might seem tricky, but with the right steps, you can do it yourself and save time and money.
Imagine transforming your space with smooth, seamless panels that protect and beautify your cabinets. In this guide, you’ll discover simple tips and clear instructions to help you attach those end panel skins like a pro. Keep reading, and you’ll have the confidence to complete your project quickly and easily.

Credit: www.youtube.com
Choosing The Right End Panel Skins
Choosing the right end panel skins is important for a neat cabinet finish. It helps the cabinet look complete and matches your room design. Picking the right type and size makes the installation easier and the result better.
Types Of End Panel Skins
End panel skins come in several types. You can find wood veneer, laminate, and melamine. Wood veneer has a natural wood look and feels warm. Laminate is durable and easy to clean. Melamine is affordable and comes in many colors. Choose a type that fits your budget and style.
Matching Materials And Finishes
Match the panel skin to your cabinet material. If your cabinet is wood, pick a wood veneer or wood-look laminate. For painted cabinets, a smooth laminate skin works well. The finish should also match. Glossy finishes suit modern kitchens. Matte finishes work for a classic look.
Measuring For Accuracy
Measure the cabinet end carefully before buying skins. Measure height, width, and thickness. Write down all measurements. Check twice to avoid mistakes. Accurate measuring helps the skin fit perfectly. It also reduces waste and extra costs.
Preparing The Cabinet Surface
Preparing the cabinet surface is a key step before attaching end panel skins. It ensures the panel sticks well and lasts longer. A clean, smooth, and dry surface helps the adhesive work better. This process takes time but makes a big difference in results.
Cleaning And Smoothing
Start by wiping the cabinet surface with a damp cloth. Remove all dirt, grease, and dust. Use mild soap if needed, but avoid harsh chemicals. After cleaning, check for rough spots or bumps. Sand these areas gently with fine-grit sandpaper. A smooth surface helps the panel skin fit tightly and look neat.
Removing Old Adhesive
Old glue can stop new adhesive from sticking well. Use a plastic scraper or putty knife to lift off dried glue. For sticky residue, apply adhesive remover or rubbing alcohol. Let the solution sit for a few minutes before wiping it away. Make sure all old adhesive is gone to prevent bumps under the panel skin.
Ensuring Dry And Dust-free Surface
After cleaning and sanding, the surface must be dry. Use a dry cloth to remove moisture completely. Dust can block the adhesive and cause weak bonding. Use a tack cloth or a vacuum to remove tiny dust particles. A clean, dry surface ensures the cabinet end panel skin attaches firmly and stays in place.
Cutting The Panel Skins To Size
Cutting the cabinet end panel skins to the right size is an important step. It ensures the skins fit perfectly on your cabinets. Accurate cuts prevent gaps and uneven edges. This part of the process needs care and the right tools. Follow simple steps for a clean, professional look.
Tools Needed For Cutting
You will need a few basic tools for cutting panel skins. A measuring tape helps you get exact sizes. A pencil or marker is useful for marking lines. Use a straight edge or ruler to guide your cuts. A utility knife or a fine-tooth saw works well for cutting. Sandpaper can smooth rough edges after cutting.
Marking The Panels
Start by measuring the cabinet ends carefully. Mark the panel skins with a pencil along the desired cut lines. Double-check your measurements before cutting. Use a ruler or straight edge to draw straight lines. Clear marks help you cut accurately and avoid mistakes.
Tips For Straight Cuts
Cut slowly and follow the marked lines closely. Keep the cutting tool steady and straight. Use clamps to hold the panel skin firmly in place. If using a utility knife, score the panel several times before cutting through. Sand any rough edges gently for a neat finish. Straight cuts create a better fit and cleaner look.
Credit: www.woodworkingtalk.com
Applying Adhesive Correctly
Applying adhesive correctly is key to a strong bond between the cabinet end panel skin and the cabinet surface. Using the right technique helps avoid bubbles, gaps, or peeling later. Follow these steps carefully for a smooth, lasting finish.
Types Of Adhesives To Use
Choose an adhesive made for wood or laminate. Contact cement and wood glue work well. Contact cement bonds quickly and holds tightly. Wood glue offers strong hold but needs clamps to set. Avoid general-purpose glues that may not stick well.
Spreading Adhesive Evenly
Apply adhesive in thin, even layers. Use a brush or roller for smooth coverage. Cover the entire panel surface without overdoing it. Too much glue causes lumps or mess. Too little glue weakens the bond and may cause peeling.
Allowing Proper Drying Time
Let the adhesive dry as instructed on the label. Some adhesives need to be tacky before pressing the panel. Others require full drying before joining surfaces. Rushing this step leads to weak bonds. Patience ensures the panel sticks firmly and lasts long.
Attaching The Panel Skins
Attaching cabinet end panel skins requires care and precision. This step ensures a smooth, professional finish on your cabinets. Proper attachment helps the skins stay in place and look great for years. Follow these simple steps for best results.
Aligning The Skins Perfectly
Place the panel skins carefully on the cabinet ends. Check edges and corners to match exactly. Use a ruler or straight edge to confirm alignment. Take your time to avoid any gaps or uneven parts.
Pressing And Securing
Once aligned, press the skins firmly against the surface. Apply even pressure across the entire panel. This helps the adhesive bond well and prevents bubbles. Use a roller or your hands to smooth the skin down gently.
Using Clamps Or Weights
Hold the skins tightly in place with clamps or weights. Position clamps evenly to avoid warping the panel. Leave them for the time recommended by the adhesive manufacturer. This keeps the skin secure while drying.
Finishing Touches
Finishing touches make your cabinet end panel skins look neat and professional. They help the panel fit perfectly and last longer. Take your time to do these steps carefully. Small details can make a big difference in your final result.
Trimming Excess Material
Use a sharp utility knife or a fine-tooth saw to trim extra panel skin. Cut along the edges slowly and carefully. Avoid cutting too deep to prevent damage to the cabinet. Keep the cuts straight for a clean look. Trim little by little to control the shape better.
Sanding Edges Smoothly
Sand the edges gently with fine-grit sandpaper. This removes rough spots and sharp corners. Sand in one direction to keep edges even. Wipe away dust with a dry cloth after sanding. Smooth edges help the panel look finished and feel safe to touch.
Cleaning And Polishing
Clean the panel surface with a soft cloth and mild cleaner. Remove dust, glue, or fingerprints for a clear finish. Use a dry cloth to polish the panel gently. Polishing brings out the color and protects the skin. A clean, shiny panel enhances the kitchen’s overall look.
Common Mistakes To Avoid
Attaching cabinet end panel skins might seem simple. Yet, many people make mistakes that cause problems later. Avoiding common errors saves time and effort. It also helps your cabinet look neat and last longer.
Misalignment Issues
Placing the panel skin slightly off can ruin the cabinet’s look. It may cause gaps or uneven edges. Always measure carefully before fixing the panel. Use clamps or guides to hold the skin straight. Check alignment twice before securing it in place.
Using Wrong Adhesive
Not all glues work well with cabinet skins. Some adhesives do not stick firmly or damage the material. Choose an adhesive made for wood or laminate surfaces. Follow the instructions on the glue container. Using the right glue ensures a strong, lasting bond.
Rushing The Drying Process
Fixing the panel without letting the glue dry fully can cause peeling. The bond will be weak and may fail quickly. Give enough time for the adhesive to cure. Avoid moving or stressing the panel until the glue is dry. Patience improves the final result.
Maintenance Tips For Longevity
Taking care of cabinet end panel skins helps keep them looking good longer. Proper maintenance stops damage and wear. Simple steps can protect your panels from common issues. Follow these tips to extend the life of your cabinet skins.
Regular Cleaning
Clean the panels often using a soft cloth. Wipe gently to avoid scratches. Use mild soap and water for dirt. Avoid harsh chemicals that can damage the finish. Dry the surface well after cleaning to prevent marks.
Avoiding Excess Moisture
Keep cabinet skins dry at all times. Moisture can cause warping or swelling. Fix leaks or spills quickly. Use vents or fans in humid areas. Place a moisture barrier if needed near sinks or dishwashers.
Handling Repairs
Fix small damages right away. Use wood filler or touch-up paint for scratches. Replace loose or broken panels promptly. Check screws and fasteners regularly. Proper repairs stop problems from getting worse.
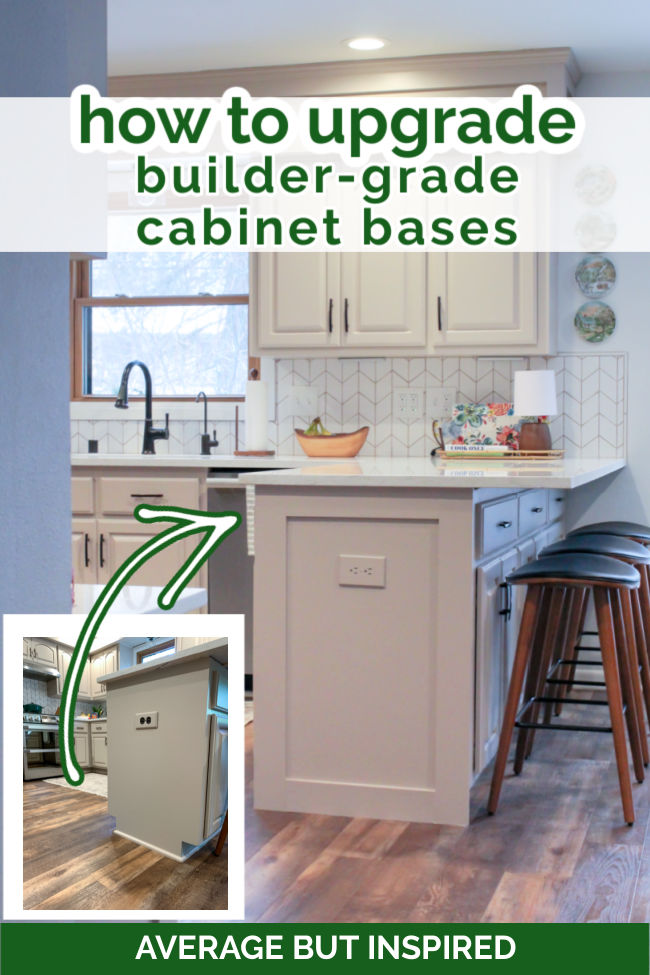
Credit: averageinspired.com
Frequently Asked Questions
What Tools Do I Need To Attach Cabinet End Panel Skins?
You need a measuring tape, adhesive, clamps, a utility knife, and a sanding block. These tools help ensure a clean and secure fit.
How Do I Prepare The Cabinet Surface For Panel Skin?
Clean the surface well and sand it lightly to remove rough spots. This helps the adhesive stick better.
What Type Of Adhesive Works Best For Cabinet Panel Skins?
Use contact cement or wood glue for strong, lasting adhesion. Apply evenly for the best results.
How Long Should I Wait Before Attaching The Panel Skin?
Let the adhesive become tacky, usually 10 to 15 minutes. This timing ensures a firm bond.
Can I Trim The Panel Skin After Attaching It?
Yes, carefully use a utility knife to trim excess material. Go slow to avoid damaging the skin.
How Do I Avoid Bubbles Under The Panel Skin?
Press firmly from the center outward to push out air bubbles. Use a roller or clamp for even pressure.
What Finish Work Is Needed After Attaching The Panel Skin?
Lightly sand edges and clean off dust for a smooth finish. You may apply a sealant for protection.
Conclusion
Attaching cabinet end panel skins is simple with the right steps. Measure and cut carefully for a perfect fit. Use strong glue and clamps to hold the panel in place. Take your time to avoid mistakes. With patience, your cabinets will look neat and polished.
Practice makes the process easier each time. Keep tools ready and follow safety tips. Enjoy your improved cabinets and the clean, finished look they bring.