
If you want your Square D pressure switch to work just right, knowing how to adjust it is key. A pressure switch that’s set too high or too low can cause problems with your system, costing you time and money.
But don’t worry — adjusting it yourself is easier than you might think. In this guide, you’ll learn simple steps to get your pressure switch running smoothly and keep your equipment safe and efficient. Keep reading, and you’ll be able to make the adjustments with confidence today.
Tools Needed
Before adjusting a Square D pressure switch, gather the right tools. Having the correct tools ensures a safe and smooth process. It saves time and helps avoid damage to the switch or system.
Use basic tools that are easy to find. Prepare a clean workspace to keep everything organized. Check each tool for damage or wear before starting.
Adjustable Wrench
An adjustable wrench fits different bolt sizes on the pressure switch. It helps loosen or tighten nuts without slipping. Choose one with a comfortable grip for better control.
Flathead Screwdriver
A flathead screwdriver adjusts the pressure settings inside the switch. It fits into the adjustment screws carefully. Use a screwdriver with a sturdy handle to avoid slipping.
Voltage Tester
A voltage tester checks if power is off before working on the switch. It prevents electrical shocks. Always test wires and terminals to ensure safety.
Safety Gloves
Wear safety gloves to protect your hands from sharp edges. Gloves also provide better grip on tools. Choose gloves made for electrical or mechanical work.
Flashlight
A flashlight helps see small parts inside the pressure switch. Good lighting improves accuracy during adjustments. Use a bright, handheld flashlight for convenience.
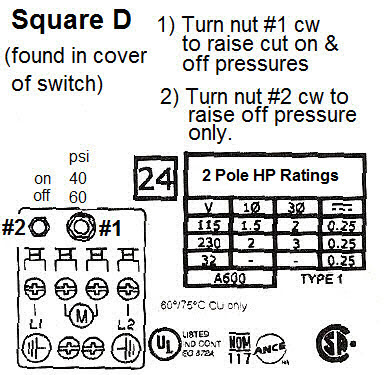
Credit: www.wwpp.co
Safety Precautions
Adjusting a Square D pressure switch requires care. Safety should be your top priority. Ignoring safety can cause injury or damage. Follow these precautions before starting your work.
Turn Off Power Supply
Always switch off the main power before adjusting the switch. This step prevents electrical shocks. Use a voltage tester to confirm power is off.
Release System Pressure
Drain the water pressure from your system before adjustment. High pressure can cause sudden bursts. Open a faucet or valve to release pressure safely.
Wear Protective Gear
Use safety goggles and gloves to protect your eyes and hands. Tools and parts may slip or snap. Protection reduces the risk of injury.
Work In A Dry Area
Ensure your working area is dry and clean. Water and electricity do not mix. A dry environment lowers the risk of electrical hazards.
Use Proper Tools
Choose the right tools for the job. Using the wrong tools can damage the switch. Proper tools make the adjustment easier and safer.
Locate The Pressure Switch
Locating the pressure switch is the first step in adjusting a Square D pressure switch. This small device controls the water pump by turning it on and off based on water pressure. Knowing where to find it saves time and avoids confusion.
The pressure switch usually sits near the water tank or pump. It connects to the system with a small pipe or tube. The switch is often inside a metal or plastic box with a cover that you can remove.
Check Near The Water Pump
Start your search by looking at the water pump area. The pressure switch is almost always mounted close to the pump. Look for a small box attached to the pipe going into or out of the pump.
Look For The Pressure Tube
Spotting the pressure tube helps locate the switch. This tube runs from the pipe to the switch. It is often a thin metal or plastic pipe.
Identify The Switch Box
The switch box is usually square or rectangular. It may have the brand name Square D on it. The box cover can be lifted or unscrewed to access the switch.
Remove The Cover
Removing the cover of your Square D pressure switch is the first step to adjust it safely. This step lets you access the internal parts that control the pressure settings. Always make sure the power is off before you start. Safety is key to avoid electric shock or damage.
The cover protects the switch from dust and moisture. Removing it carefully keeps the switch clean and working well. Follow these steps to remove the cover without causing any harm.
Turn Off The Power
Find the main power source for the pressure switch. Switch it off completely. This prevents any electrical accidents while you work on the switch.
Locate The Cover Screws
Look around the pressure switch for small screws holding the cover. These screws keep the cover tightly in place. Use a screwdriver that fits well to avoid stripping the screws.
Remove The Screws
Unscrew each one carefully and place them somewhere safe. Keep them in a small container so they don’t get lost. Handle the screws gently to avoid damage.
Lift Off The Cover
Once the screws are out, gently lift the cover straight up. Avoid forcing it to prevent breaking any clips or parts. Set the cover aside on a clean surface.
Identify Adjustment Screws
Knowing how to identify the adjustment screws is the first step in adjusting a Square D pressure switch. These screws control the pressure settings that turn your pump on and off. Finding the right screws makes the adjustment process easier and safer.
The adjustment screws are usually located under the cover of the pressure switch. You need to remove the cover carefully to see them. Inside, you will find two main screws, each with a specific role.
Location Of The Adjustment Screws
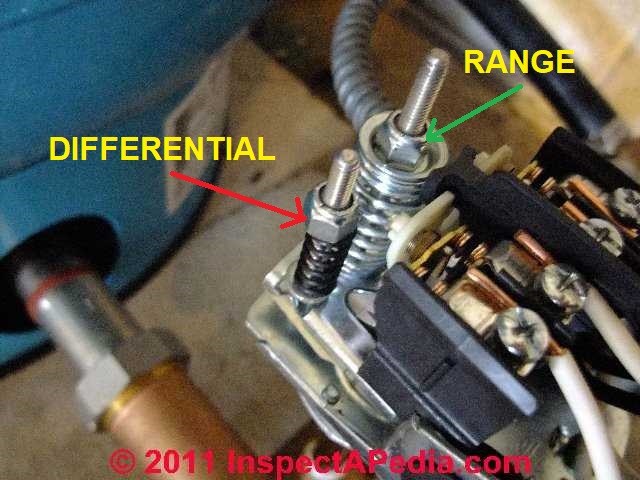
The screws sit on the pressure switch’s spring assembly. One screw controls the cut-in pressure, which starts the pump. The other controls the cut-out pressure, which stops the pump. These screws are often marked or labeled for easy identification.
Visual Differences Between Screws
The cut-in screw is usually smaller or thinner than the cut-out screw. The cut-out screw often has a lock nut to keep it in place. This lock nut must be loosened before making adjustments.
Tools Needed To Adjust Screws
A flathead screwdriver is commonly used to turn these screws. Some models may require a small wrench for the lock nut. Using the correct tool helps prevent damage to the screws.
Adjust Cut-in Pressure
Start by turning off the power to the pressure switch. Then, turn the cut-in pressure screw to set the desired pressure. Adjust slowly and check the pressure gauge often.
Understanding Cut-in Pressure
The cut-in pressure is the point where the pump turns on. It starts pumping water to increase pressure. Setting this pressure correctly helps save energy and avoid pump damage. Too low or too high cut-in pressure causes problems.
Tools Needed For Adjustment
Use a flathead screwdriver or a small wrench. You may also need a pressure gauge. This gauge shows the current pressure. Make sure the power to the pump is off before adjusting.
Locating The Adjustment Screw
Open the pressure switch cover carefully. Find the small screw marked for cut-in pressure. It is usually near the spring or pressure dial. This screw controls when the pump starts.
Adjusting The Cut-in Pressure
Turn the screw slowly to adjust pressure. Clockwise turns increase cut-in pressure. Counterclockwise turns decrease it. Make small changes and check the pressure each time.
Testing The New Settings
Turn the pump power back on. Watch the pressure gauge as the pump runs. Confirm the pump starts at the new cut-in pressure. Make more adjustments if needed.
Adjust Cut-out Pressure
Adjusting the cut-out pressure on a Square D pressure switch controls when the switch stops the pump. This setting helps protect your pump and maintains proper water pressure. Proper adjustment ensures the pump turns off at the right pressure level, saving energy and preventing damage.
Follow these steps carefully for a safe and accurate adjustment.
Locate The Cut-out Pressure Adjustment Screw
First, find the cover on the pressure switch. Remove it carefully to see inside. Look for a small screw labeled for cut-out pressure. This screw controls when the pump stops running.
Check The Current Cut-out Pressure
Use a pressure gauge on your water system to read the current cut-out pressure. Note this number. It helps you know how much to adjust the screw.
Turn The Adjustment Screw
Turn the screw slowly. Clockwise raises the cut-out pressure. Counterclockwise lowers it. Make small turns only. Stop and check the pressure after each turn.
Test The New Cut-out Pressure Setting
Run the pump and watch the pressure gauge. See if the pump stops at the new cut-out pressure. Adjust more if needed. Ensure the pump turns off before reaching the maximum safe pressure.
Credit: inspectapedia.com
Test The Settings
Testing the settings on your Square D pressure switch is vital. It ensures the switch works correctly and protects your system. This step confirms that your adjustments meet your needs and that the pump starts and stops at the right pressures.
Careful testing prevents damage and extends the life of your pump. It also helps avoid costly repairs and downtime. Follow these simple steps to test the settings safely and accurately.
Check The Cut-in Pressure
Turn on the water supply and watch the pressure gauge. The cut-in pressure is when the pump starts. Compare this reading to your desired setting. Adjust if the pump starts too early or too late.
Observe The Cut-out Pressure
Let the pump run until it stops. This is the cut-out pressure. It should match the setting you chose. If the pump stops too soon or too late, make small adjustments on the switch.
Use A Pressure Gauge For Accuracy
Attach a reliable pressure gauge near the switch. This gives exact pressure readings. It helps you see if the switch settings are correct. Without a gauge, you may guess and make errors.
Test Multiple Times
Repeat the pump cycle several times. This confirms the switch works consistently. Watch if the pump starts and stops at the same pressures each time. Consistent operation means your settings are right.
Listen For Unusual Sounds
Pay attention to the pump noise during testing. Strange sounds may show a problem. It could mean the switch is faulty or set incorrectly. Address any odd noises before finishing your work.
Replace The Cover
Replacing the cover on a Square D pressure switch is a simple but important step. The cover protects the internal parts from dust, water, and damage. It also keeps the switch working safely and correctly.
After adjusting the pressure settings, take time to put the cover back carefully. A loose or missing cover can cause problems with the switch’s performance and safety.
Check The Cover For Damage
Before putting the cover back, examine it for cracks or breaks. A damaged cover can let moisture or dirt inside. Replace the cover if you see any damage. Using a good cover keeps the switch safe and clean.
Align The Cover Correctly
Place the cover so the screw holes line up with the base. Proper alignment helps the cover fit tightly. This step prevents dust and water from entering the switch.
Secure The Screws Firmly
Use a screwdriver to tighten the screws evenly. Tighten each screw a little at a time. Avoid over-tightening to stop stripping the screws or cracking the cover.
Double-check The Cover Fit
After securing the screws, check the cover for gaps. The cover should sit flush against the switch body. A tight fit ensures the switch stays protected and operates well.
Troubleshooting Tips
Troubleshooting a Square D pressure switch can feel tricky. Problems may stop your system from working right. Simple checks often fix common issues. Follow these tips to find and solve problems fast.
These troubleshooting steps save time and avoid costly repairs. Stay safe by turning off power before any work.
Checking For Power Supply Issues
First, verify the switch gets power. Use a tester to check voltage at terminals. No power means a wiring or breaker problem.
Look for loose wires or blown fuses. Tighten connections carefully. Replace damaged parts if needed.
Inspecting The Pressure Settings
Incorrect pressure settings cause frequent on/off cycling. Check cut-in and cut-out pressures on the switch.
Compare settings to your pump’s recommended range. Adjust screws gently to correct pressure points. Avoid over-tightening screws.
Cleaning And Removing Debris
Dirt or dust can block the switch mechanism. Open the cover and clean inside with a soft brush.
Clear any buildup around the pressure tube. Keep parts dry to prevent rust and corrosion.
Testing The Switch Contacts
Faulty contacts stop the switch from turning the pump on or off. Use a multimeter to test continuity.
Replace the switch if contacts are burned or stuck. Do not try to repair damaged contacts.
Verifying The Pressure Tube Condition
Check the pressure tube for cracks or leaks. A damaged tube gives wrong pressure readings.
Replace the tube if it is cracked or worn. Ensure the tube is firmly connected to the switch.

Credit: www.wikihow.com
Frequently Asked Questions
What Tools Do I Need To Adjust A Square D Pressure Switch?
You need a flathead screwdriver and a wrench. These tools help you safely open and adjust the switch cover.
How Do I Know When To Adjust The Pressure Switch?
Adjust the switch if your pump runs too often or stops too soon. It helps maintain correct water pressure.
Can I Adjust The Cut-in And Cut-out Pressure Settings?
Yes, turn the adjusting nuts inside the switch. One controls cut-in pressure, the other controls cut-out pressure.
Is It Safe To Adjust The Pressure Switch Myself?
Yes, but always turn off the power first. Follow safety steps to avoid electric shock or damage.
How Often Should I Check My Pressure Switch Settings?
Check your pressure switch every 6 to 12 months. Regular checks keep your system running smoothly.
What Happens If I Set The Pressure Too High Or Low?
Too high pressure can damage pipes; too low causes weak water flow. Correct settings protect your plumbing.
Can A Faulty Pressure Switch Cause Pump Problems?
Yes, a bad switch can cause the pump to start or stop incorrectly. Adjusting or replacing it fixes the issue.
Conclusion
Adjusting a Square D pressure switch is simple with clear steps. Always turn off power before starting for safety. Check the pressure settings carefully to avoid mistakes. Small changes can improve your system’s performance. Regular checks help keep your pump running well.
Take your time and follow instructions closely. This helps you avoid costly repairs later. You can save money by doing this yourself. Feel confident making adjustments with the right tools. Keep your system working smoothly and safely every day.