
Are you planning to add a shower in your basement? One of the most important steps you can’t afford to miss is the basement shower drain rough-in.
Getting this right early on saves you time, money, and headaches later. But if you’re unsure where to start or worried about making costly mistakes, you’re not alone. You’ll discover exactly what a basement shower drain rough-in involves, why it’s crucial, and how to handle it like a pro—even if you’re new to plumbing.
Keep reading to make your basement shower project smooth and stress-free from the very beginning.
Credit: www.doityourself.com
Planning The Drain Location
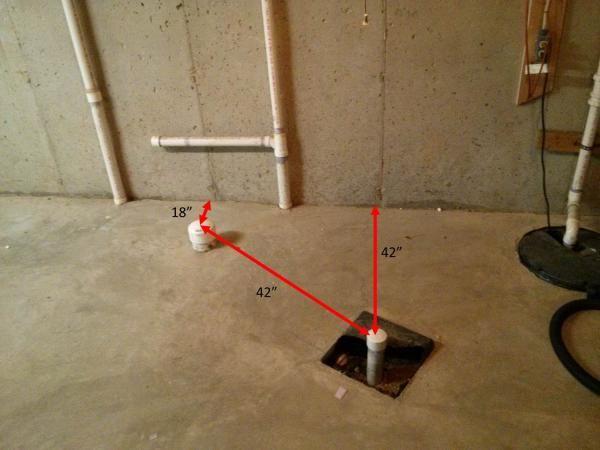
Planning the drain location is a key step for a basement shower drain rough-in. It ensures proper water flow and avoids future problems. This stage requires careful thought about where the drain will go. It affects plumbing, flooring, and shower installation. Taking time here saves effort later.
Choosing The Best Spot
Pick a spot near existing plumbing lines to reduce work. The drain should be in the shower floor’s lowest point. Avoid placing it too close to walls or corners. This helps water drain quickly and prevents pooling. Clear access for maintenance is important too. Think about the shower design and space around it.
Checking Local Codes
Local plumbing codes set rules for drain placement and size. Check these codes before starting work. Some areas require permits or inspections. Codes may specify minimum slope, pipe size, and venting. Following rules avoids fines and ensures safety. Visit your city’s website or call the building department for details.
Measuring For Proper Slope
Drain pipes need a slope to move water by gravity. The standard slope is 1/4 inch per foot. Measure carefully from the drain to the main sewer line. Use a level and tape measure for accuracy. A slope that’s too flat causes blockages. Too steep leads to noisy pipes and leaks. Proper slope ensures smooth drainage and long-lasting plumbing.

Credit: www.familyhandyman.com
Gathering Materials And Tools
Before starting a basement shower drain rough in, gather all needed materials and tools. This step saves time and avoids interruptions. It also helps ensure the installation goes smoothly and meets plumbing codes. Having the right supplies and equipment ready boosts confidence and efficiency.
Essential Plumbing Supplies
Get the right pipes for your drain, usually PVC or ABS. You will also need pipe fittings like elbows, tees, and couplings. A drain trap is necessary to prevent sewer gases from entering. Don’t forget pipe cement and primer to join parts securely. Drain strainers and cleanouts help with maintenance later.
Tools You’ll Need
Prepare a pipe cutter or saw to cut pipes neatly. A measuring tape helps measure pipe lengths accurately. Use a level to keep pipes straight and properly sloped. A wrench or pliers will tighten fittings. A drill may be needed for making holes in concrete or framing. Keep a bucket handy to catch water spills.
Safety Gear And Precautions
Wear safety glasses to protect your eyes from debris. Use gloves to avoid cuts and skin irritation. A dust mask shields you from dust when cutting pipes or drilling. Work in a well-ventilated area to avoid inhaling fumes from glue and primer. Keep a first aid kit nearby for minor injuries.
Preparing The Basement Floor
Preparing the basement floor is a key step before installing a shower drain. It sets the base for proper drainage and prevents future water problems. This process needs careful work to ensure the drain fits well and functions correctly.
Start by organizing the space and clearing out any obstacles. Then mark the exact spot for the drain. Finally, cut through the concrete to create the opening for the drain pipe. Each step requires attention to detail to avoid costly mistakes.
Clearing The Area
Remove all items from the basement floor where the shower will be. Clear dust, dirt, and debris for a clean workspace. This helps avoid damage to tools and materials. A clean area also makes measurements and cutting easier.
Marking The Drain Position
Identify the best place for the shower drain on the floor. Use a tape measure to find the center point. Mark this spot clearly with a pencil or chalk. Accurate marking ensures the drain pipe lines up with plumbing.
Cutting The Concrete
Use a concrete saw to cut the floor at the marked spot. Cut carefully to avoid cracking the surrounding concrete. The hole should be just big enough for the drain pipe. Wear safety gear to protect eyes and hands during cutting.
Installing The Drain Pipe
Installing the drain pipe in a basement shower is a key step. It ensures water flows out correctly and avoids leaks or backups. Proper pipe installation sets the foundation for a functional, long-lasting shower drain system.
Connecting To Existing Plumbing
First, find the nearest existing drain pipe. Cut into the pipe carefully to avoid damage. Use a proper fitting to join the new drain pipe. Secure the connection with glue or a coupling. Check for tightness to prevent leaks. This link must be strong to handle water flow.
Setting The Drain Pipe
Lay the new drain pipe from the shower drain to the connection point. Use sturdy, clean pipes rated for drainage. Avoid sharp bends that block water flow. Support the pipe with brackets or hangers. Keep the pipe steady and aligned with the floor.
Ensuring Proper Slope And Alignment
The drain pipe must slope downward toward the main drain. Aim for about a quarter inch drop per foot. This slope helps water flow freely. Use a level tool to check the angle. Adjust the pipe position as needed. Proper slope prevents standing water and clogs.
Securing The Drain Assembly
Securing the drain assembly is a key step in basement shower drain rough-in. This step ensures that the drain stays in place and prevents water leaks. Proper installation here helps avoid future problems like water damage and mold growth.
Each part must fit tightly and be sealed well. Take your time to check every joint and connection. A strong drain assembly means a long-lasting shower system.
Attaching The Shower Drain
First, position the drain body into the shower pan or floor opening. Make sure it sits flat and stable. Use screws or clips provided with the drain kit to secure it firmly. Avoid overtightening, which can crack the drain or floor.
Check that the drain aligns with the waste pipe below. Proper alignment prevents stress on pipes and reduces leak risk.
Sealing Joints And Connections
Apply plumber’s putty or a silicone sealant around the drain flange. This creates a watertight seal between the drain and shower base. Smooth out excess sealant for a clean finish.
Seal all pipe connections with thread tape or pipe dope. This stops water from seeping through the threads. Make sure seals are even and cover the entire joint surface.
Testing For Leaks
After assembly, test the drain for leaks before closing walls or floors. Pour water into the shower pan and watch all connections closely. Look for drips or wet spots below the drain.
Fix any leaks by tightening fittings or reapplying sealant. Retest until the drain stays dry and secure. This step saves time and money by catching issues early.
Finalizing The Rough-in
Finalizing the rough-in for your basement shower drain is a crucial step. This phase ensures that the plumbing is secure and ready for the next part of your project. Proper finishing prevents leaks and drainage problems later.
Careful attention to detail here saves time and money. Make sure all pipes are correctly placed and firmly connected. This stage sets the foundation for a smooth shower installation.
Backfilling And Leveling
After the drain pipes are laid, backfilling is next. Fill the trench with soil or gravel, packing it tightly around the pipes. This supports the pipes and keeps them from shifting.
Level the area carefully. A flat, even surface helps the shower base fit perfectly. Check the slope too; it must guide water toward the drain.
Preparing For Shower Installation
Clear debris from the rough-in area. Make sure the drain is clean and free of blockages. Test the drain for leaks by running water through it.
Mark the shower base position using measurements. Confirm all plumbing connections are secure. This preparation helps the installation go smoothly.
Documentation And Inspection Tips
Take photos of the rough-in work for records. Note pipe locations and connections for future reference. This documentation assists during inspections.
Schedule an inspection before covering the pipes. Inspectors check for code compliance and proper installation. Passing this step avoids costly fixes later.

Credit: diy.stackexchange.com
Frequently Asked Questions
What Is A Basement Shower Drain Rough-in?
A basement shower drain rough-in is the initial plumbing setup. It includes placing pipes and drains before pouring the concrete floor. This step ensures proper water flow from the shower.
How Deep Should A Basement Shower Drain Rough-in Be?
The drain pipe should be at least 12 inches below the floor level. This depth helps prevent leaks and allows good water drainage. Local codes may require specific depths.
Can I Install A Basement Shower Drain Rough-in Myself?
Yes, with basic plumbing skills and tools, you can do it. But careful measuring and following local codes is important. Mistakes can cause water damage later.
What Materials Are Needed For A Shower Drain Rough-in?
You will need PVC pipes, drain fittings, a drain trap, and a flange. Also, plumber’s putty and pipe glue are essential for sealing joints. These materials ensure a watertight drain system.
How Long Does It Take To Complete A Rough-in Drain?
Usually, it takes a few hours to a full day depending on complexity. Time varies if you need to cut concrete or move existing pipes. Proper planning speeds up the process.
Why Is Proper Slope Important In Shower Drain Rough-in?
A correct slope, usually 1/4 inch per foot, helps water flow smoothly. Too little slope causes water to pool; too much can clog pipes. The slope prevents drainage problems.
What Inspections Are Required After Rough-in Installation?
Local building inspectors check for code compliance and leak-free connections. This usually happens before covering pipes with concrete or flooring. Passing inspection avoids costly fixes later.
Conclusion
A basement shower drain rough-in sets the stage for a smooth shower install. Proper planning helps avoid leaks and water damage. Check local codes before starting any work. Use the right tools to make the job easier. Take your time to measure and fit pipes correctly.
A well-done rough-in saves time and money later. Even beginners can handle this with clear steps. Start with a solid foundation for a clean, dry basement. You’ll enjoy the comfort of a new shower space soon.