
When it comes to sealing gaps around your home, choosing the right caulk can make all the difference. You might have come across two common options: sanded and unsanded caulk.
But which one is best for your project? Picking the wrong type could lead to cracks, peeling, or a finish that just doesn’t look right. You’ll discover the key differences between sanded and unsanded caulk, so you can make the smartest choice and get a durable, professional-looking result every time.
Keep reading to find out which caulk fits your needs perfectly.
Caulk Basics
Caulk is a flexible material used to fill gaps and cracks. It helps stop water, air, and insects from getting inside. Caulk keeps buildings safe and energy efficient. It comes in different types for various jobs. Understanding caulk is key for home repairs and improvements.
What Is Caulk
Caulk is a soft, paste-like substance. It hardens after you apply it to a surface. It can stretch and move with the building. This prevents cracks from opening again. Caulk is made from silicone, latex, or other materials. Each type has different uses and benefits.
Common Uses
Caulk seals gaps around windows and doors. It stops drafts and moisture from entering. It fills cracks in walls, floors, and ceilings. Caulk also seals joints in bathroom tiles. It keeps water out and prevents mold growth. This simple tool improves comfort and protects your home.
Credit: www.cravingsomecreativity.com
Sanded Caulk Features
Sanded caulk is a popular choice for many home improvement projects. It has unique features that set it apart from other types of caulk. Understanding these features helps you pick the right product for your needs. Sanded caulk offers durability and a strong finish, making it ideal for certain surfaces.
Texture And Composition
Sanded caulk contains fine sand particles. These particles give it a gritty texture. This texture helps the caulk blend well with rough surfaces like stone or brick. The composition includes cement, sand, and latex or silicone. This mix makes sanded caulk hard and strong after it dries. It also resists cracking and shrinking over time.
Best Applications
Sanded caulk works best in wide gaps and rough areas. It is ideal for filling spaces between tiles or bricks. This caulk is perfect for outdoor use due to its toughness. It holds up well against weather changes and moisture. Sanded caulk also matches grout texture, which improves the look of tiled surfaces.
Unsanded Caulk Features
Unsanded caulk is a type of sealant used in areas that need a smooth finish. It contains no sand particles, making it softer and easy to spread. This feature helps it fill small gaps and cracks with precision. Unsanded caulk is also less abrasive, so it works well on delicate surfaces.
This caulk type is flexible and resists shrinking or cracking over time. It adheres well to materials like glass, metal, and ceramic. Because of its smooth texture, it creates clean lines and neat joints. These qualities make unsanded caulk a popular choice for indoor use.
Texture And Composition
Unsanded caulk has a smooth, creamy texture. It contains no gritty sand particles. This makes it easy to apply and shape with a finger or tool. Its soft composition allows it to fill narrow spaces effectively. The caulk cures to a flexible, rubbery finish. This flexibility prevents cracks as surfaces move or expand.
Best Applications
Unsanded caulk works best in small gaps under 1/8 inch wide. It is ideal for bathroom fixtures like sinks, tubs, and showers. Use it on smooth surfaces such as tile, glass, and metal. It seals joints where water resistance is important. Unsanded caulk is also good for interior trim and molding. It helps create neat, paintable seams without rough texture.
Comparing Performance
Choosing the right caulk matters for your project’s success. Sanded and unsanded caulk serve different needs. Their performance varies in important ways. Understanding these differences helps you pick the best option.
Durability
Sanded caulk contains fine sand particles. These particles add strength to the caulk. It holds up well under pressure and wear. It suits wide gaps and heavy-use areas. Unsanded caulk has a smoother texture. It works better on narrow joints. It may not last as long in high-stress spots.
Flexibility
Unsanded caulk is softer and more flexible. It moves easily with surfaces that expand or contract. This makes it ideal for areas with temperature changes. Sanded caulk is stiffer due to sand content. It resists cracking but bends less. Use unsanded caulk where flexibility is key.
Appearance
Unsanded caulk dries with a smooth, clean finish. It blends well with tiles and trim. Sanded caulk has a rougher, textured look. It matches better with grout lines in tile work. Choose based on the look you want to achieve.
Choosing Based On Surface Type
Choosing the right caulk depends on the surface you are working on. Different surfaces need different types of caulk for the best results. Sanded and unsanded caulks serve different purposes based on texture and durability needs. Understanding the surface type helps to pick the right caulk for a strong and clean finish.
Tile And Grout Lines
Tile and grout lines need caulk that can handle movement and moisture. Sanded caulk works well here because it has a gritty texture. The texture matches the roughness of grout and fills gaps better. It also resists cracking and shrinking in these tight spaces. Sanded caulk blends with grout lines, making repairs less visible.
Unsanded caulk is too smooth for grout lines. It may not stick well or last long. Use sanded caulk for tile edges, shower walls, and floor grout lines. It keeps the area sealed and looks natural.
Drywall And Trim
Drywall and trim require a smoother finish. Unsanded caulk is the best choice here. It spreads easily and creates a clean, neat line. The smooth texture fits small cracks and gaps perfectly.
Unsanded caulk paints well and blends with the wall or trim surface. Sanded caulk is rough and can damage delicate surfaces like drywall. Use unsanded caulk to fill nail holes, seams, and corners on walls and trim. It gives a polished look and holds paint well.
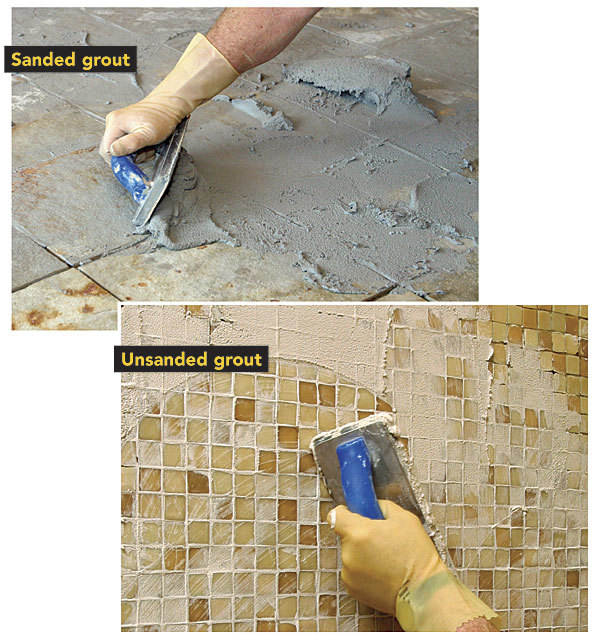
Credit: www.finehomebuilding.com
Application Tips
Applying sanded or unsanded caulk correctly ensures a neat, lasting finish. Knowing the right steps and tools helps avoid common mistakes. Proper preparation and finishing make your project look professional.
Preparation Steps
Clean the surface well before applying caulk. Remove old caulk and dirt using a scraper. Make sure the area is dry to help caulk stick better. Use painter’s tape to mark the edges for a straight line. Cut the caulk tube tip at a 45-degree angle. This controls the flow and size of the bead.
Tools Needed
Use a caulk gun for smooth, even application. Have a damp cloth or sponge nearby to wipe mistakes. A caulk smoothing tool or your finger helps shape the bead. Use a utility knife to trim excess dried caulk. Keep a bucket of water handy for cleaning tools and hands.
Finishing Techniques
Apply steady pressure on the caulk gun for an even bead. Smooth the caulk right after application for a clean look. Use a wet finger or tool to press caulk into gaps. Remove painter’s tape before the caulk dries to avoid tearing. Let the caulk dry fully according to package instructions before touching or painting.
Common Mistakes To Avoid
Choosing between sanded and unsanded caulk can be tricky. Many people make mistakes that cause poor results. These errors can lead to cracks, peeling, or a messy finish. Avoiding common mistakes saves time and money. Here are key mistakes to watch out for.
Wrong Caulk Selection
Using the wrong caulk type is a common error. Sanded caulk contains grit and works well for wide gaps. Unsanded caulk is smooth and suits narrow joints. Using sanded caulk on small cracks causes rough edges. Using unsanded caulk on large gaps leads to weak seals. Select the right caulk based on the size and type of gap. This helps ensure a strong, neat finish.
Improper Application
Applying caulk incorrectly reduces its effectiveness. Skipping surface cleaning leads to poor adhesion. The caulk may peel or crack quickly. Applying too much caulk creates a messy look. Applying too little leaves gaps unsealed. Use a steady hand and smooth out the caulk after application. Proper technique ensures a clean, lasting seal.

Credit: www.diffen.com
Maintenance And Longevity
Maintaining caulk properly extends its life and keeps surfaces sealed. Both sanded and unsanded caulk need care to stay effective. Understanding how to clean and when to reapply helps protect your home from water damage and mold.
Cleaning Tips
Use a soft cloth or sponge with mild soap and water. Avoid harsh cleaners that can break down the caulk. Gently scrub to remove dirt and mildew. For tough stains, try a mix of vinegar and water. Rinse thoroughly and let dry before touching the caulk again.
When To Reapply
Check caulk regularly for cracks or peeling. Sanded caulk may last longer in wide gaps but still needs replacing if damaged. Unsanded caulk works best in small joints and should be reapplied if it shrinks or pulls away. Reapply caulk every few years or after heavy wear. Proper reapplication keeps surfaces sealed and looking fresh.
Frequently Asked Questions
What Is The Difference Between Sanded And Unsanded Caulk?
Sanded caulk has small sand particles, making it rough and stronger. Unsanded is smooth and flexible.
When Should I Use Sanded Caulk?
Use sanded caulk for larger gaps and surfaces like tile or stone.
Is Unsanded Caulk Better For Small Cracks?
Yes, unsanded caulk works best for narrow joints and small cracks.
Can Sanded Caulk Be Used On Delicate Surfaces?
No, sanded caulk can scratch soft surfaces; use unsanded for delicate areas.
How Does Sanded Caulk Affect Tile Grout?
Sanded caulk matches grout texture and hides joints well in tiled areas.
Does Unsanded Caulk Shrink Or Crack Over Time?
Unsanded caulk is less likely to crack but may shrink if applied too thin.
Conclusion
Choosing between sanded and unsanded caulk depends on your project. Sanded caulk works well for wider gaps and rough surfaces. Unsanded caulk fits narrow gaps and smooth surfaces better. Both types seal and protect against water damage. Always pick the caulk that matches your material and gap size.
Proper use ensures a neat, long-lasting finish. Careful application makes all the difference. Your project will look clean and hold up well over time. Simple choices lead to great results.