
Are you planning to move your sink plumbing just a few inches but don’t know where to start? Shifting your plumbing might sound tricky, but with the right steps, you can do it yourself without calling a plumber.
Moving your sink plumbing even a small distance can improve your kitchen or bathroom layout and give you more space where you need it most. In this guide, you’ll learn simple, clear instructions that make the process easy to follow.
Keep reading to discover how to move your sink plumbing quickly and safely—saving time, money, and hassle along the way.
Tools And Materials Needed
Moving sink plumbing a few inches requires specific tools and materials. Having the right items makes the job smoother and safer. This section lists the must-have tools and materials for the task.
Essential Plumbing Tools
- Pipe wrench – for gripping and turning pipes
- Adjustable wrench – fits various nuts and bolts
- Hacksaw – to cut pipes accurately
- Pipe cutter – offers clean cuts on metal or plastic pipes
- Teflon tape – seals threaded connections tightly
- Plumber’s putty – seals joints and prevents leaks
- Slip-joint pliers – useful for gripping and tightening
- Bucket – to catch water when disconnecting pipes
- Measuring tape – ensures precise pipe length and placement
- Level – keeps pipes aligned properly
Required Plumbing Materials
- New pipes – PVC or copper depending on your setup
- Pipe fittings – elbows, couplings, and adapters for connections
- Pipe sealant or joint compound – for leak-proof joints
- Plumber’s tape – wraps around threads to prevent leaks
- Compression nuts and washers – secure pipe fittings
- Drain assembly parts – tailpiece, trap, and extension pipes
- Mounting brackets – to support and stabilize pipes
- Replacement washers and gaskets – ensure tight seals
Preparing The Workspace
Preparing the workspace is a key step before moving sink plumbing. It helps avoid damage and keeps the work safe and clean. Proper preparation saves time and effort during the project.
Shutting Off Water Supply
Start by turning off the main water valve. This stops water flow to the sink. Open the faucet to drain any water left in the pipes. This reduces leaks and spills during the move. Make sure the water is fully off before beginning any plumbing work.
Clearing The Area
Remove all items under and around the sink. Clear the cabinet or space to allow easy access. Use a bucket to catch any water that may spill. Keep tools and parts organized nearby. A clean workspace helps you work faster and avoids accidents.
Removing The Existing Sink Plumbing
Removing the existing sink plumbing is the first step to move your sink a few inches. This process involves carefully taking apart the pipes and connections. Doing this right prevents leaks and damage. It also makes the new installation easier.
Start by clearing the area under the sink. Place a bucket or towel to catch water spills. Turn off the water supply to avoid flooding. Now, focus on disconnecting the water lines and detaching the drain pipes.
Disconnecting Water Lines
Locate the shut-off valves under the sink. Turn them clockwise to close the water flow. Open the faucet to drain any water left in the lines. Use an adjustable wrench to loosen the nuts connecting the water lines. Unscrew these nuts carefully. Pull the water lines away from the faucet and valves. Keep a cloth handy to wipe up any drips. Check the lines for wear or damage. Replace if needed before reinstalling.
Detaching Drain Pipes
Place a bucket under the drain trap to catch water. Use pliers or a pipe wrench to loosen the slip nuts on the drain pipes. Turn the nuts counterclockwise. Remove the drain trap carefully. Check for any trapped debris or buildup. Detach the drain tailpiece from the sink drain. Keep all parts organized for reuse or replacement. Inspect washers and gaskets for wear. Replace old or cracked parts to avoid leaks later.
Adjusting The Plumbing Position
Adjusting the plumbing position is an important step when moving your sink a few inches. It ensures that water flows properly without leaks or blockages. This process requires careful planning and precise measurements. Taking the time to adjust the pipes correctly can save you from costly repairs later.
Measuring The New Location
Start by measuring the exact spot where you want the sink to move. Use a tape measure to check the distance from the wall and the countertop edges. Measure twice to be sure. Accurate measurements help avoid mistakes during pipe installation. Note the height and width carefully to match the sink’s new position.
Marking Pipe Placement
Mark the spots for the pipes on the wall or cabinet where you will install them. Use a pencil to draw clear marks for each pipe connection. Mark the water supply lines and drain pipe locations separately. These marks guide you during cutting and fitting. Proper marking reduces confusion and speeds up the work process.
Modifying Drain Pipes
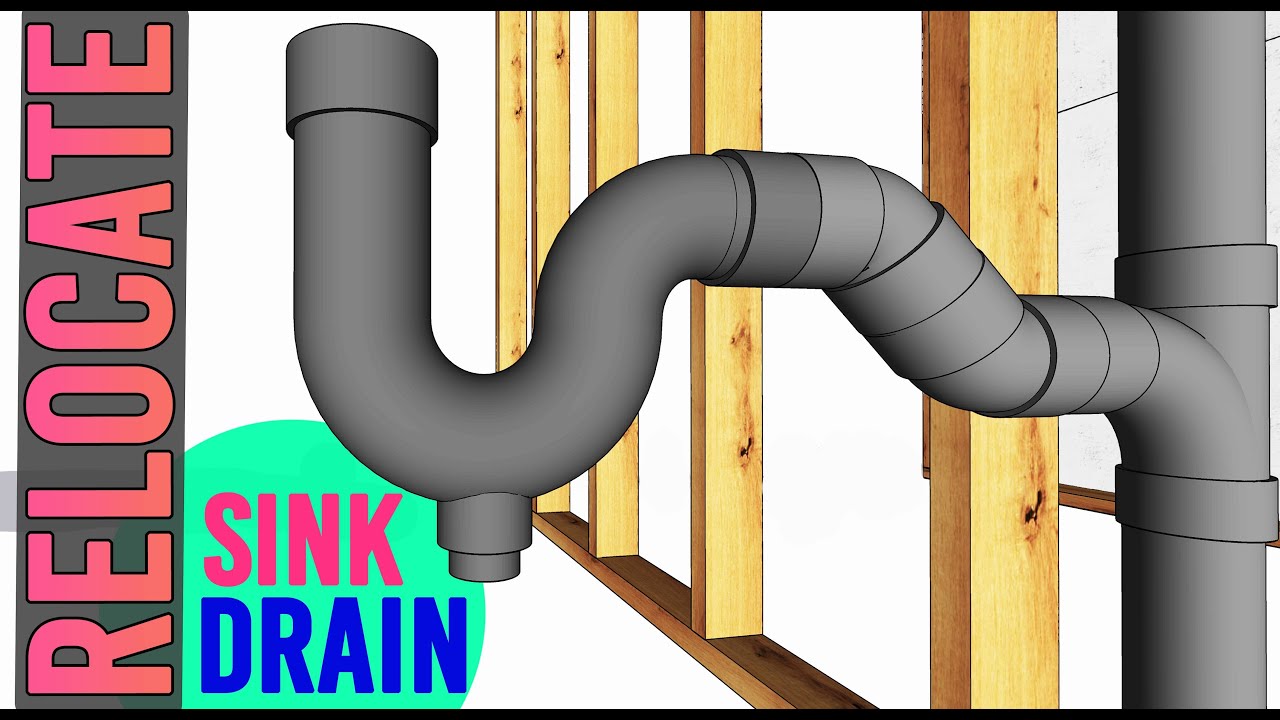
Modifying drain pipes is an important step when moving sink plumbing a few inches. This process allows you to adjust the plumbing to fit the new sink location. It involves cutting the existing pipes and adding new sections where needed. Proper handling of drain pipes ensures no leaks and smooth water flow.
Cutting Pipes To Size
Start by measuring the length of pipe you need to remove. Use a pipe cutter or a hacksaw for a clean cut. Cut the pipe straight to avoid leaks later. Remove any burrs or rough edges with sandpaper or a deburring tool. Make sure the cut pipe matches the new layout exactly.
Fitting And Gluing New Sections
Dry fit all new pipe sections before gluing. Check if the pipes fit well with the existing plumbing. Use PVC primer on the pipe ends and inside the fittings. Apply PVC glue evenly to both parts. Quickly join the pipes and hold them for 30 seconds. Wipe off any excess glue and let it dry fully.
Credit: www.youtube.com
Relocating Water Supply Lines
Moving sink plumbing a few inches requires careful work with water supply lines. These lines deliver water to your sink and must stay secure and leak-free. Relocating water supply lines means adjusting their position without causing damage. This step is key to making sure your sink works well after moving it.
Extending Supply Tubes
Start by turning off the main water valve. Drain any water left in the lines by opening the faucet. Measure the distance you need to move the supply tubes. Use flexible supply tubes that fit the new position. Cut the old tubes if needed and attach new ones of the right length. Make sure the tubes are not twisted or bent sharply. Smooth curves keep water flowing easily and prevent leaks.
Securing Connections
Check all connections before turning water back on. Use plumber’s tape on threaded parts to stop leaks. Tighten nuts by hand first, then use a wrench. Don’t overtighten, or you might damage fittings. Test for leaks by slowly opening the water valve. Watch for drips and tighten connections if needed. Secure tubes to nearby studs or brackets to avoid movement. Stable lines last longer and reduce the risk of leaks.
Reinstalling The Sink Plumbing
Reinstalling the sink plumbing is the final step after moving your sink over a few inches. This process involves carefully connecting the drain and water lines to ensure proper function. Take your time and check each connection for leaks and tightness. A well-reinstalled plumbing setup saves you from future problems and water damage.
Connecting Drain Assembly
Start by attaching the drain assembly to the sink’s drain hole. Use plumber’s putty or a rubber gasket to create a seal. Tighten the locknut underneath the sink to secure the drain. Connect the P-trap to the drain tailpiece and wall pipe. Make sure all slip nuts are snug but not over-tightened. Test the drain for leaks by running water through it.
Attaching Water Lines
Next, connect the water supply lines to the faucet. Use flexible supply tubes that fit the new sink location. Attach the hot and cold water lines to their correct valves. Hand-tighten the connections, then use a wrench for a final snug fit. Avoid overtightening to prevent damage. Turn the water back on and check for leaks around all connections.

Credit: www.reddit.com
Testing For Leaks And Functionality
Testing for leaks and functionality is a crucial step after moving sink plumbing. It ensures everything works well and prevents water damage. Checking for leaks keeps your home safe and dry. Testing the sink’s function confirms the plumbing is correct.
Turning On Water Supply
Start by turning the water supply back on slowly. Watch and listen carefully as water begins to flow. Check under the sink for any signs of dripping or moisture. Running water through the faucet helps spot hidden leaks. Turn both hot and cold water to test all pipes. Let the water run for a few minutes to observe any issues.
Inspecting All Connections
Look closely at every joint and fitting in the plumbing. Tighten any loose connections with a wrench. Use a dry cloth to check for tiny water drops. Pay special attention to the areas where pipes meet. Check the drain pipe and trap for proper sealing. Make sure no water escapes from any part of the system.
Tips For A Smooth Plumbing Move
Moving sink plumbing a few inches can be tricky without proper care. Small changes can cause big problems if done wrong. Follow clear tips to keep your plumbing safe and working well. These tips help avoid leaks and other common issues.
Focus on careful planning and correct pipe placement. This ensures water flows smoothly and drains properly. Take time with each step for a smooth plumbing move.
Avoiding Common Mistakes
Do not rush the job. Take time to measure twice and cut once. Avoid using the wrong pipe sizes or materials. Use quality fittings that match your existing plumbing.
Check all connections for tight seals. Loose joints cause leaks. Test the system before finishing the job. Fix any leaks immediately.
Ensuring Proper Pipe Slope
Drain pipes must slope downward slightly. This slope helps water flow away from the sink. A good rule is a quarter inch drop per foot of pipe.
Too little slope causes slow drainage. Too much slope can cause noise or pipe damage. Use a level to check the angle. Adjust pipes to keep the right slope.

Credit: www.reddit.com
Frequently Asked Questions
How Do I Move Sink Plumbing A Few Inches Safely?
Turn off the water supply before starting any work. Use proper tools and follow plumbing codes for safety and accuracy.
What Tools Do I Need To Move Sink Plumbing Slightly?
You will need a pipe wrench, adjustable pliers, plumber’s tape, and possibly a pipe cutter or extension fittings.
Can I Move Sink Plumbing Without A Professional Plumber?
Yes, small moves can be done by DIYers with basic plumbing skills and tools. Take care to avoid leaks and damage.
How Much Does It Cost To Move Sink Plumbing A Few Inches?
Costs vary by material and complexity but usually range from $50 to $200 for a small move done by a pro.
How Do I Extend Drain Pipes When Moving A Sink?
Use flexible drain connectors or extension pipes sealed with plumber’s putty or silicone to prevent leaks.
Will Moving Sink Plumbing Affect Water Pressure?
Moving plumbing a few inches typically does not affect water pressure if connections are tight and pipes are not kinked.
How Long Does It Take To Move Sink Plumbing A Few Inches?
The job usually takes 1 to 2 hours for a small adjustment, depending on your skill level and tools available.
Conclusion
Moving sink plumbing a few inches can be simple with the right steps. Measure carefully and plan before you start. Use proper tools and materials for safety. Take your time to avoid mistakes or leaks. This small change can improve your sink’s function and space.
Trust your skills and stay patient throughout the process. A little effort brings better results in your home plumbing.