
Are you struggling to remove your Oatey shower drain cover? You’re not alone.
Many people find it tricky to get that cover off without damaging the drain or the surrounding tiles. But don’t worry—this guide will walk you through simple, step-by-step methods to safely and easily remove your Oatey shower drain cover. By the end, you’ll have the confidence to handle it yourself, saving time and avoiding costly repairs.
Keep reading to discover the best tips and tools for the job!

Credit: www.reddit.com
Tools Needed
Removing an Oatey shower drain cover requires a few simple tools. These tools help you take off the cover without damage. Having the right tools makes the job faster and easier.
Gather everything before starting. This prevents interruptions and frustration. Below are the basic tools needed for this task.
Flathead Screwdriver
A flathead screwdriver is essential. It helps pry the drain cover gently from the shower floor. Choose a screwdriver with a thin blade to fit under the cover edge.
Adjustable Wrench
An adjustable wrench is useful for loosening the drain’s locking mechanism. It fits different sizes of nuts and bolts. Use it carefully to avoid scratching the drain parts.
Gloves
Wear gloves to protect your hands. They keep your skin safe from sharp edges and dirt. Gloves also improve your grip while removing the cover.
Cleaning Cloth
A cleaning cloth helps wipe away grime and water. Use it to keep the area clean during the process. It also protects the shower surface from scratches.
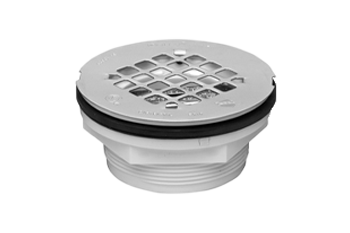
Credit: www.oatey.com
Preparing The Area
Preparing the area is the first step before removing the Oatey shower drain cover. A clean and organized space makes the task easier and safer. It also helps protect your bathroom from damage.
Clear everything around the drain. Remove any bath mats, towels, or toiletries nearby. This gives you enough room to work comfortably without risking spills or accidents.
Gather the tools you need. Common tools include a screwdriver, pliers, and a flashlight. Having these ready saves time and avoids frustration during the process.
Clean The Shower Floor
Start by wiping down the shower floor around the drain. Dirt or soap scum can cause slipping or make it hard to see the screws. Use a mild cleaner and a cloth to remove grime. Dry the area well before proceeding.
Protect Surrounding Surfaces
Place a small towel or cloth around the drain cover. This protects the shower floor from scratches or dents. It also catches any small parts that might fall during removal.
Check For Proper Lighting
Good lighting helps you see screws and small parts clearly. Use a flashlight or a bright lamp focused on the drain area. This reduces mistakes and speeds up the removal process.
Identifying Your Drain Cover Type
Identifying your drain cover type is the first step to removing an Oatey shower drain cover. Different covers have unique shapes and mechanisms. Knowing your cover type helps you use the right tools and method. This makes the removal process easier and avoids damage.
Most Oatey shower drain covers fall into a few common types. Each type has distinct features you can spot quickly. You can check the cover’s shape, screw presence, and locking style to identify it. Take a close look before starting any work.
Flat Screw-on Drain Covers
Flat screw-on drain covers have visible screws on the top. These screws hold the cover tightly to the drain. Usually, a screwdriver is needed to remove these screws. The cover lies flat against the shower floor.
Pop-up Or Twist-lock Drain Covers
Pop-up or twist-lock covers twist to lock or unlock. They do not have visible screws on top. You often need to turn the cover counterclockwise to remove it. These covers fit snugly inside the drain opening.
Lift-out Drain Covers
Lift-out covers simply lift out without twisting or unscrewing. They may have a small tab or hole for grip. These covers are held by friction or clips. Use gentle force to pull them up straight.
Plastic Vs. Metal Drain Covers
Oatey drain covers come in plastic or metal materials. Plastic covers are lighter and may crack under force. Metal covers are heavier and more durable. Identifying material helps decide the care needed during removal.
Removing Screws Or Clips
Removing screws or clips is the first step to take off an Oatey shower drain cover. These parts keep the cover tightly fixed. Removing them carefully prevents damage to the drain or cover.
Screws and clips hold the drain cover in place. They stop it from moving or lifting. Knowing how to remove these parts helps make the job easier and safer.
Identifying The Type Of Fastener
Look closely at the drain cover. Find out if it uses screws or clips. Screws are small metal pieces with a head. Clips are small metal or plastic parts that snap in place.
Check the head of the screws. It may be flat, Phillips, or hex-shaped. This helps pick the right tool for removal.
Tools Needed For Removal
Use a screwdriver or a drill with the correct bit for screws. For clips, use pliers or a flat tool to pry them gently. Having the right tools makes removal easier and faster.
Removing Screws Safely
Turn the screwdriver counterclockwise to loosen screws. Apply steady pressure to avoid stripping the screw head. Remove each screw completely before lifting the cover.
Removing Clips Without Damage
Gently pry the clips with pliers or a flat tool. Avoid bending or breaking the clips. Work slowly to release the clips without hurting the drain cover.
Using A Flathead Screwdriver
Using a flathead screwdriver is a simple way to remove an Oatey shower drain cover. This tool fits well under the cover’s edge and helps lift it carefully. It avoids damage to the drain and the surrounding area.
The process is quick and needs only a few steps. With the right technique, you can remove the cover without extra tools or help.
Prepare The Area And Tools
Clear the shower floor around the drain. This stops dirt from falling in. Have a flathead screwdriver ready. Choose one with a thin, flat tip for better grip.
Insert The Flathead Screwdriver Under The Cover
Place the screwdriver’s tip gently under the drain cover. Find a small gap or slot around the edge. Push the screwdriver in slowly to avoid scratching.
Lift The Drain Cover Carefully
Press down on the screwdriver handle to lift the cover. Move the screwdriver around the cover’s edge. Lift evenly to prevent bending or breaking.
Remove The Cover Fully
Once loose, lift the cover with your hands. Set it aside on a clean surface. Check the drain for any debris or buildup before cleaning.
Handling Stubborn Covers
Removing an Oatey shower drain cover can be tricky when it sticks tight. Rust, grime, and old sealant often hold it firmly in place. Handling these stubborn covers needs patience and the right tools. Small efforts can loosen the cover without damage.
Applying Penetrating Oil
Spray a small amount of penetrating oil around the edges of the drain cover. Let it sit for 10 to 15 minutes. The oil seeps into tight spaces and loosens rust or grime. This makes the cover easier to turn or lift off. Avoid using too much oil to prevent slippery surfaces.
Using Pliers For Grip
Grip the edge of the drain cover with locking pliers for better control. Turn the cover slowly to avoid breaking it. Use gentle pressure to avoid damaging the drain or cover. If the cover still won’t move, try rocking it back and forth while pulling up. Pliers give you extra strength to remove stubborn covers safely.
Cleaning The Drain Area
Cleaning the drain area is important after removing the Oatey shower drain cover. Dirt, hair, and soap scum often collect around the drain. This buildup can cause slow draining or unpleasant smells. A clean drain area helps water flow smoothly and keeps your shower fresh.
Start by clearing out any visible debris. Use a small brush or cloth to scrub the drain edges. This removes grime stuck in hard-to-reach spots. Avoid harsh chemicals that can damage pipes or finishes. Instead, use gentle cleaners that are safe for bathroom use.
Gather Cleaning Tools
Prepare simple tools like a soft brush, sponge, and mild cleaner. A toothbrush works well for scrubbing tight spaces. Have a clean cloth ready to wipe the area dry. These tools make the cleaning process quick and effective.
Remove Hair And Debris
Pick out hair and debris by hand or with tweezers. This prevents clogs and improves water flow. Dispose of the waste in the trash, not down the drain. Clear the drain opening so cleaning solutions reach all surfaces.
Scrub The Drain Edges
Apply a mild cleaner to the drain edges and scrub gently. Focus on corners where buildup is common. Rinse thoroughly with warm water to remove residue. Dry the area with a clean cloth to prevent mold growth.
Check For Remaining Residue
Look closely for leftover dirt or soap scum. Repeat scrubbing if needed to ensure a clean surface. A spotless drain area helps keep your shower hygienic. This simple step extends the life of your drain cover.

Credit: www.youtube.com
Replacing Or Reinstalling The Cover
Replacing or reinstalling the Oatey shower drain cover is a simple process. It keeps your shower clean and prevents debris from clogging the drain. This guide helps you put the cover back securely after cleaning or repair. Follow each step carefully for a tight fit and smooth finish.
Preparing The Drain Area
Clean the drain opening before placing the cover. Remove any dirt, soap scum, or residue. A clean surface helps the cover sit flat. Use a cloth or sponge with mild soap and water. Dry the area completely to avoid slipping.
Aligning The Cover Properly
Match the drain cover’s holes with the drain’s screw holes. Check the orientation to ensure the cover fits correctly. Place the cover gently on top of the drain. Avoid forcing it to prevent damage to the cover or drain.
Securing The Cover In Place
Insert screws into the holes on the drain cover. Tighten them evenly with a screwdriver. Do not overtighten, or you may crack the cover. The cover should feel firm and not move. Check for any gaps around the edges after tightening.
Frequently Asked Questions
How Do I Safely Remove An Oatey Shower Drain Cover?
Use a screwdriver or putty knife to gently pry the cover. Work slowly to avoid damaging the drain or tile.
What Tools Are Needed To Remove An Oatey Shower Drain Cover?
A flathead screwdriver or putty knife works best. Sometimes, gloves help to get a better grip.
Can I Remove The Oatey Drain Cover Without Damaging It?
Yes, by prying carefully and slowly lifting it up. Avoid using excessive force to keep it intact.
How Do I Clean Under The Oatey Shower Drain Cover?
Lift the cover and use a brush or cloth to clean debris. Rinse with water to remove buildup.
How Often Should I Remove And Clean The Drain Cover?
Clean it every few months to prevent clogs. Regular cleaning helps maintain good drainage.
What If The Oatey Drain Cover Is Stuck And Won’t Budge?
Try applying a little lubricant around the edges. Tap gently with a tool to loosen it up.
Can I Replace The Oatey Shower Drain Cover Myself?
Yes, replacement is simple and can be done with basic tools. Make sure the new cover fits your drain size.
Conclusion
Removing an Oatey shower drain cover is simple with the right steps. Start by loosening screws or prying gently. Take care not to damage the drain or surrounding area. Clean the drain once the cover is off to prevent clogs.
Replace or reinstall the cover securely to avoid leaks. This task saves money and avoids hiring a plumber. Try it yourself and keep your shower drain working well. Easy, quick, and effective—no special tools needed.